How to Record Yourself on Zoom
June 12, 2026
June 12, 2026
June 12, 2026
June 12, 2026

Recording a Zoom meeting isn't always as simple as clicking a button. Free and paid accounts work differently, participants have fewer options than hosts, and finding your recording afterward takes a few extra steps.
Here's what you'll find in this article:
- How to record yourself on Zoom as a host, on desktop and mobile
- The difference between local and cloud recording
- How to record as a participant, with or without host permission
- Where Zoom saves your recordings and how to find them
- How to get a full Zoom transcript without recording at all
TL;DR: How Do I Record Just Myself on Zoom?
Free Zoom accounts support local recording on desktop only. Paid accounts unlock cloud recording on desktop and mobile. Participants need host's permission to record within the Zoom app. If you want the key points from a meeting without a video file, Tactiq transcribes your Zoom calls live and delivers summaries and action items the moment the call ends.
How to Record Yourself on Zoom (Native Method)
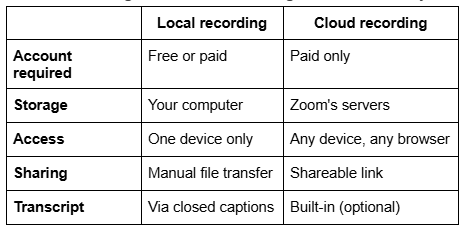
Free Zoom accounts support local recording only, saving files to your computer. Paid accounts unlock cloud recording, which stores files online in your Zoom account.
How to record yourself as a host (desktop/laptop)
Make sure your camera and microphone are on before you hit record.
Local recording (free and paid):

- Sign in to zoom.us and go to Settings → Recording.Enable record to computer files
- Under General, click the Record to computer files toggle to enable it.
- Open the Zoom desktop app and start a meeting as host.
- Click Record in the toolbar and select Record on this Computer.
- Click Stop Recording or end the meeting to save the file.
Cloud recording (paid only):

- Sign in to zoom.us, go to Settings → Recording, and toggle on Cloud Recording.
- Start your meeting and click Record in the toolbar.
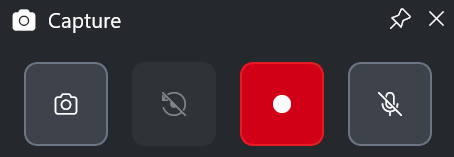
- Select Record to the Cloud. A red indicator will appear in the top-left corner.
- Click Stop Recording or end the meeting to save.
Once processed, you can upload the file to Google Drive or share it directly via link.
💡 Pro tip: If you need a searchable record of your meeting without managing a video file, Tactiq transcribes your Zoom calls live and automatically generates summaries and action items. No paid Zoom plan required.
How to record yourself on Zoom on mobile (iOS and Android)
Mobile recording requires a paid Zoom account. Local recording isn't supported on iOS or Android. Only cloud recording is available on mobile.
- Open the Zoom app and start a meeting as host.
- Tap More (three-dot icon) in the bottom-right corner.
- Tap Start recording.
- To stop, tap More → Stop Recording.
Local recording vs. cloud recording: which should you use?
How to Record a Zoom Meeting as a Participant
Recording as a participant is more restricted than recording as a host. By default, only hosts can record in Zoom. As a participant, you have two options: ask the host for permission, or use a screen recording workaround.
With host permission
The host can grant you recording access during the meeting in a few clicks.
To request permission as a participant:
- Ask the host directly in the meeting chat or before the call.
To grant permission as the host:
- Click Participants in the meeting toolbar.
- Hover over the participant's name and click More.
- Select Allow to record to computer.
Once granted, the participant can click Record in their toolbar and select Record on this Computer.
Without host permission (screen recording workarounds)
If you can't get host permission, built-in OS tools can capture your screen during a Zoom meeting. Note that recording without consent may violate privacy laws or workplace policies depending on your location. Always check before proceeding.
Windows (Game Bar):
- Press Windows + G to open the Game Bar.
- Click the Record button (or press Windows + Alt + R) to start capturing.
- Press Windows + Alt + R again to stop. The file saves to your Videos → Captures folder.
macOS (QuickTime):
- Open QuickTime Player and go to File → New Screen Recording.
- Click Record and select the area of your screen to capture.
- Click Stop in the menu bar to end. The file saves to your desktop.
Need to screen record a Zoom meeting without any setup? Both Windows and macOS tools are free and require no additional software.
Where Do Zoom Recordings Save?
Where your recording lands depends on which method you used: local or cloud.
Local recordings
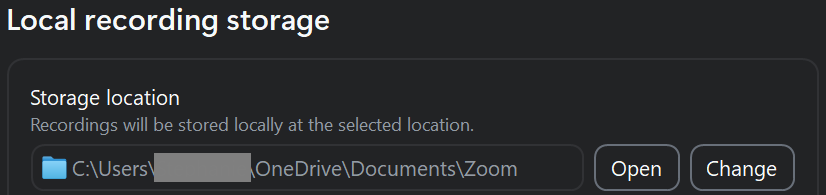
By default, Zoom saves local recordings to your Documents folder:
- Windows: C:\Users[Username]\Documents\Zoom
- Mac: /Users/[Username]/Documents/Zoom
You can change this path in the Zoom desktop app under Settings → Recording → Storage location.
Cloud recordings
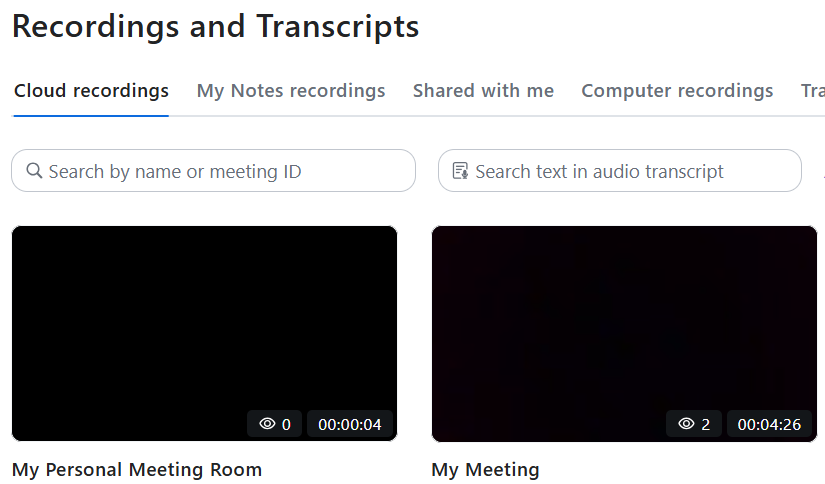
Cloud recordings save to your Zoom account, not your device. To access them:
- Sign in to zoom.us and click Recording & Transcripts in the left navigation menu.
- Click the Cloud Recordings tab to view your processed recordings.
- Click a recording to play, download, or share it via link.
For a full walkthrough on saving transcripts from local recordings, see this guide on how to save a transcript of a Zoom local recording.
Common issues
- Recording not showing up: Cloud recordings take time to process after the meeting ends. Check back after a few minutes.
- Storage limits: Free accounts have no cloud storage. Paid plans include a storage allowance. Once full, new recordings won't save to the cloud.
- Wrong account: Cloud recordings are tied to the host's account. Make sure you're signed in as the host who started the recording.
How to Capture Zoom Meetings Without Recording
A video file means you need to watch the whole meeting back to find what you need. A transcript gives you the content directly: searchable, shareable, and ready the moment the call ends.
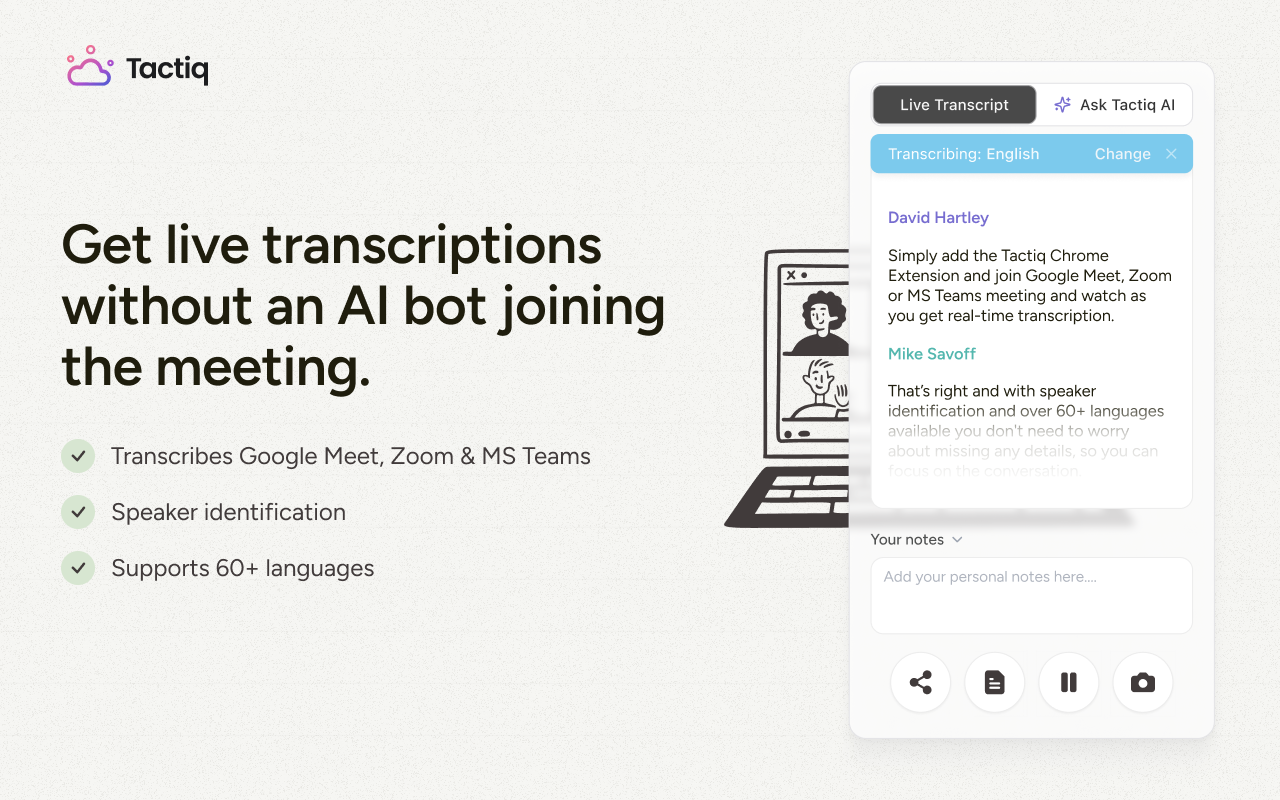
Tactiq is a Chrome extension that transcribes your Zoom meetings live. No recording or host permission needed. Install it from the Chrome Web Store, join your next Zoom call, and Tactiq starts transcribing automatically. When the call ends, you get:
- AI summaries and action items automatically
- Notes pushed directly to Notion, HubSpot, Linear, or Slack
- A searchable meeting archive saved to your dashboard or Google Drive
- Speaker identification on every transcript
For more on Zoom's built-in option, see this breakdown of the Zoom AI transcription tool. To get a transcript from an existing recording, see how to get a Zoom recording transcript for free. Add Tactiq to Chrome. It's free.
The Smarter Way to Capture Zoom Meetings
Zoom's native recording does the job when you need a video file. Local recording is free and saves directly to your computer. Cloud recording costs a paid plan but makes sharing easy. The tradeoff with both is that you still have to watch the recording to get anything out of it.
A transcript skips that step entirely. Tactiq captures your Zoom meetings live, turns them into summaries and action items, and pushes the output to the tools your team already uses right after the call.
Try Tactiq for free and get more out of every Zoom meeting.
Yes. Free Zoom accounts support local recording on desktop. Open the Zoom app, start a meeting as host, and click Record → Record on this Computer. Cloud recording requires a paid plan.
Local recordings save to Documents/Zoom on Windows and Mac. Cloud recordings are accessible via Recording & Transcripts in your Zoom web portal.
Not within the Zoom app. Without host permission, you can use built-in OS tools (Windows Game Bar or macOS QuickTime) to screen record. Always check local laws and workplace policies first.
Zoom records the meeting window, including video, audio, and shared screens. It does not capture anything outside the Zoom window.
Related articles


_Main.jpg)


Want the convenience of AI summaries?
Try Tactiq for your upcoming meeting.
Want the convenience of AI summaries?
Try Tactiq for your upcoming meeting.
Want the convenience of AI summaries?
Try Tactiq for your upcoming meeting.