Where to Find Zoom Recordings: Your Ultimate Guide
August 25, 2023
August 25, 2023
June 12, 2025
June 12, 2025

Are you struggling to locate your saved Zoom recordings? In this guide, we’ll walk you through how to record a Zoom meeting, find your recordings on your computer, or access recordings in the cloud, and share them with others. We’ll also cover troubleshooting tips for common recording issues.
What we'll cover:
- How Do I Record a Zoom Meeting?
- How Do I Locate My Cloud and Local Zoom Recordings?
- How Do I Customize the File Path for Local Recordings?
- How Do I Share My Zoom Recordings?
- How Do I Find My Missing Local Zoom Recordings?
- How Do I Find Zoom Recordings on My Mobile Phone?
- Can I Retrieve My Unrecorded Zoom Meetings?
How Do I Record A Zoom Meeting?
Recording a Zoom meeting is easy, but only hosts and co-hosts have recording permissions by default. Participants must request recording permissions from the host unless the settings allow them to record.
To start recording a Zoom meeting:
- Join the meeting.
- Click the Record button at the bottom of the Zoom window.
- If cloud recording is enabled, choose between recording on your computer or in the cloud.
- Once recording starts, a red dot with ‘Recording’ appears in the upper left corner.
- Click Pause to pause the recording.
- Click Resume to continue recording.
- Click Stop to end the recording.
How Do I Locate My Cloud and Local Zoom Recordings?
You can find your Zoom recordings either in the cloud (for paid users) or on your computer (for local recordings).
How to Find Your Zoom Cloud Recordings
Cloud recordings are available for paid Zoom users (Pro, Business, or Enterprise plans). They are automatically saved in your Zoom account, making them accessible without taking up local storage.
Option 1: Email Notification
Once your meeting ends, Zoom sends an email with a link to your cloud recording. To access it:
- Open your email and look for a message from Zoom.
- Click the provided link to access your recording.
Option 2: Zoom Web Portal
You can also find your cloud recordings through the Zoom web portal:
- Go to zoom.us and sign in.
- Click Recordings on the left panel.
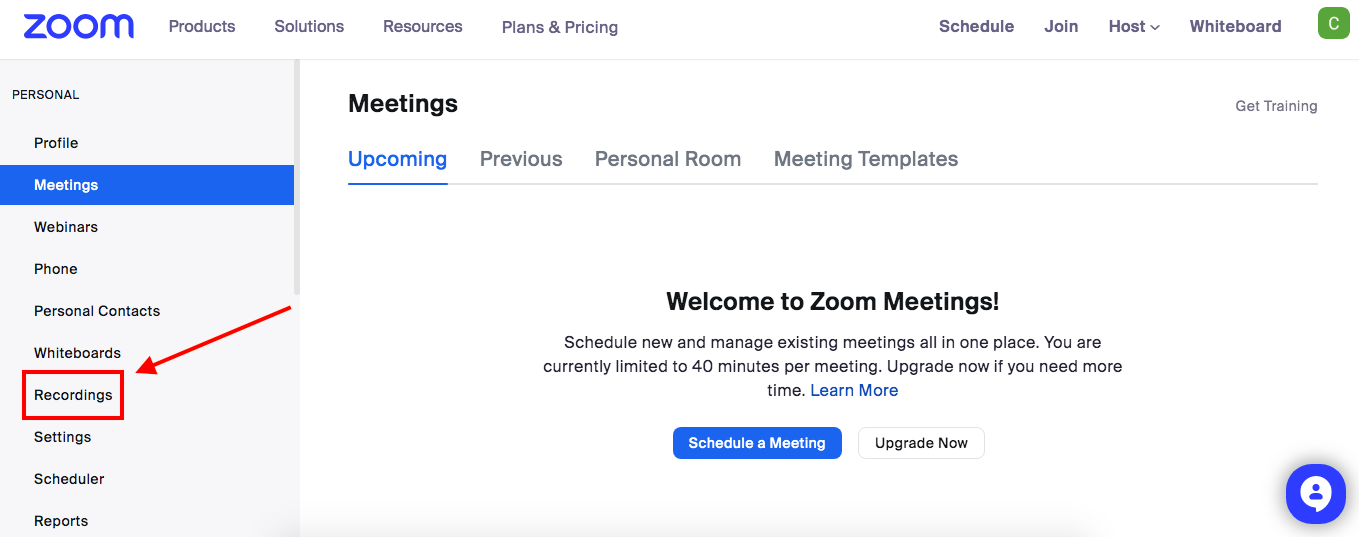
- Under the Cloud Recordings tab, locate your recording.
Note: Cloud recordings are only available to paid users. If you’re on a free plan, check your Zoom local recordings.
How to Find Your Local Zoom Recordings (Mac or Windows)
If you don’t have a paid plan, Zoom automatically saves your recordings locally in .mp4 format for video and .m4a format for audio.
To find your local Zoom recordings:
- Open the Zoom Desktop Client and sign in.
- Click Meetings at the top, then go to the Recorded tab.
- Check the File Location to see where the recording is saved.
- Click Open to view the folder containing your recordings.
Default Storage Location:
- Windows: C:\Users\[Your Name]\Documents\Zoom
- Mac: /Users/[Your Name]/Documents/Zoom
How Do I Find the Zoom Recording as a Guest?
If you attended a Zoom meeting as a guest, you won’t have direct access to the recording unless the host shares it with you.
To request access:
- Ask the host to share the cloud recording link via email.
- If it’s a local recording, the host can upload it to Google Drive, Dropbox, or YouTube for sharing.
How to Change the File Path for Local Recordings
Want to save your Zoom recordings to a different folder? Follow these steps:
- Open the Zoom Desktop Client and sign in.
- Click the Settings icon in the upper right corner.
- Select Recording from the left panel.
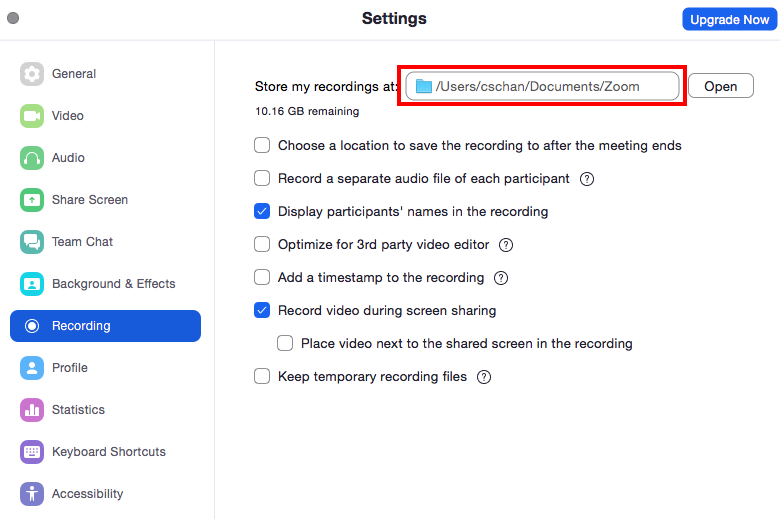
- Choose a new location and select your preferred folder.
Important: Avoid saving recordings directly to cloud-syncing services (like Google Drive or Dropbox) or external drives, as this may cause corruption or loss of data.
{{rt_cta_ai-convenience}}
How Do I Share My Zoom Recordings?
Once you locate your Zoom recordings, you can easily share them with teammates.
How to Share Your Cloud Recording
- Sign in at zoom.us.
- Click Recordings > Cloud Recordings.
- Find the recording and click Share to generate a link.
- You can also share the link from Zoom’s email notification.
How to Share Your Local Recording
- Locate the recording on your computer.
- Upload it to a cloud storage service like Google Drive, YouTube, or Dropbox.
- Share the link via email, social media, or embed it on a website.
How Do I Find My Missing Local Zoom Recordings?
If you can’t find your recording, consider these possibilities:
1. Check the Local Recording File Location
- Open Zoom Desktop Client and go to Meetings > Recorded.
- Click Open to view the file location.
- If missing, sign in to the Zoom Web Portal, go to Recordings > Local Recordings, and verify the location.
2. The Recording Has Not Finished Processing
If your recording doesn’t appear immediately, Zoom may still be processing it. Wait a few hours and check again.
3. You Have No Access to Cloud Recordings
Only meeting hosts can access cloud recordings. If you’re not the host, request access from them.
What to Do if Zoom Says "Recording Does Not Exist"?
If you receive a "Recording does not exist" error, try the following:
- Confirm the meeting was recorded: If the recording wasn’t started, it won’t exist.
- Check if it was deleted: Cloud recordings are automatically deleted after a set period based on your Zoom plan. Local recordings can also be manually deleted.
- Verify your Zoom account: Ensure you're logged into the correct account where the recording was made.
- Look for backups: Check your device's Recycle Bin (Windows) or Trash (Mac) for deleted local recordings.
- Contact Zoom Support: If you still can’t find your recording, visit Zoom Support for assistance.
How Do I Find Zoom Recordings on My Mobile Phone?
Zoom does not support local recording on mobile devices. However, if you recorded a meeting to the cloud, you can access it through the Zoom mobile app:
- Open the Zoom app and sign in.
- Tap Recordings from the menu.
- Find your recording under Cloud Recordings.
{{rt_cta_ai-convenience}}
Can I Retrieve My Unrecorded Zoom Meetings?
No, if a Zoom meeting wasn’t recorded, there’s no way to recover it. Zoom does not provide an option to retrieve meetings that were never recorded.
However, to avoid missing important details in the future, you can use Tactiq, a real-time transcription tool that works with Zoom. Tactiq captures live conversations and provides searchable transcripts, AI-powered summaries, and automated meeting insights to ensure you always have a written record of key discussions.

Key Features of Tactiq:
- Live Transcriptions – Capture every word spoken in real-time during your Zoom meetings.
- AI-Powered Summaries – Automatically generate concise summaries of meeting discussions.
- Speaker Identification – Know who said what for better clarity and reference.
- Meeting Insights – Use AI prompts to extract action items and key takeaways from your meetings.
- AI Workflows – Automate the extraction of Zoom recordings, generate follow-up notes, and sync insights with your tools.
- Multi-Platform Support – Works with Zoom, Google Meet, and Microsoft Teams.
How to Use Tactiq for Future Meetings:
- Install the Tactiq Chrome Extension from the Chrome Web Store.
- Click Add to Chrome > Add Extension.
- Join a Zoom meeting, and Tactiq will transcribe the conversation in real time.
Wrapping Up
Finding and managing your Zoom recordings doesn’t have to be complicated. Whether you save them in the cloud or locally, this guide has outlined everything you need to locate, share, and troubleshoot your recordings.
If you often forget to start a recording or need a better way to track and retrieve meeting insights, Tactiq can help. With real-time transcription, AI-powered summaries, and automated workflows, you can ensure that all your important discussions are captured, organized, and easily accessible.
Recording a Zoom meeting is easy, but only hosts and co-hosts have recording permissions by default. Participants must request recording permissions from the host unless the settings allow them to record. To start recording a Zoom meeting: Join the meeting. Click the Record button at the bottom of the Zoom window. If cloud recording is enabled, choose between recording on your computer or in the cloud. Once recording starts, a red dot with ‘Recording’ appears in the upper left corner. Click Pause to pause the recording. Click Resume to continue recording. Click Stop to end the recording.
You can find your Zoom recordings either in the cloud (for paid users) or on your computer (for local recordings).
Cloud recordings are available for paid Zoom users (Pro, Business, or Enterprise plans). They are automatically saved in your Zoom account, making them accessible without taking up local storage.
If you don’t have a paid plan, Zoom automatically saves your recordings locally in .mp4 format for video and .m4a format for audio. To find your local Zoom recordings: Open the Zoom Desktop Client and sign in. Click Meetings at the top, then go to the Recorded tab. Check the File Location to see where the recording is saved. Click Open to view the folder containing your recordings. Default Storage Location: Windows: C:\Users\[Your Name]\Documents\Zoom Mac: /Users/[Your Name]/Documents/Zoom
If you attended a Zoom meeting as a guest, you won’t have direct access to the recording unless the host shares it with you. To request access: Ask the host to share the cloud recording link via email. If it’s a local recording, the host can upload it to Google Drive, Dropbox, or YouTube for sharing.
Related articles


_Main.jpg)


Want the convenience of AI summaries?
Try Tactiq for your upcoming meeting.
Want the convenience of AI summaries?
Try Tactiq for your upcoming meeting.
Want the convenience of AI summaries?
Try Tactiq for your upcoming meeting.