How to Access Zoom Cloud Recordings
May 24, 2024
May 24, 2024
June 12, 2025
June 12, 2025
Navigating Zoom's cloud recordings should be a smooth process. Capturing critical meeting decisions, training sessions, or milestone celebrations helps you and your team stay productive and informed, so knowing how to access Zoom cloud recordings is crucial.
In this article, we’ll cover the following:
- The benefits of using cloud recordings
- How to enable Zoom cloud recordings
- How to find Zoom cloud recordings
- How to start Zoom cloud recordings
Benefits of Using Cloud Recordings
Accessibility from anywhere
One of the standout benefits of Zoom cloud recordings is the ability to access each Zoom recording from anywhere. Simply sign in to your Zoom account to view your recordings. This flexibility is helpful for remote teams and individuals who need to review meetings on the go.
Saves local storage space
Storing recordings in the cloud means you won't need to use valuable space on your local device. Long meetings or webinars can take up significant storage. Keeping your Zoom meeting in the cloud frees your computer for other important tasks and data.
Easy sharing and collaboration
Cloud recordings simplify the process of sharing content with your team. You can generate a link to your recording files and send it to colleagues, clients, or stakeholders. Everyone can access the same information without the hassle of transferring large files.
Enhanced security
Cloud recordings are stored securely, protecting your data. You can set permissions and add passcodes to your recordings, giving you control over who can view the content. This added layer of security is crucial for sensitive meetings and confidential discussions.
Multiple recording layouts
When you record to the cloud, Zoom offers various recording layouts, such as active speaker, gallery view, and shared screen. Select the layout that best suits your needs.
Automated transcription and smart features
Zoom’s integration with tools like Tactiq enhances the value of your cloud recordings. Automated transcription turns your recorded audio into searchable text, making finding critical points and creating summaries easier. Smart features can highlight essential moments and identify action items, saving time and ensuring you don’t miss any crucial details.
Reduced risk of data loss
Recording meetings to the cloud reduces the risk of losing data due to system failures or accidental deletions. Cloud storage provides a reliable backup, ensuring your recordings are safe and can be retrieved whenever needed.
Efficient Management and Organization
Zoom’s cloud recording feature includes management tools that help you organize your recordings. You can label and categorize recordings, making it easy to find specific meetings later. This organizational capability is essential for maintaining a well-structured archive of your meeting history.
With Zoom recordings, you can improve your meeting management, enhance collaboration, and ensure your discussions are securely stored and easily accessible.
How to Enable Zoom Cloud Recordings
Enabling cloud recording allows hosts to record their events in the Zoom cloud. This setting is automatically enabled for all paid subscribers by default. You can customize cloud recording settings, like automatic recording, requiring a passcode to view recordings, and setting a deletion period.
You can enable cloud recording for the following:
- Account
- Group
- User
Prerequisites to enable Cloud Recording
- Pro, Business, Education, or Enterprise account
- Account owner or admin privileges
- Licensed user
How to enable Zoom Cloud Recording for accounts
- Sign in to the Zoom web portal as an admin with privileges to edit account settings.
- Navigate to Account Management > Account Settings. Click the Recording tab.
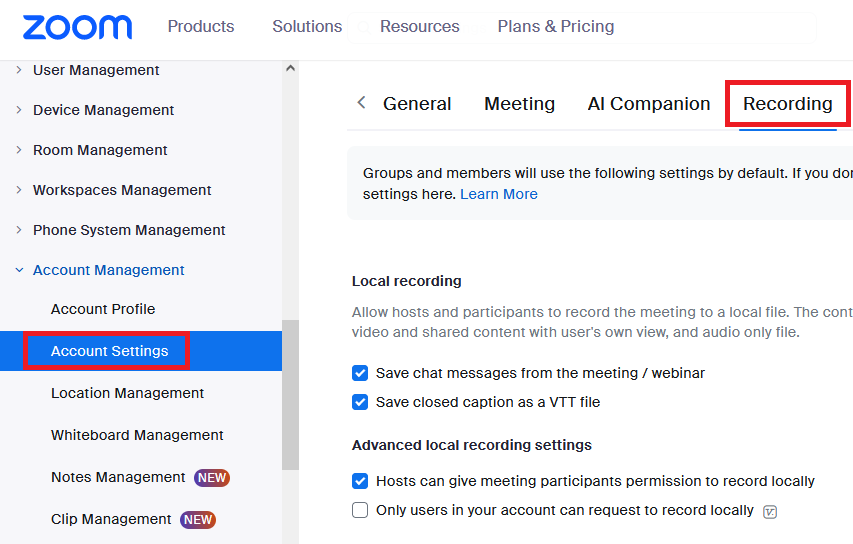
- Toggle the Cloud Recording switch to turn it on or off.
- If a verification dialog appears, click Enable or Disable to verify. This setting ensures that all group meeting recording files are captured and stored appropriately.
How to enable Zoom Cloud Recording for groups
- Sign in to the Zoom web portal as an admin with privileges to edit groups.
- Navigate to User Management > Groups.
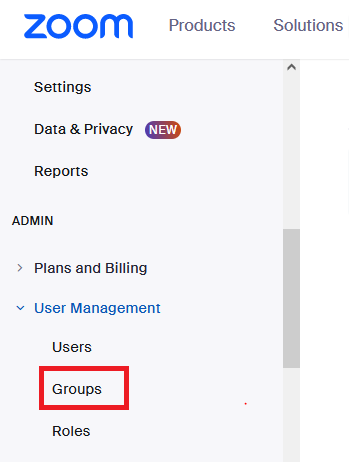
- Select the applicable group from the list.
- Click the Recording tab.
- Toggle the Cloud Recording switch to enable or disable it.
- If a verification dialog appears, click Enable or Disable to verify the change to the Zoom recording.
How to enable Zoom Cloud Recording for a user
- Sign in to your Zoom account.
- Navigate to Settings. Click the Recording tab.
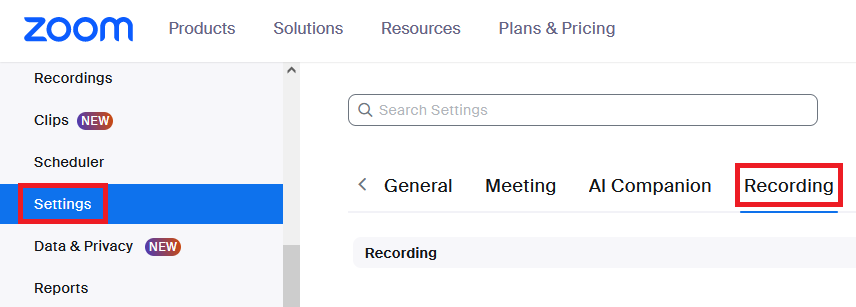
- Toggle the Cloud Recording switch to enable or disable it.
- If a verification dialog appears, click Enable or Disable to verify the change.
Transcribe your Zoom recordings
Connect Zoom with transcription tools like Tactiq to enhance the value of your cloud recordings. Tactiq transcribes your recordings automatically, transforming them into searchable and editable documents. This way, you can highlight important parts, create summaries, and share insights with your team without the hassle of manual note-taking.
Here’s how to install Tactiq on your computer:
- Visit the Chrome Web Store. Click ‘Add to Chrome’ on the right side of the page, then ‘Add Extension.’
- If you have Tactiq installed but haven't enabled Zoom, go to the ‘Integrations’ section on the left side of the Tactiq dashboard.
.png)
- Click ‘Connect’ next to the Zoom icon.
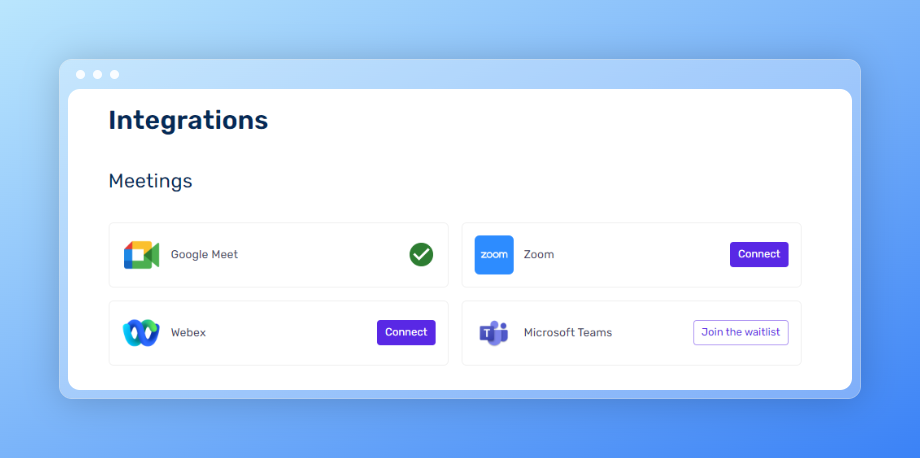
- Join your meeting. Within your Zoom display, you'll see the Tactiq widget on the right side of your screen. This section is where the live transcription will appear.
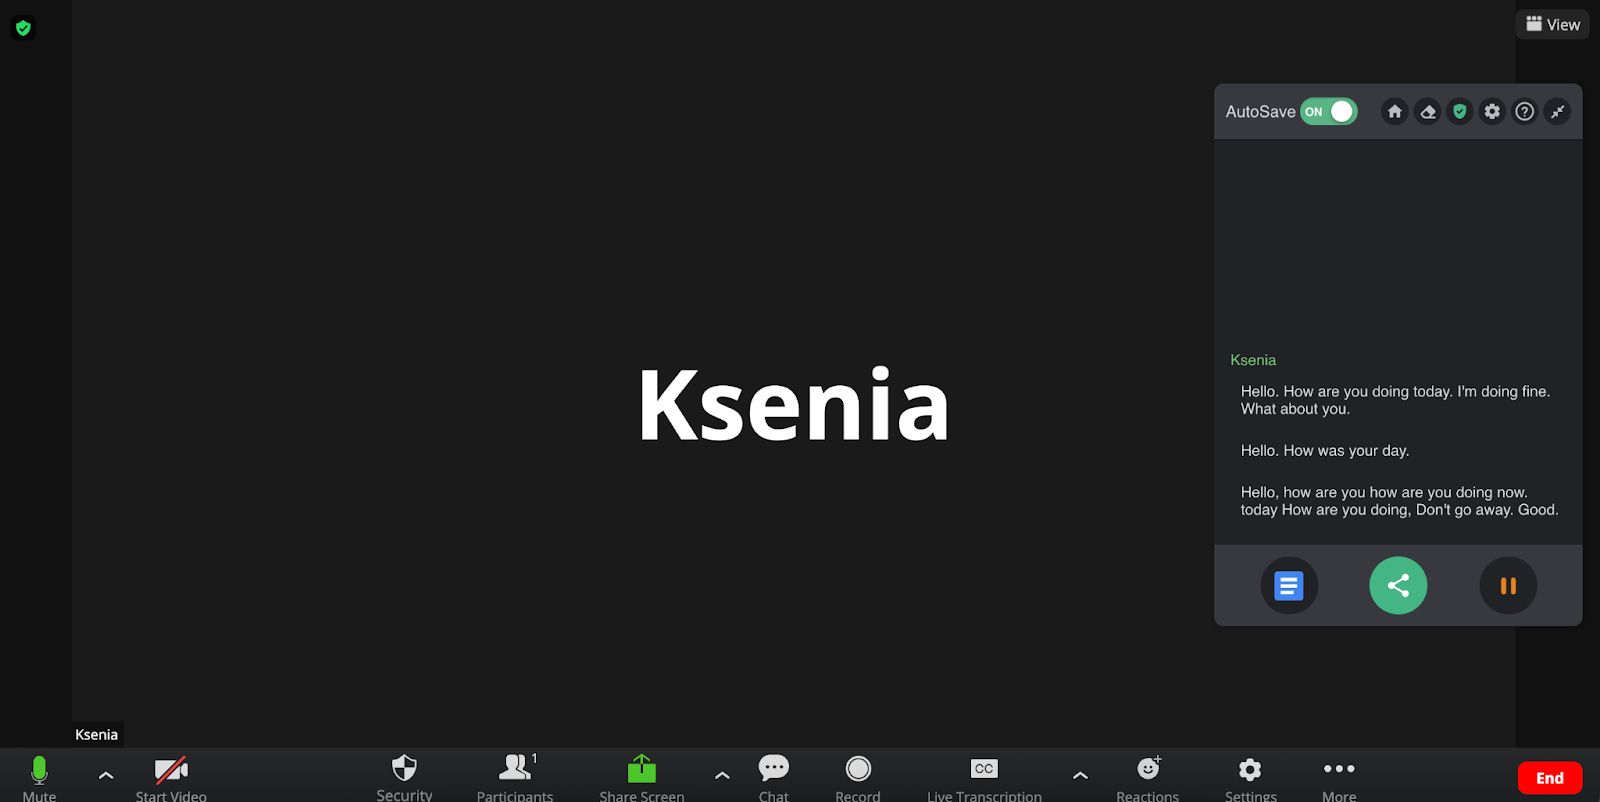
By integrating Tactiq with Zoom, every important detail from your meetings will be captured, searchable, and ready for action.
{{rt_cta_ai-convenience}}
How to Find Zoom Cloud Recordings
If you have a paid subscription, you can access your recordings directly from your account—there’s no need to save them on your local device! This feature provides easy access to your recordings and helps save valuable storage space on your computer.
There are two main ways to access your cloud recordings:
Via email link
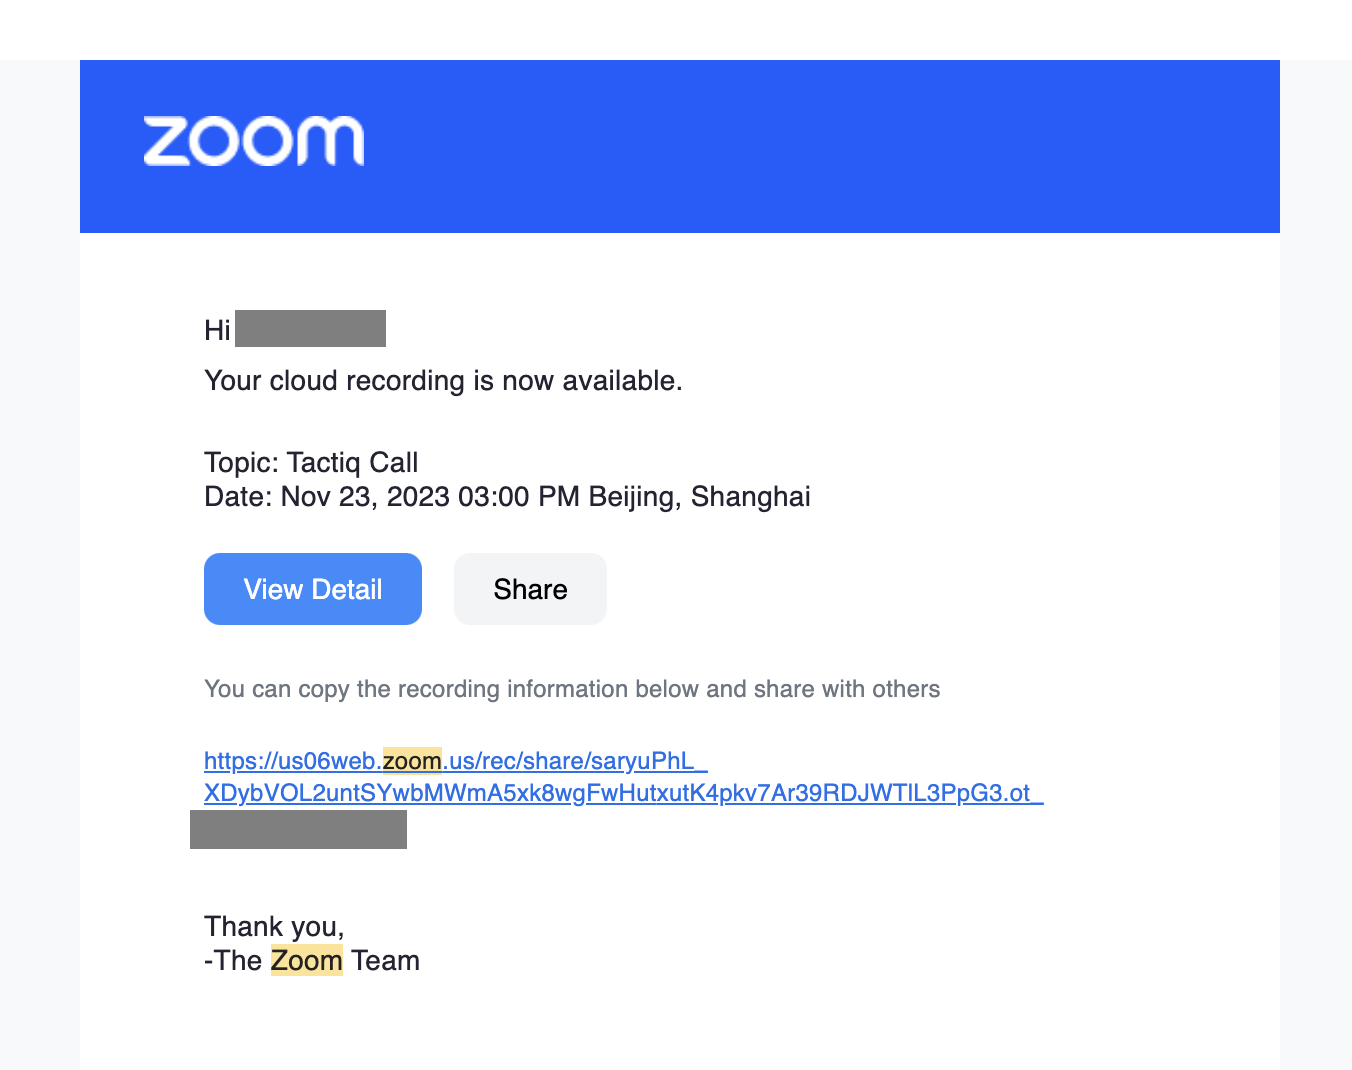
- Once the recording is saved to the cloud, Zoom will email you a link to access it.
- Look for the email notification from Zoom.
- Tap the link in the email to view and access your recording.
Directly from the Zoom Web Portal
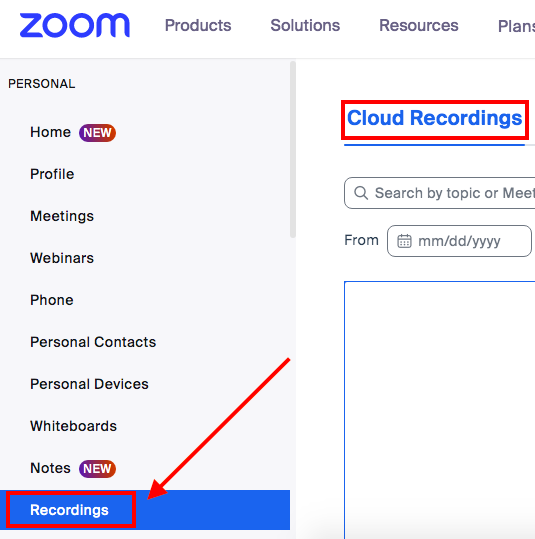
- Open your web browser and go to zoom.us.
- Click ‘Sign In’ at the top right corner and log into your Zoom account.
- On the left side of the screen, click ‘Recordings’ to view all your cloud recordings.
For a detailed guide on finding your Zoom cloud and local recordings, check out Where to Find Zoom Recordings: Your Ultimate Guide.
How to Start Zoom Cloud Recordings
Recording in the cloud is a convenient feature for paid Zoom subscribers, automatically enabled to capture your meeting's video, audio, and chat text in the Zoom cloud. These recordings can be downloaded to your computer or streamed from a browser.
Prerequisites for Starting a Cloud Recording
To start a cloud recording, ensure you meet the following requirements:
- You are a licensed user on a Pro, Business, or Enterprise account
- Recoding in the cloud is enabled
- Desired recording settings are selected
You'll also need:
- Zoom desktop client for Windows, macOS, or Linux with the global minimum version or higher
- Zoom mobile app for Android or iOS with the global minimum version or higher
- Zoom Web App access
How to start a Zoom Cloud Recording
Starting a cloud recording is straightforward and can be done from the Zoom desktop client, mobile app, or web app. Here’s a step-by-step guide:
- Begin your instant or scheduled meeting as the host.
- During the meeting, click the Record button at the bottom of the screen.
- From the options that appear, choose Record to the Cloud. This option starts recording the meeting to Zoom’s cloud storage.

- If you are muted, a Recording Alert pop-up will appear to notify you.
- To stop recording, click Stop Recording or End Meeting. You can also click Pause to pause it temporarily.
Benefits of Testing Your Zoom Meeting Before Recording
Before diving into your actual meeting, it's a good idea to test your Zoom setup to ensure everything works perfectly. Testing helps you:
- Verify if your audio and video are working properly
- Ensure your internet connection is stable
- Familiarize yourself with Zoom controls and settings
Doing a test run minimizes the risk of technical issues during your recorded meeting, ensuring that the final Zoom recording captures clear audio and video. To learn more about testing your Zoom meeting, check out this article: How to Test Zoom Before a Meeting.
Accessing Zoom Cloud Recordings Made Easy
Enabling cloud recording ensures that you capture and store every critical discussion. Accessing each recorded meeting is simple, whether using email links or logging into the Zoom web portal. Plus, with cloud storage, you save precious space on your computer.
Integrating with tools like Tactiq takes it further by offering automatic transcriptions and innovative features highlighting key moments. You can quickly revisit essential points and share insights with your team.
By following these steps, you’ll have all your meeting details at your fingertips to make your workflow smoother and more efficient.
Zoom cloud recordings let you access meetings from anywhere, save local storage space, and easily share content with your team. You also benefit from enhanced security, multiple recording layouts, and reliable backup, so your important discussions are always safe and accessible.
To enable cloud recordings, sign in to the Zoom web portal as an admin, navigate to the appropriate settings (Account Management, User Management, or individual Settings), and toggle the Cloud Recording switch. This ensures your meetings are captured and stored in the cloud, making them easy to manage and retrieve.
You can access your Zoom cloud recordings via an email link sent by Zoom or directly from the Zoom web portal under the 'Recordings' section. This gives you quick access to your meeting files without using up your computer’s storage.
Start your meeting as the host, click the Record button, and select 'Record to the Cloud.' You can pause, stop, or end the recording as needed, ensuring every important moment is captured for later review.
By connecting Tactiq, your Zoom recordings are automatically transcribed into searchable, editable documents. This saves you from manual note-taking and lets you highlight key points, create summaries, and share actionable insights with your team effortlessly.
Want the convenience of AI summaries?
Try Tactiq for your upcoming meeting.
Want the convenience of AI summaries?
Try Tactiq for your upcoming meeting.
Want the convenience of AI summaries?
Try Tactiq for your upcoming meeting.


