How to Transcribe Audio to Text in Microsoft Word
February 2, 2024
February 2, 2024
June 12, 2025
June 12, 2025

Are you struggling to keep up with the endless audio recordings from online meetings, interviews, or lectures? It's a common challenge in the professional world, where vital information is often shared verbally. But what if there was a way to effortlessly transcribe audio to text, ensuring you don’t miss any valuable information?
In this article, you’ll learn how Microsoft Word can transcribe audio to text. With easy-to-follow steps, you'll be equipped to transform your audio files into accessible documents quickly.
How to Transcribe Audio to Text Inside MS Teams (for Microsoft 365 Premium Subscribers)
Microsoft Teams addressed the need for effective communication by offering a feature to convert audio to text. This feature is an inclusive practice, aiding participants who are deaf, hard of hearing, have varying levels of language proficiency, or are in noisy environments. Especially for online audio content, this feature ensures that every participant can follow the conversation accurately and understand it clearly regardless of their situation.
Note: This feature is available exclusively for Microsoft 365 Business Premium subscribers.
Key Features and Availability
- Real-Time Transcription: As a meeting progresses, Teams provides a live transcription of the audio. This transcript includes the speaker's name and a timestamp.
- Anonymity Option: Participants can hide their identity in the transcript for privacy reasons.
- Compatibility: This feature is available on the desktop version of Teams.
- Eligible Licenses: The live transcription service is available to users with specific Office 365 and Microsoft 365 licenses, including E1, A1, A3, A5, E3, E5, F1, F3, Business Basic, Business Standard, and Business Premium.
Pre-requisites and Accessibility
- Administrative Setup: For organizations utilizing OneDrive for Business and SharePoint for meeting recordings, IT administrators must enable the 'Allow transcription' option in the Teams meeting policy.
- Availability: If the transcription option is not visible, it may indicate that the feature needs to be enabled by your IT admin. You need to ensure that this transcription tool is activated and properly configured.
- Post-Meeting Access: After the meeting concludes, the transcript is accessible and downloadable from Teams on both desktop and web platforms. However, participants who join the meeting via phone won't have access to this downloadable transcript.
How to Start Live Transcription in MS Teams
- Initiating Transcription:
- During a meeting, navigate to the meeting controls and select 'More…’ (represented by an ellipsis icon).
- Choose the 'Record and transcribe' icon, then select 'Start transcription'.
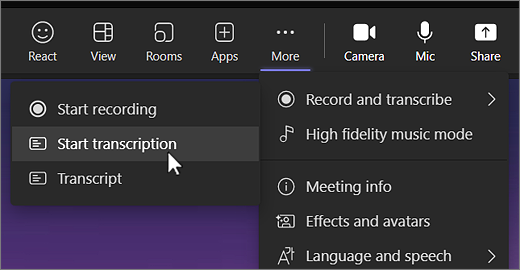
(Image from Microsoft Support)
- Participants will be notified that the live transcription has begun, and the transcript will appear on the right side of your screen.
- Recording Option:
- If you wish to record the meeting, click 'More…’ and select 'Start recording.'
How to Transcribe Recorded Audio Files in Microsoft Word
Microsoft Word allows transcribing audio directly within the application, making it easier to convert your conversations, interviews, or meetings into editable text. This functionality is crucial, especially when dealing with an audio or video file, ensuring everything is captured and converted accurately. This section will guide you through the steps to convert audio directly into Microsoft Word:
- Preparing for Recording: Sign in to Microsoft 365 using the new Microsoft Edge or Chrome browsers.
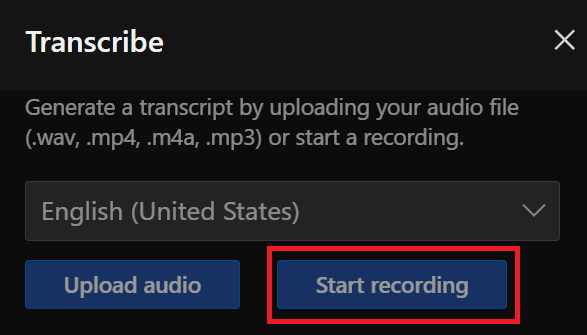
- Accessing the Transcribe Feature: In Word, navigate to the 'Home' tab, click 'Dictate,' and then select 'Transcribe.' This feature is useful when converting audio into a readable format. It's also worth noting that while the focus here is on audio, you can apply the same process if you're working with a video file, extracting its audio component for transcription.

- Starting the Recording: In the Transcribe pane, click 'Start recording.'
- If it's your first time, you must give the browser permission to use your mic. This step might involve a pop-up dialog or adjusting settings in your browser.
- For Microsoft Edge: Navigate to 'Settings > Site permissions > Microphone' and allow your company's SharePoint URL.
- For Chrome: Go to 'Settings > Privacy and security > Site settings > Microphone' and allow your company's SharePoint URL.
- Recording the Audio: Start speaking or begin your audio recording once the recording icon turns blue and the timestamp starts. Keep the Transcribe pane open while recording. You can pause and resume recording as needed using the respective icons.
- Saving and Transcribing: Once done, click 'Save and transcribe now' to save your recording to OneDrive and start the transcription process. The transcription might take some time, depending on your internet speed. You can continue with other tasks as it processes in the background.
- Editing the Transcript: After the transcription is complete, you can revisit parts of the recording by playing back the timestamped audio and, if required, start editing the transcription for accuracy.
- Using the Transcript: You can save the entire transcript as a Word document or insert snippets into existing documents.
How to Transcribe Uploaded Audio Files in Microsoft Word
Transcribing a pre-recorded audio recording in Microsoft Word is a straightforward process. Here’s how you can upload it to Word and use its capabilities to convert audio:
- Ensure Proper Sign-In: Sign in to Microsoft 365 using the new Microsoft Edge or Chrome browsers.
- Access the Transcribe Feature: In Microsoft Word, go to the 'Home' tab, click on the 'Dictate' dropdown, and then choose 'Transcribe.'
- Uploading Your Audio File: In the Transcribe pane, select 'Upload audio.' This step will open a file picker where you can choose your pre-recorded file.

- File Format Compatibility: The Transcribe in Word feature currently supports various file formats, including .wav, .mp4, .m4a, and .mp3. This compatibility with multiple audio formats ensures that your transcription process is smooth, regardless of the source of your audio content.
- Transcription Process: After selecting your file, the transcription process will begin. The duration of this process can vary, typically up to the length of the audio file. While Word is transcribing, you can keep the Transcribe pane open.
- Multi-Tasking During Transcription: Feel free to engage in other tasks or switch between browser tabs and applications while the transcription is underway. Just ensure that the Transcribe pane remains open. Once the transcription is complete, you can edit the text for accuracy and clarity. The real advantage comes in converting audio into a structured, written format, making it easier to analyze and reference in the future.
How to Get MS Doc with the Transcript from the Audio
Here’s how you can turn your audio file into a Microsoft Word document:
How to Upload Audio Files to Microsoft Word
- Start by launching Microsoft Word on your device.
- Select the 'Home' tab in the Word ribbon to find transcription options.
- Click the 'Dictate' button, then choose the 'Transcribe' option from the dropdown menu. This option is designed to handle your audio files efficiently.
- This step will prompt you to upload the file you want to transcribe. Select 'Upload audio' and browse your device for the desired file.
- After selecting the file, upload it. Word will process the file and start transcribing it into text. This process is an efficient way to convert audio into written documentation.
How to Convert Audio to Text in Microsoft Word
- Launch Word on your computer.
- In the Home tab, find the 'Dictate' button and click 'Transcribe.’
- Select the 'Upload audio' option and upload the audio file you want to transcribe.
- Word will start transcribing the audio file. This process may take a few minutes, depending on the length of the audio.
- The audio file, whether recorded or uploaded, is saved to the Transcribed Files folder in OneDrive. You can review and make edits if necessary.
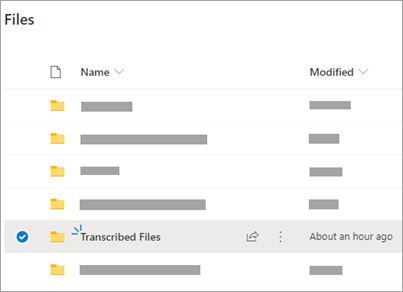
(Image from Microsoft Support)
How to Save It as Text and Open It in Microsoft Word
- Click on the transcribed text in the pane.
- Right-click and choose 'Copy' or use the Ctrl+C shortcut.
- Open a new Microsoft Word document.
- Right-click and select 'Paste' or use the Ctrl+V shortcut to paste the transcribed text into the new document.
- Remember to save your document. Choose a memorable file name and select your preferred location on your device.
With these steps, you can easily convert audio files into a written format, making reviewing and sharing information easier. This skill is handy for keeping accurate records of important audio or video files. Remember, transcription quality may vary based on the clarity of the audio, so it’s always a good idea to review and edit the transcribed text for accuracy.
{{rt_cta_ai-convenience}}
How to Transcribe Recorded Audio Files and get AI Summary in Microsoft Word
If you want to get a quick AI summary and highlights from your transcripts, there are many tools you can use for this purpose. One audio to text tool is Tactiq. It allows easy upload of files and offers AI Meeting tools to swiftly generate summaries, bullet point highlights, action items, and more useful resources from your transcripts. You can also thoroughly review your transcripts and add notes as needed, making it a valuable tool for efficient transcript management. It’s easy to get started:
- Install Tactiq on Chrome. It’s free!
- Go to the Transcripts page.
- Click ‘Upload Transcript or Recording’ in the upper right corner.
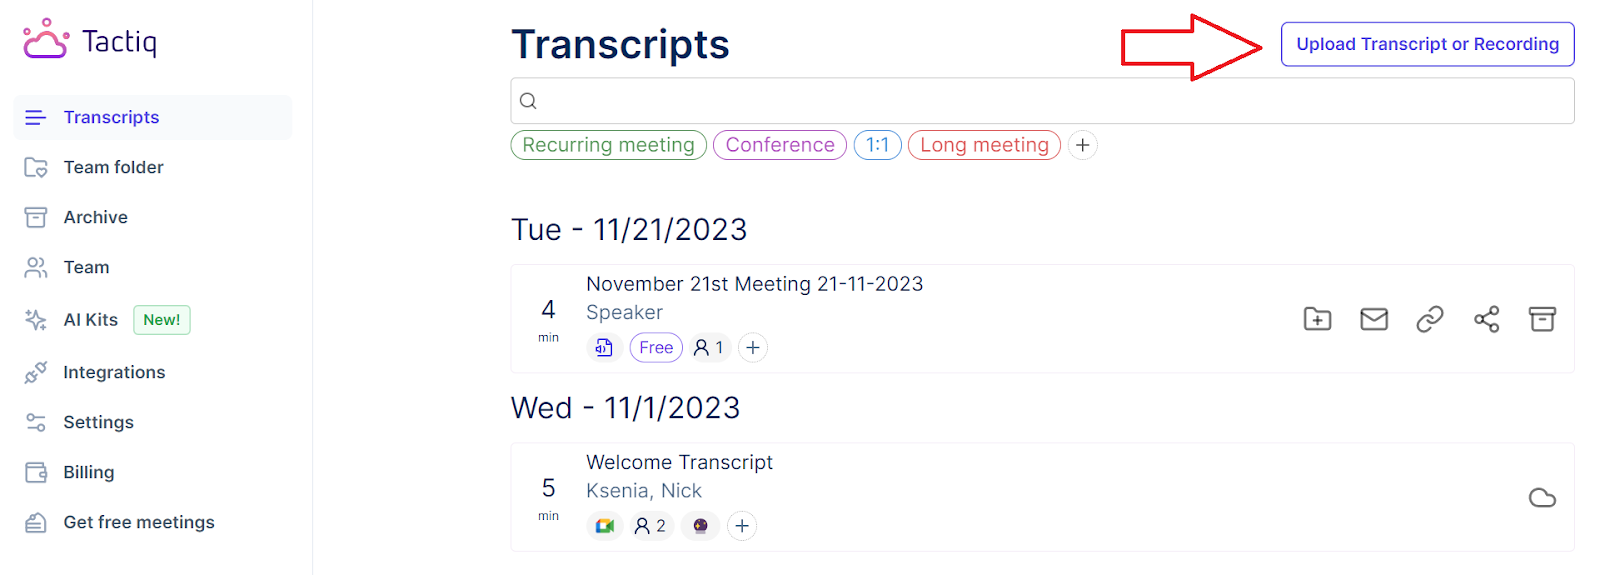
- Drag and drop the file into the box or click ‘Choose file.’ After the file is selected, click ‘Upload’.
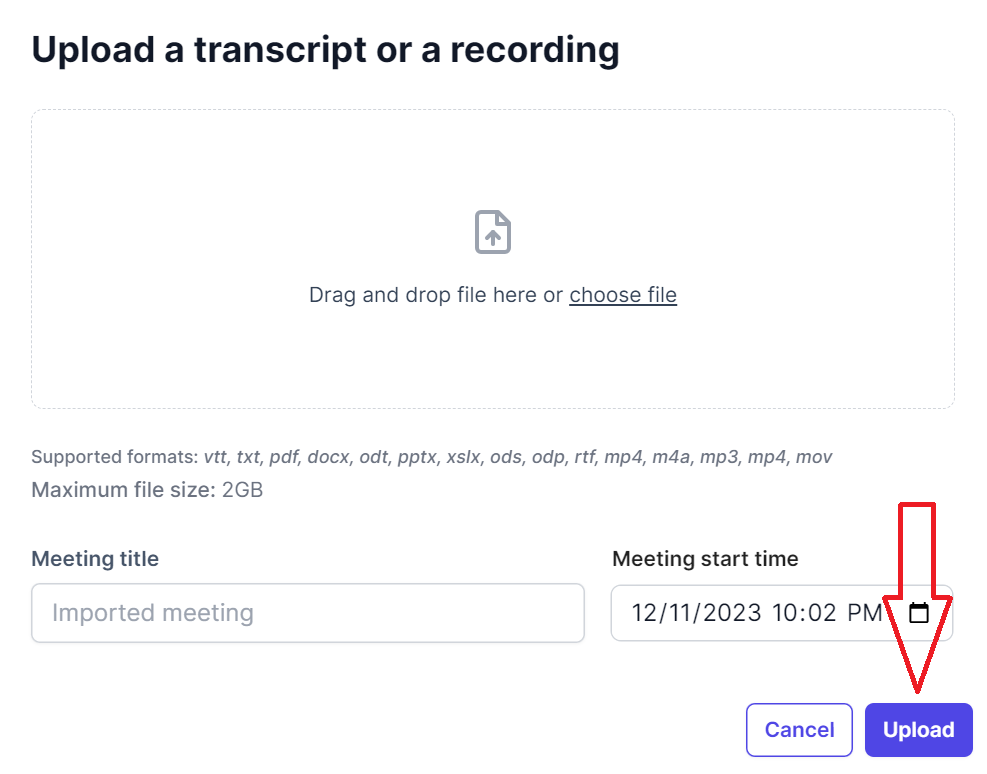
- Select the transcript from the list of transcripts.
- Using Tactiq’s AI feature, click ‘Short summary’ under AI Meeting tools to quickly generate a summary. You can also ask AI to write bullet point highlights, create action items, and more.
.png)
- You can also view the full transcript, its highlights and add notes. Try Tactiq for free now.
Conclusion
Converting spoken words to written text represents more than a technical feat; it demonstrates modern efficiency. Converting audio or processing a video file into text, powered by automatic transcription, is not just a convenience but a transformative stride towards better accessibility and clarity. By integrating this tool into your daily operations, you can elevate your team's productivity and drive your business forward.
More Resources
- "How to Get a Transcript of Microsoft Teams Phone Calls": Discover how to obtain transcripts of Microsoft Teams phone calls.
- "Microsoft Teams Recording Location": Understand where Microsoft Teams recordings are stored and how to access them.
- "How to Record a Microsoft Teams Meeting": Find out how to record meetings in Microsoft Teams for future reference and transcription.
There are several free automatic transcription tools available for transcribing audio to text. Online converters and free transcription software are good options to consider. For Microsoft 365 users, Microsoft Word and Teams offer built-in transcription features that are convenient and cost-effective. Additionally, Tactiq is also a notable transcription tool. It offers both real-time transcription during meetings, which is particularly useful for Teams or Zoom calls, and the option to upload audio files for transcription. This makes Tactiq a comprehensive solution for various transcription needs.
You sign in to Microsoft 365 using Edge or Chrome, open Word, and select the 'Dictate' dropdown under the Home tab. Choose 'Transcribe,' then upload your audio file. Word will process the file and provide a transcript, letting you edit and save it for easy reference.
With Tactiq, you upload your transcript or recording and use its AI Meeting tools to instantly generate summaries, bullet point highlights, and action items. This saves you time and helps you quickly capture the most important points from your meetings or interviews.
Microsoft Word’s Transcribe feature supports .wav, .mp4, .m4a, and .mp3 files. This flexibility means you can easily convert audio from a variety of sources into text, making your workflow smoother and more efficient.
Transcription tools help you capture every detail from meetings or interviews, so you never miss important information. You save time on note-taking and can focus on the conversation, knowing you’ll have an accurate, editable record to review and share later.
Related articles


Want the convenience of AI summaries?
Try Tactiq for your upcoming meeting.
Want the convenience of AI summaries?
Try Tactiq for your upcoming meeting.
Want the convenience of AI summaries?
Try Tactiq for your upcoming meeting.