How to Find Zoom Recording Location
August 2, 2023
August 2, 2023
June 12, 2025
June 12, 2025

One useful feature of Zoom is its recording capability, which allows users to capture and revisit important Zoom sessions. When a meeting ends, you might be left wondering, “Where can I find my Zoom recordings”? You’d be surprised at how easy it is.
Whether you’re a busy professional trying to stay on top of things, a student hustling to keep up with your lectures, or simply someone looking to keep things organized, we’ve got you covered. Read on to discover how to locate your Zoom recordings effortlessly.
How to Find Zoom Recordings on the Cloud
If you have a paid Zoom Cloud subscription (Pro, Business, or Enterprise plan), you can conveniently access your recordings directly from your account without the need to save them on your local device. This feature not only provides easy access to your recordings but also helps save valuable storage space on your computer.
There are two ways you can access recordings from the cloud:
Option 1: Email link
Once the recording is saved to your cloud, Zoom will notify you via email with a link to the recording. Follow these steps to access the file:
- Sign in to your email and locate the email from Zoom.
- Tap the link on the email to view the recording.
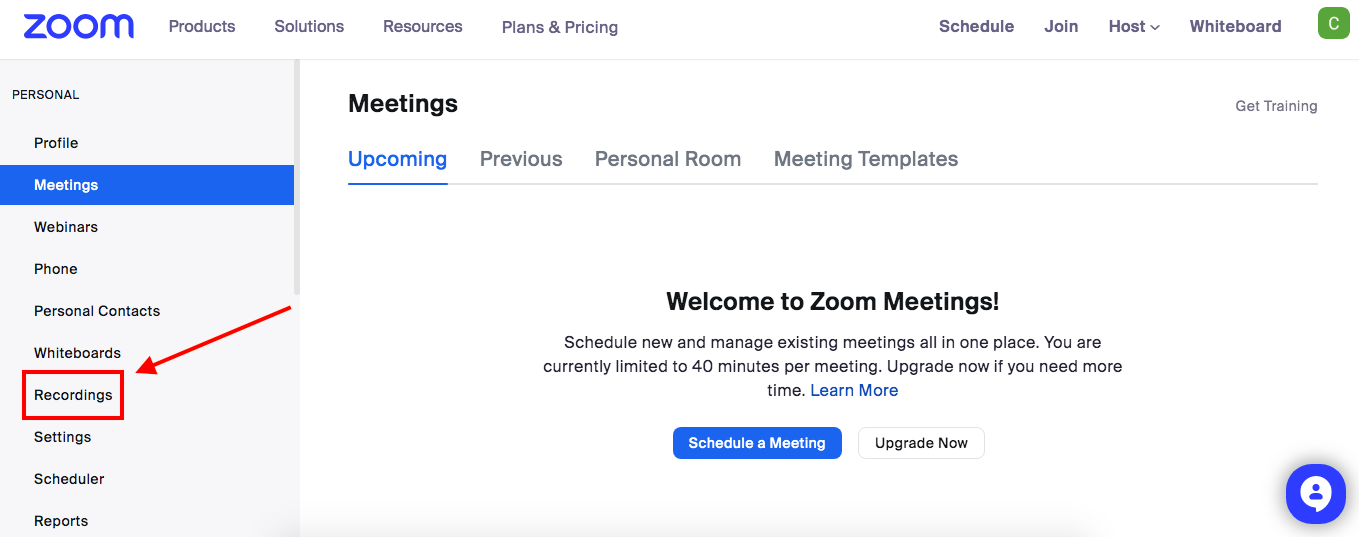
Option 2: Directly from Zoom web portal
- Go to zoom.us and click ‘Sign In’.
- Click ‘Recordings’ on the left side of the screen to view your recordings.
Reminder: You can only find your recordings on the cloud if you have a paid subscription. If you are a free subscriber, read on to find your recordings directly from your computer.
How to Find Local Zoom Recordings on Your Computer
If you don't have a paid Zoom cloud subscription, you can still access your recordings locally on your computer. When you record a meeting or webinar using Zoom without a paid subscription, the recordings are automatically saved in .mp4 format and stored in a specific location on your device. Regardless of the operating system you're using, the recordings are typically saved in your 'Documents' folder.
On the other hand, here’s how to locate your local recording files from the Zoom desktop client:
- Install the latest version of Zoom Desktop Client.
- Once installed, open the application and sign into your Zoom account.
- Click ‘Meetings’ on the top, then click the ‘Recorded’ tab.
- ‘File location’ will tell you where the file is saved on your computer.
- Click ‘Open’ to be redirected to the folder with your recordings.

{{rt_cta_ai-convenience}}
How to Customize the File Path for Local Recordings
If you prefer more control over where your Zoom recordings are saved on your computer, you're in luck! Zoom provides the flexibility to customize the file path, allowing you to choose a location that suits your organizational preferences. By following these simple steps, you can easily change the default file path for your local recordings:
- Sign in to Zoom Desktop Client.
- Click the settings icon on the upper right corner, then select ‘Recording’ from the left panel.
- Change the file path by clicking the section shown in red below.
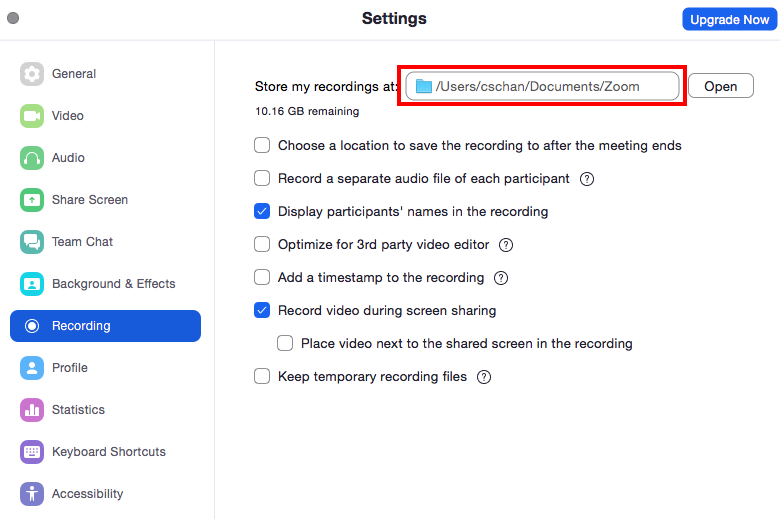
- Select ‘Choose a new location’ and navigate your folders to select your new file path.
How to Share Your Zoom Recordings
Now that you know how to locate your Zoom recordings, let's talk about how you can share these valuable recordings with others. Whether you want to collaborate with colleagues, share educational content with students, or simply showcase your presentation skills to a wider audience, Zoom provides several convenient methods to make sharing your recordings a breeze.
Sharing Cloud Recordings
- Go to zoom.us and click ‘Sign In’.
- Click ‘Recordings’ on the left-hand side of the screen to view your recordings.
- Locate the recording and click ‘Share’ to get a link you can share with others.
You can also share your cloud recording using the link you receive in your email.
Sharing Local Recordings
- Locate the recording on your computer (see “How to Find Local Zoom Recordings on Your Computer” above)
- Upload the file to cloud storage services such as Google Drive, YouTube, Dropbox or any similar third-party platforms, share them on social media platforms, or embed them in websites or presentations.
By exporting your recordings, you can expand your reach and cater to different audiences beyond the confines of the Zoom environment.
Troubleshooting Issues with Zoom Recordings
Why didn’t my Zoom recording save?
There are a couple of reasons why you cannot locate your recordings:
- It is important to note that after you end a Zoom meeting and choose to record it, the recording may not be immediately available. The recording must undergo a processing phase, during which Zoom prepares the file for playback and storage. This process typically takes some time, especially for longer recordings or when there is high demand on the Zoom servers. If you cannot locate your recording, wait a few hours and check back later.
- Cloud recordings are only available for hosts. You could not access the recording if you weren’t the meeting host. However, you can ask the host to share it with you.
Where can I find Zoom recordings on my mobile phone?
After you end the meeting from your mobile, the recording will appear under ‘Recordings’ on the Zoom web portal. Here’s how you can find it:
- Sign in to your Zoom account.
- On the left side of the screen, select ‘Recordings’.
- If you do not find your recording under ‘Cloud Recordings’, click ‘Local Recordings’.
Can I retrieve a Zoom meeting that was not recorded?
Unfortunately, no. There will be no record of the meeting if no local or cloud recording was made. However, there is a way you can save important information even if you don’t have the Zoom recording!
With Tactiq, you can capture the full meeting transcript in-real time. As the meeting progresses, Tactiq diligently transcribes every spoken word into written text, providing you with a comprehensive record of the entire conversation.
Gone are the days of scrambling to take notes or relying on memory alone. With Tactiq, you can focus on actively participating in the meeting, knowing that a reliable transcript is being generated in the background.
To install Tactiq on your computer, follow these steps:
- Visit the Chrome Web Store.
- Click ‘Add to Chrome’ on the right-hand side of the page, then ‘Add Extension’.
- Go to Google Meet. The Tactiq widget will be on the right-hand side of the screen.
If you want to know more about recording a zoom meeting as a participant, check out our guide here: How to Record a Zoom Meeting as a Participant
If you want to learn how to take notes in Zoom, you can also check out our guide here: How to Take Notes in Zoom (2023 Guide)
By installing Tactiq as a browser extension, you gain access to its transcription capabilities during Zoom, Google Meet, and other popular online meeting platforms. It offers a game-changing solution for capturing, organizing, and sharing meeting transcriptions.

Easily Locate Your Zoom Recordings
Zoom's recording capability is a game-changer when it comes to preserving and revisiting the valuable content shared during virtual sessions. We hope that this guide has made it easier for you to easily locate your Zoom recordings in a stress-free way! Say goodbye to the anxiety of losing important information and embrace the convenience and efficiency that Zoom's recording feature brings to your virtual communication experiences. Happy recording!
You can access your Zoom recordings on the cloud by either clicking the link sent to your email after the meeting or by signing in to the Zoom web portal and selecting ‘Recordings’ on the left side of the screen. This saves you time and keeps your computer storage free.
If you don’t have a paid subscription, your Zoom recordings are saved locally on your computer, usually in your ‘Documents’ folder. You can also find them by opening the Zoom desktop client, clicking ‘Meetings,’ then the ‘Recorded’ tab, and checking the file location.
You can customize the file path for your local Zoom recordings by opening the Zoom desktop client, going to settings, selecting ‘Recording,’ and choosing a new location. This gives you control over your file organization and makes it easier to find your recordings later.
If your recording isn’t available immediately, it may still be processing, especially for longer meetings or during busy times. Wait a few hours and check again; if you weren’t the meeting host, ask the host to share the recording with you.
If no recording was made, you can’t retrieve the meeting video, but you can use Tactiq to capture a real-time transcript during future meetings. With Tactiq, you get a written record of every conversation, so you never miss important details and can focus on participating.
Related articles


Want the convenience of AI summaries?
Try Tactiq for your upcoming meeting.
Want the convenience of AI summaries?
Try Tactiq for your upcoming meeting.
Want the convenience of AI summaries?
Try Tactiq for your upcoming meeting.