How to Attach File in Microsoft Teams Meeting
January 28, 2026
January 28, 2026
January 28, 2026
January 28, 2026

Attaching files to Microsoft Teams meetings sounds simple until you realize each method works differently. Some create links, others upload to cloud storage, and permissions vary based on where files live.
When files are not attached correctly, meetings lose focus. Time gets spent fixing access issues instead of reviewing documents and making decisions.
Understanding how file attachments work in Teams helps you prepare meetings properly and avoid last-minute problems.
In this guide, you’ll learn:
- How to attach files to a Microsoft Teams meeting invite
- Where the attached files are stored and who can access them
- How to share files during a meeting without permission issues
- How to keep file discussions clear and organized
How To Attach Files To Microsoft Teams Meeting Invites
Microsoft Teams does not attach files the same way email does. Every file you add to a Teams meeting is stored in the cloud storage and shared as a link. Knowing this upfront helps you avoid access issues and broken attachments.
Method 1: Add file links to the Teams Calendar event
This method adds a link to your document, not a true attachment.
1. Open Microsoft Teams using the desktop app or visit teams.microsoft.com.
2. Select Calendar from the left sidebar.
3. Create a new meeting or open an existing meeting invite.
4. In the meeting details, select Insert link in the message box, then paste the link.

5. Click Save to notify attendees and save the changes.
The file appears as a link in the meeting invitation. Attendees can open it before the meeting starts, as long as they have the right permissions.
Method 2: Attach files directly from the Teams Calendar
This option works well when you want to upload files straight into the meeting invite without switching tools.
1. Open the Teams calendar and locate your meeting, or create a new one.
2. Open the meeting details so you can edit the invitation.
3. In the message area, select the paperclip icon.

4. Choose one of the available options:
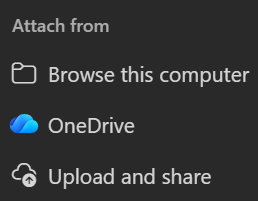
- Browse this computer to upload a local file
- OneDrive to attach an existing cloud file
- Upload and share to add the file to a OneDrive folder and share it
5. Save the meeting or send an update to notify attendees.
Meeting participants can open the file before the meeting starts if they have access.
How To Use Meeting Transcripts With Attached Files (Tactiq)

Attaching files helps set the agenda, but the real value comes from what gets discussed during the meeting. Feedback, decisions, and next steps tied to those files are easy to lose once the call ends.
Tactiq captures those conversations automatically during Microsoft Teams meetings. It transcribes discussions in real time and turns file-related conversations into clear, searchable records.
With Tactiq, you can:
- Automatically transcribe conversations that reference attached files
- Generate summaries that highlight decisions made about documents
- Create action items from discussions
- Export transcripts for documentation
- Identify speakers to track ownership of decisions
- Search transcripts to quickly find moments tied to shared files
Instead of digging through chat messages or replaying meetings, you can review exactly what was decided about each file.
Try the free Tactiq Chrome Extension to capture file discussions and automatically turn meetings into clear follow-ups.
{{rt_cta_ai-convenience}}
How To Share Files During A Microsoft Teams Meeting
Sometimes meetings move fast, and there is no time to prepare attachments in advance. In those cases, you can share files during the meeting by using the chat. This keeps the discussion going without the need to resend a meeting invite.
Share files via meeting chat
This method lets you send documents to all participants while the meeting is in progress.
1. During the meeting, select the Chat tab to open the meeting chat.
2. In the message box, click the plus sign to open the chat options, then select Attach file from the menu.
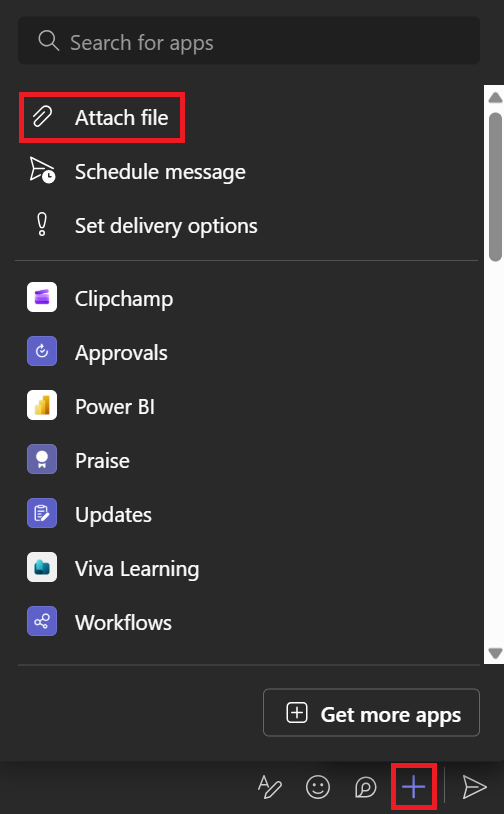
3. Choose Attach cloud files or Upload from device.
4. Click the arrow button to send the file to the chat conversation.
The file appears in the chat window and remains available after the meeting ends. Participants can access the file later from the meeting chat, as long as permissions allow.
Share your screen to present files
If you need to walk participants through a file instead of sending it, screen sharing works well. This option helps you explain context, highlight details, or guide the discussion in real time.
In Microsoft Teams, you can share your entire screen, a specific app, or a presentation during a meeting.
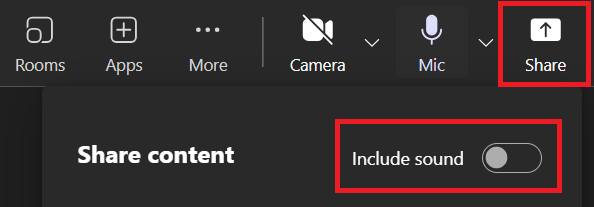
1. During the meeting, select Share from the meeting controls. Turn on Include sound if you want to share computer audio.
2. Choose what you want to present:
- Screen to show everything on your display
- Window to share a specific open app or browser tab
- PowerPoint Live to present slides directly in Teams
- Microsoft Whiteboard to collaborate visually
3. Once sharing starts, a red border appears around the shared content.
4. Select Stop sharing when you are finished presenting.
While you are sharing, meeting participants will not see your notifications. On Linux devices, the red border does not appear, and window sharing is not available.
Upload files to the Files tab
If you want files to stay easy to find after the meeting, uploading them to the Files tab works well. Files shared here are stored in the channel and remain accessible to everyone with access to that space.
1. Open the Teams channel where the meeting takes place.
2. Select the Files tab at the top of the channel.
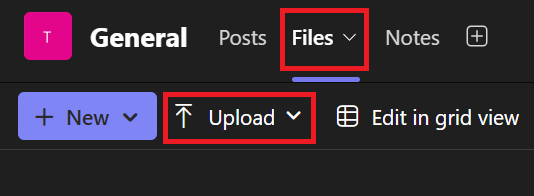
3. Click Upload, then choose Files, Folder, or Template.
4. Select the files you want to upload from your computer.
Once uploaded, the files are saved to cloud storage and available to all channel members. This makes it easier to reference documents during the meeting and return to them later without having to search through chat messages.
File Permissions and Access Settings
Attaching files is only part of the setup. Access and permission settings decide who can open, edit, or share those files. Getting this right helps avoid delays during the meeting and follow-up issues after it ends.
Setting permissions for external guests
When meetings include external users, file access needs extra attention.
Files shared in Microsoft Teams are usually stored in OneDrive or SharePoint. External attendees may not have access unless permissions are adjusted.
Before the meeting starts, open the file link and confirm that external users can view or edit the document. If access is restricted, update the sharing settings so guests can open the file without the need to request permission.
Managing OneDrive and SharePoint access
Files attached to meeting invites or shared in chat rely on the cloud storage.
Check whether the file is saved to OneDrive or a SharePoint team site. From there, review who has access and what level of permission they have. You can limit editing rights or switch files to view-only mode to prevent unwanted changes.
This step helps keep shared documents controlled and organized.
Best practices for file security
A few small checks help protect shared files.
Only share files with the people who need access. Avoid using public links when sharing sensitive documents. Review permissions again after the meeting ends, especially if external participants joined.
Taking a moment to double-check access settings reduces the risk of files being shared beyond the intended audience.
Best Practices For Attaching Files In Teams Meetings
Attaching files correctly helps meetings stay focused and avoids delays caused by access issues. A few simple habits can make file sharing more reliable for everyone involved.
- Use clear file naming conventions: Clear file names help attendees understand what they are opening. Include the project name, topic, or date so files are easy to recognize in the meeting invite, chat, or Files tab.
- Share files before the meeting: Whenever possible, attach files before the meeting starts. This gives participants time to review documents in advance and keeps the meeting focused on discussion instead of setup.
- Compress large files: Large files can take longer to upload and may cause access issues. Compress files or store them in cloud storage, then share the link in the meeting invite.
- Verify permissions before the meeting: Always double-check file access before the meeting begins. Open the file link as a participant or external user to confirm everyone can view or edit the document as needed.
These small steps help meetings start on time and keep file discussions productive.
Troubleshooting File Attachment Issues In Teams
File attachment issues can interrupt meetings and slow things down. Most problems come from permissions, syncing delays, or where the file is stored.
Attachment option not showing
If you do not see the attachment option, the meeting may not be saved yet. Save the meeting first, then reopen the meeting details. This unlocks attachment options in the message box and Files tab.
Also, check that you are using the Teams desktop app or a supported browser.
Files not syncing between Outlook and Teams
Outlook does not attach files the same way email does. Attachments are converted into cloud links. If files do not appear in Teams, open the meeting details in Teams and check the links manually.
Make sure the file still exists in OneDrive or SharePoint and was not deleted or moved.
External users can’t access files
External users often need extra permission settings. Open the file link and confirm that sharing access allows guests. Update permissions to view or edit, depending on the meeting needs.
Avoid restricted organization-only links when inviting external participants.
File size limitations
Large files may fail to upload or take too long to sync. Upload large files to cloud storage first, then share the link in the meeting invite or chat.
Wrapping Up
Attaching files to Microsoft Teams meetings helps everyone arrive prepared and keeps discussions focused. You can add files to meeting invites, share documents during the meeting, or store them in the Files tab so they stay easy to find later.
The key is knowing where files are stored and how permissions work. When access is set up correctly, meetings start on time, and follow-ups are clearer.
Microsoft Teams handles file sharing well, but it does not capture what gets decided about those files. That context often matters most after the meeting ends.
Using Tactiq alongside Teams helps you keep track of file-related discussions, decisions, and action items. You can review what was said, who said it, and what needs to happen next without searching through chat messages or rewatching meetings.
FAQs on How to Attach Files in Microsoft Teams Meetings
Can I attach a file directly to a Teams meeting invite?
Microsoft Teams does not support true file attachments in meeting invites. Files are shared as cloud links from OneDrive or SharePoint, which control access and permissions.
How do I upload files in a Teams meeting?
You can upload files during a meeting using the meeting chat, screen sharing, or the Files tab. Each option keeps files connected to the meeting.
How do I attach a file instead of a link in Teams?
Teams always uses links for files. When you attach a file, Teams uploads it to cloud storage and shares it as a link.
How do I share a PDF during a Teams meeting?
You can upload the PDF to the meeting chat, share it from the Files tab, or present it by sharing your screen.
How can I automatically capture meeting discussions about attached files?
You can use Tactiq to transcribe Microsoft Teams meetings and capture discussions, decisions, and action items related to shared files.
Related articles


Want the convenience of AI summaries?
Try Tactiq for your upcoming meeting.
Want the convenience of AI summaries?
Try Tactiq for your upcoming meeting.
Want the convenience of AI summaries?
Try Tactiq for your upcoming meeting.