Guide to Using Zoom Whiteboard for Collaboration
August 8, 2024
August 8, 2024
June 12, 2025
June 12, 2025

Effective collaboration tools do more than just connect people; they help teams think together. Zoom Whiteboard is one of those tools. Built into Zoom, it gives your team a shared digital space to capture ideas, map out plans, and share feedback in real time, whether you're using the desktop app, a tablet, or the Zoom mobile app.
In this article, you’ll learn what Zoom Whiteboard is, how to create a whiteboard for your meetings, key features available across devices, and how to use it effectively for team collaboration.
What is the Zoom Whiteboard?
Zoom Whiteboard is a virtual whiteboard feature built into Zoom that allows users to draw, add text, insert sticky notes, and upload images. It’s designed to simulate the experience of a physical whiteboard while offering digital advantages like editable templates, multiple pages, and real-time collaboration. With this tool, teams can brainstorm ideas, map out projects, and collaborate visually.
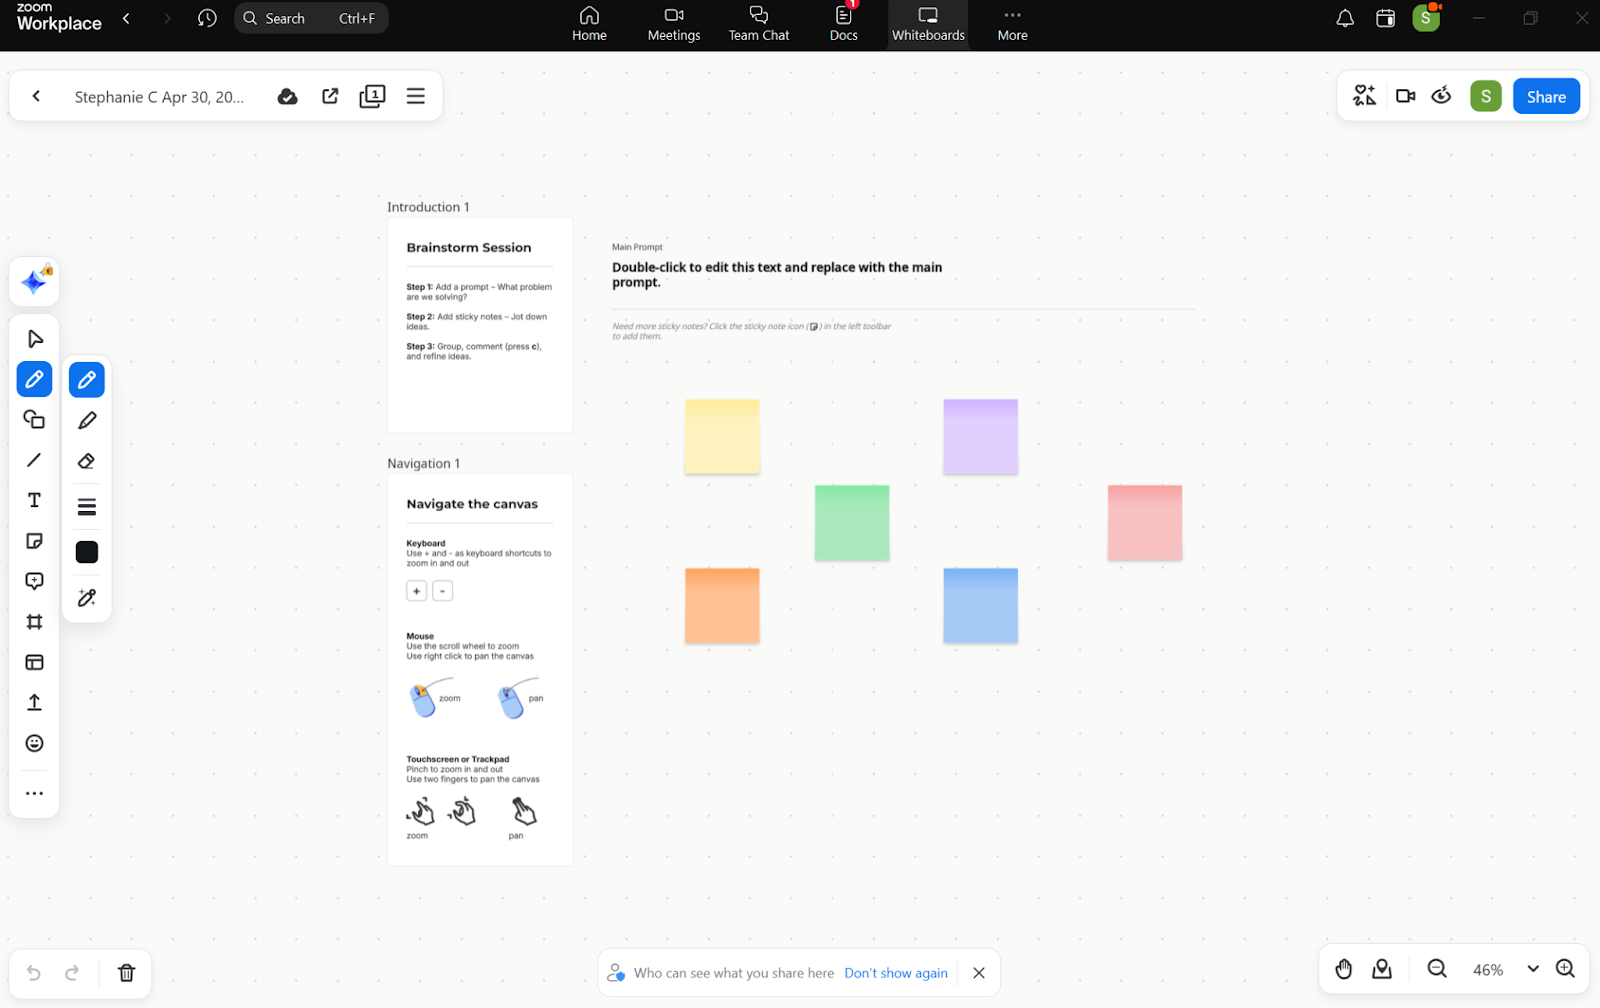
Key Features and Tools Available

Image from Zoom
Zoom’s virtual whiteboard feature includes easy-to-use tools:
- Drawing Tools: Use pens, highlighters, and shapes to sketch and illustrate concepts.
- Text Boxes: Add clear labels, descriptions, or headings to your whiteboard content.
- Sticky Notes: Quickly jot down comments or ideas and move them around the board as needed.
- Upload Images: Insert relevant images or diagrams for context.
- Multiple Pages: Create and navigate between multiple whiteboards within a single session to organize content better.
- Templates for Recurring Zoom Meetings: Save time by creating reusable templates for weekly check-ins, planning sessions, or team retrospectives.
- Saved Automatically: Your whiteboards are saved to the Zoom cloud, so you can revisit or continue working on them anytime.
- Whiteboards Button: Launch, manage, or access your whiteboards easily from the Zoom desktop client or mobile app.
Compatibility with Different Devices
Here’s how the whiteboard feature performs across platforms:
- Windows and macOS: Access full functionality using the Zoom desktop client. You can create a whiteboard, share whiteboard content, and use all available tools and templates.
- iOS and Android: The Zoom mobile app supports whiteboard viewing and basic interactions like drawing or adding sticky notes. Some advanced editing tools may be limited.
- Chromebook and Web: Using the Zoom Progressive Web App (PWA), Chromebook users can access whiteboards in-browser and collaborate without installing extra software.
- Zoom Rooms: Whiteboards can be launched in Zoom Rooms for interactive in-office collaboration, especially in hybrid work setups.
Why Use Zoom Whiteboard for Collaboration
Zoom Whiteboard gives teams a flexible and interactive way to collaborate visually. It transforms passive Zoom sessions into hands-on problem-solving and creative discussions.
Enhances Real-Time Brainstorming
Zoom Whiteboard helps you create a whiteboard space for instant idea sharing. Participants can sketch out thoughts, respond to others in real time, and build on each other’s input using sticky notes, shapes, and drawing tools.
Makes Visual Collaboration Easy
The whiteboard feature supports dynamic team collaboration by giving everyone a shared canvas. You can organize ideas using color coding and simple layouts, helping teams visualize goals and action plans more clearly.
Boosts Meeting Participation
Interactive tools encourage everyone to join in. Whether you’re planning a project or running a training session, participants stay engaged because they can annotate, draw, and share their input directly on the screen.
Works Across Use Cases
Zoom Whiteboard fits different industries and meeting types. It’s useful for corporate trainings, project management, or quick team syncs. You can even save and reuse templates for recurring meetings to keep things consistent.
How to Use Zoom Whiteboards During a Meeting
Follow these steps to use the Zoom desktop client:
- Start your Zoom meeting
- Open the Zoom desktop app and start your scheduled meeting or instant meeting.
- Click the “Whiteboards” button
- In the in-meeting controls toolbar, click the Whiteboards button.

- Create or open a whiteboard
- To start a new board, click New Whiteboard.
- To access a saved one, click Existing Whiteboards and choose from your list.
- Choose your whiteboard mode
- When opening an existing whiteboard, you'll be prompted to select:
- Collaborating: Attendees can edit the board.
- Presenting: Attendees can only view the content.
- Collaborating: Attendees can edit the board.
You can also allow persistent access for verified participants after the meeting.
- Edit and collaborate
- Use the drawing tools, text boxes, sticky notes, and shapes to work together. All updates happen in real time. Up to 30 users can typically edit simultaneously, though this may vary depending on network conditions.
- Share your whiteboard
- Click Share at the top right of the whiteboard window.
- Enter names, Zoom Team Chat channels, or email addresses to invite others.
- Set their permissions (e.g., “Can view” or “Can edit”), and optionally add a message.
- Click Share Whiteboard to send it.
- Close the whiteboard
- When done, click Close Whiteboard at the top. The content is saved automatically and can be reopened anytime from the Whiteboards tab. You can also download Zoom recordings alongside your whiteboard to keep a full record of the discussion.
Note: If you don’t see the whiteboard feature, contact your Zoom account admin to enable it.
Can Everyone Write on Zoom Whiteboard?
Zoom Whiteboard allows multiple participants to collaborate, but the meeting host controls who can edit and when. Here’s how access works and how to manage it:
Permissions and Access
- By default, only the host can create new whiteboards during a meeting.
- Hosts can choose whether participants can edit or view the board by selecting Collaborating or Presenting mode when opening the whiteboard.
- A whiteboard can be shared with participants both inside and outside the meeting using their email addresses or Zoom Team Chat channels.
- Persistent access can be granted to verified meeting participants after the whiteboard is closed.
Editing Limits
- There is no fixed limit to the number of users who can edit a whiteboard, but Zoom may automatically reduce access if network activity is high.
- For example, in a 100-person meeting, about 30 participants can typically edit the board at the same time.
- If traffic increases, Zoom dynamically limits the number of concurrent editors to maintain performance.
How to Enable or Disable Editing

Image from Zoom
- Open or create a whiteboard during a Zoom meeting.
- Click Share in the top right of the whiteboard window.
- Enter participant emails or Zoom contacts.
- Use the dropdown next to each contact to select Can View or Can Edit.
- Click Share Whiteboard to send invitations with the selected permissions.
Tip: If you’re experiencing issues with editing access, check that participants are signed in and are using the latest version of the Zoom desktop or mobile app.
Best Practices for Collaborative Whiteboard Sessions
To keep your Zoom Whiteboard sessions productive and organized, it’s important to set clear guidelines and manage collaboration carefully. Here’s what you can do:
- Set clear expectations
- Before opening the whiteboard, explain how participants should interact—whether they can edit, view only, or use certain tools like sticky notes.
- Assign roles
- Designate a facilitator who guides the session, a notetaker to capture key ideas, and contributors who focus on brainstorming or visual mapping.
- Use color coding
- Encourage participants to use different colors for their annotations. This makes it easier to identify individual contributions and organize information visually.
- Keep the board organized
- Divide the whiteboard into labeled sections for different discussion topics. This helps avoid clutter and keeps everyone focused.
- Disable editing when needed
- If the session gets too chaotic, click More in the screen sharing toolbar and select Disable Annotation for Others to pause participant edits temporarily.

- Save regularly
- Although Zoom whiteboards are saved automatically, it’s a good habit to download keyboards manually, especially after major brainstorming sessions.
- Review and clean up
- After discussions, tidy up the whiteboard by deleting irrelevant notes or grouping similar ideas. This makes post-meeting reviews easier.
Following these practices helps ensure your team collaboration stays focused, interactive, and productive.
Troubleshooting Common Access Issues
Even with the best preparation, you might run into access or editing problems during a Zoom Whiteboard session. Here’s how to solve the most common issues:
- Participants can't see or edit the whiteboard
- Make sure you’ve shared the whiteboard properly and set their permissions to Can Edit or Can View as needed. Reopen the sharing settings if necessary.
- Whiteboard tools are missing
- If participants can't access editing tools, check that they are using the latest version of the Zoom desktop or mobile app. Outdated versions may have limited whiteboard features.
- Annotation is disabled
- If participants report they can’t draw or write, check if you’ve accidentally selected Disable Annotation for Others under the More button during screen sharing. Re-enable it if collaboration is needed.
- Lag or delays in whiteboard updates
- If drawings and edits are slow to appear, it may be due to a weak internet connection. Ask participants to check their connection or move closer to their router.
- Permissions aren’t saving properly
- If participant permissions reset, reopen the whiteboard sharing settings and manually update their access levels again. Saving changes carefully usually fixes the issue.
- Zoom’s Whiteboard doesn't appear in the meeting
- If you don't see the Whiteboards button, contact your Zoom account admin. The whiteboard feature might not be enabled for your account yet.
Preparing a Zoom Whiteboard Before a Meeting
Setting up your Zoom Whiteboard ahead of time can make your meetings smoother and more focused. Here’s how to prepare:
- Create templates in advance

- Open the Zoom desktop app, go to the Whiteboards tab, and click New Whiteboard. Design templates for recurring meetings, like project updates, brainstorming sessions, or team collaboration check-ins.
- Save your templates
- Once your whiteboard is ready, it’s saved automatically in your Zoom account. You can also export it as a PDF or PNG for offline sharing.
- Plan pre-meeting collaboration
- Share your whiteboard with teammates before the meeting by clicking Share and inviting them via email or Zoom Team Chat. Set permissions so they can add ideas, sticky notes, or questions ahead of time.
- Import external content
- Add relevant files, images, or links to the whiteboard by clicking Insert. This can include project diagrams, charts, or reference documents.
- Organize the whiteboard layout
- Divide your whiteboard into labeled sections to separate different topics. Use color coding to highlight priorities, action items, or important notes.
- Double-check access and permissions
- Before the meeting starts, review who has editing or viewing access to your prepared whiteboard to avoid confusion during the session.
By preparing your whiteboard before the meeting, you save time, stay organized, and create a more engaging environment for team collaboration.
What Value Does Tactiq Add During Brainstorming Sessions?

Capturing ideas during fast-paced brainstorming can be challenging, but Tactiq makes it effortless. With live transcription, AI-generated summaries, and automated workflows, Tactiq helps you transform every Zoom session into organized, actionable outcomes without missing a single detail.
Here’s how Tactiq improves your brainstorming sessions:
- Live Transcriptions
- Tactiq captures a live transcript of your Zoom meeting so you can stay focused without worrying about manual note-taking.
- AI-Generated Summaries
- After the session, Tactiq provides instant AI summaries that highlight key ideas, decisions, and next steps discussed during brainstorming.
- Custom AI Prompts and Meeting Kits
- Use customizable prompts and AI meeting kits to turn meeting insights into project plans, action items, blog posts, follow-up emails, or documentation automatically.
- AI Workflows
- Automate post-meeting tasks by syncing meeting summaries to tools like Google Drive, Notion, or HubSpot. Tactiq’s workflows help teams stay organized without extra manual work.
- Transcript Download and Sharing
- Download the full transcript or share highlights instantly with your team to keep everyone aligned.
Using Tactiq with your Zoom Whiteboards ensures that no idea gets lost and that brainstorming sessions translate directly into actionable results. Download the free Tactiq Chrome Extension today!
{{rt_cta_ai-convenience}}
Wrapping Up
Zoom Whiteboard is a powerful tool for teams looking to capture ideas, collaborate visually, and stay organized during meetings. With features like real-time editing, templates for recurring meetings, and easy sharing options, it’s never been easier to bring team collaboration to life. And by pairing Zoom with tools like Tactiq, you can turn every brainstorming session into clear, actionable results.
Yes, you can create a whiteboard before your meeting in the Zoom Whiteboards tab and organize it with templates, sections, and preloaded content.
No, Zoom has not removed Whiteboards. The feature is still available and has been expanded with new editing tools, sharing options, and AI-powered enhancements.
Zoom Whiteboard is available on the latest versions of the Zoom desktop app, mobile app, and web app. Make sure your Zoom app is updated to access all features.
Basic whiteboard features are free for all Zoom users. Some advanced features, like expanded storage and team collaboration tools, may require a paid Zoom plan.
Yes, Zoom includes a built-in whiteboard feature that lets you draw, type, and add sticky notes during meetings. It’s a digital collaboration tool available on the Zoom desktop, mobile, and web apps. We’ll explore how it works in the next section.
Related articles


_Main.jpg)


Want the convenience of AI summaries?
Try Tactiq for your upcoming meeting.
Want the convenience of AI summaries?
Try Tactiq for your upcoming meeting.
Want the convenience of AI summaries?
Try Tactiq for your upcoming meeting.