How to Mute All Participants During a Zoom Meeting
August 11, 2024
August 11, 2024
June 12, 2025
June 12, 2025
Hosting effective Zoom meetings can be challenging, especially when managing large groups. Background noise, distractions, and poor etiquette can disrupt the flow and reduce productivity.
This guide will show you how to mute all participants during a Zoom meeting, ensuring a more organized and focused session. By understanding the importance of muting participants, you'll learn how to enhance overall meeting efficiency.
For additional tips, explore how to test Zoom before a meeting and how to create a Zoom meeting link to keep your meetings on track.
Why Mute All Participants in a Zoom Meeting?
In Zoom meetings, background noise can disrupt the flow of conversation and make it hard for everyone to stay focused. Muting participants can solve this issue, especially in large groups. By assigning a co-host to help manage the meeting, you can further ensure that participants remain muted when necessary. Let's explore why it’s important to mute participants and how it helps maintain order and manage disruptions.
Maintain Focus and Reduce Disruptions
- Importance of reducing background noise: Background noise can be a major distraction in Zoom meetings. Whether it's the sound of typing, barking dogs, or street noise, these sounds can pull attention away from the speaker. Reducing this noise keeps everyone focused on the agenda.
- Impact on meeting efficiency: When everyone can hear the speaker clearly, meetings run more smoothly. There’s no need to repeat points or ask for clarifications. This efficiency saves time and ensures that all points are covered within the allotted time.
Manage Large Groups Effectively
- Controlling the flow of conversation: In meetings with many participants, it's easy for conversations to get off track. By muting everyone except the speaker and co-host, you can control who speaks and when. Additionally, muting new participants joining mid-meeting can help maintain focus and order throughout the session.
- Maintaining order and organization: Orderly meetings are essential for productivity. Muting participants helps in maintaining a structured environment where everyone knows when it’s their turn to speak. This makes it easier to follow the agenda and ensures that all voices are heard at the right time.
Handle Poor Video Conferencing Etiquette
- Dealing with individuals causing distractions: Not everyone remembers to mute themselves when not speaking. Some might engage in side conversations or forget to turn off loud music. Muting these individuals can prevent these distractions and keep the meeting professional.
- Ensuring smooth meeting flow: A smooth meeting flow is crucial for keeping everyone engaged and on track. Muting participants ensures that the focus remains on the speaker, reducing the chances of sidetracks and unnecessary disruptions. This allows for a more productive and engaging meeting environment.
By understanding the reasons for muting participants, you can manage your Zoom meetings more effectively, ensuring that they are focused, organized, and free from unnecessary disruptions.
How to Mute Everyone in a Zoom Meeting
Muting everyone in a Zoom meeting can help maintain order and focus. Follow these steps to mute participants effectively.
Step-by-Step Instructions
Accessing the 'Participants' menu
- Open the Zoom meeting: Start your Zoom meeting or join an existing one.
- Locate the 'Participants' menu: At the bottom of the Zoom window, you will see a toolbar. Click on the 'Participants' button. This opens a panel on the right side of the screen showing all Zoom meeting participants.
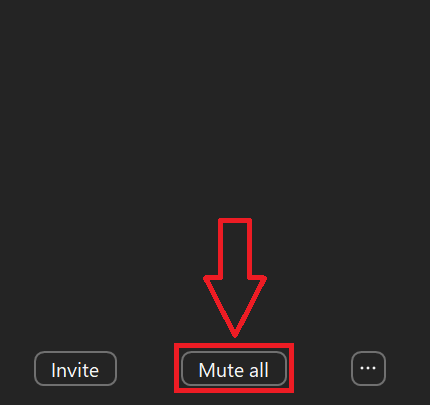
- Click 'Mute All': In the 'Participants' panel, find the 'Mute All' button at the bottom. Clicking this button will mute participants in the meeting.

Granting Permission to Unmute
Allowing Zoom meeting participants to unmute themselves
- Option in 'Participants' menu: After using the meeting mute function, you may want some participants to speak later. To do this, go back to the 'Participants' panel and find the 'Allow participants to unmute themselves' checkbox. You can also have a co-host manage this task.
- Check the box: By checking this box, you give participants the ability to use the unmute button when they need to speak.
Managing participant permissions
- Individual unmuting: Sometimes, you might want only specific participants to unmute. Hover over the participant's name in the 'Participants' panel, click 'More,' and select 'Ask to Unmute.' This sends a request to the participant, allowing them to unmute their microphone.
- Pre-approval settings: For recurring meetings, you can set up pre-approved consent for unmuting. In the meeting settings, enable 'Request permission to unmute participants.' This way, participants can grant permission for you to unmute them without needing to ask each time.
By following these instructions, you can easily mute and manage participants in your Zoom meetings, ensuring a smooth and organized session.
How to Mute Individual Participants in a Zoom Meeting
Sometimes, you need to mute specific participants instead of everyone. This can help manage disruptions without silencing the entire group.
Step-by-Step Instructions
Selecting individual participants
- Open the 'Participants' list: During your Zoom session, click on the 'Participants' button in the toolbar at the bottom of the screen. This opens the participants list on the right side.
- Find the participant: Scroll through the list to locate the user you want to mute. If the list is long, you can use the search bar at the top of the 'Participants' panel to quickly find their name.
Using the 'Mute' option
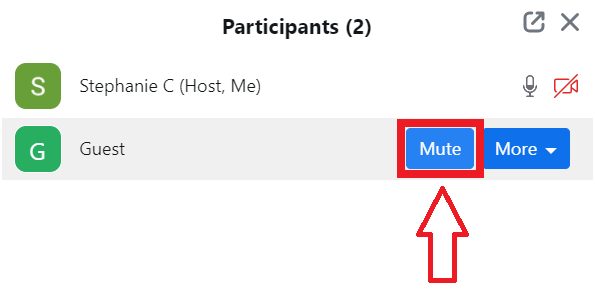
- Hover and select: Hover over the participant's name. When you do this, a 'Mute' button will appear next to their name.
- Click 'Mute': Click the 'Mute' button. This will immediately mute only that participant’s microphone.

Handling Consent for Unmuting
Pre-approved consent settings
- Pre-meeting setup: To streamline this process for future meetings, you can enable pre-approved consent to unmute. When scheduling the meeting, navigate to the 'Meeting Options' section.
- Enable consent: Check the box labeled 'Request permission to unmute participants.' This allows participants to give consent for you to unmute them without needing to ask each time.
- Account-wide settings: For consistent settings across all meetings, sign in as an administrator on your Zoom account. Go to 'Account Management' -> 'Account Settings' -> 'Meeting' tab -> 'In Meeting (Advanced)' section. Enable 'Request permission to unmute' by toggling it on.
By following these steps, you can mute and manage participants effectively, ensuring your Zoom meetings remain orderly and productive.
How to Keep Participants Engaged While Muted
If you mute participants, keeping them engaged can be challenging. But with some strategies, you can make your Zoom meetings interactive and lively.
Creating an Interactive Agenda
Collaboratively creating an agenda
- Involve your team: Before the meeting, involve participants in creating the agenda. Ask for their input on topics to discuss. This makes them feel invested and more likely to pay attention.
- Use collaborative tools: Utilize tools like Google Docs Meeting Notes or shared Excel sheets where everyone can add their points. This ensures everyone has a chance to contribute.
Breaking up the meeting into segments
- Short, focused segments: Divide the meeting into short segments, each focusing on a specific topic. For example, spend the first 10 minutes on updates, the next 15 on brainstorming, and so on.
- Scheduled breaks: Include brief breaks between segments. This helps participants stay fresh and attentive throughout the meeting.
Using Zoom Features for Engagement

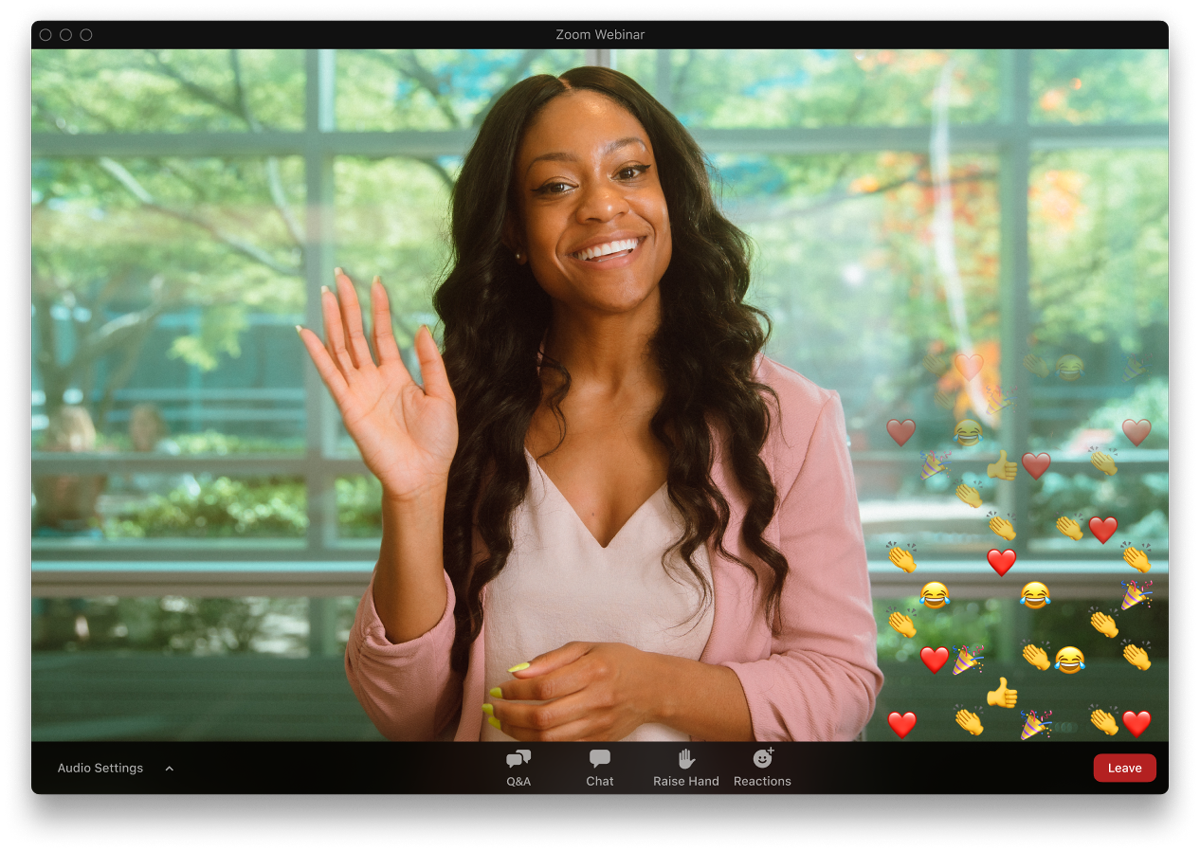
Image from Zoom
Enabling comments and reactions
- Reactions feature: Enable reactions in Zoom so participants can use emojis like thumbs up or clapping hands. This allows them to express themselves without speaking.
- Comments during presentations: Allow participants to leave comments during presentations. They can share their thoughts or ask questions without interrupting the speaker.
Using the chat feature for interaction
- Active chat box: Encourage participants to use the chat feature. They can ask questions, share links, or make comments in real-time.
- Chat moderators: Assign a moderator to monitor the chat. This person can summarize key points or bring up important comments during the meeting.
Incorporating Icebreakers and Activities
Conducting icebreakers
- Start with an icebreaker: Begin the meeting with a fun icebreaker. Ask a simple question like, “What’s your favorite book?” or “Where would you like to travel next?” This helps participants relax and become more engaged.
- Rotate icebreakers: Rotate different types of icebreakers for each meeting. For example, one meeting could start with a quick game, another with a fun fact about each participant.
Organizing energizing activities
- Interactive polls: Use Zoom’s polling feature to ask questions related to the meeting topic. This keeps participants thinking and engaged.
- Virtual activities: Plan short, energizing activities like a quick trivia quiz or a virtual scavenger hunt. These activities can break the monotony and re-energize the group.
By incorporating these strategies, you can keep your participants engaged and active, even when they are muted.
Advanced Tips for Managing Muted Participants
Utilizing Breakout Rooms
Benefits of smaller group discussions
- Focused discussions: Breakout rooms allow smaller groups to discuss specific topics in-depth. This can lead to more detailed and meaningful conversations.
- Increased participation: Participants may feel more comfortable speaking in smaller groups, leading to higher levels of engagement.
- Diverse perspectives: Smaller groups can bring out diverse ideas and solutions that might not surface in larger settings.
Instructions for setting up breakout rooms
- Enable breakout rooms: In your Zoom account settings, make sure the breakout room option is enabled.
- Create rooms during the meeting: Once the meeting starts, click on the “Breakout Rooms” button in the meeting controls.
- Assign participants: Choose to assign participants manually, automatically, or let them select their own rooms.
- Monitor discussions: You can move between breakout rooms to monitor discussions and provide input as needed.
Encouraging Self-Expression
Using custom Zoom backgrounds
- Personal touch: Encourage participants to use custom backgrounds that reflect their personality or interests. This can make the meeting feel more personal and engaging.
- Theme-based meetings: Occasionally, set a theme for your meeting backgrounds. For example, “favorite vacation spot” or “dream office.”
Allowing creative self-expression
- Props and attire: Allow participants to bring props or wear attire related to the meeting’s theme. This can add a fun, creative element to the meeting.
- Interactive elements: Consider incorporating activities where participants can show off their backgrounds or props, such as a quick “background tour” or “prop show and tell.”
Including Entertainment
Incorporating live entertainment
- Music sessions: Invite a musician to play live music during breaks or at the beginning of the meeting. This can create a relaxed and enjoyable atmosphere.
- Comedy acts: A short performance by a comedian can lighten the mood and provide a refreshing break from serious discussions.
Keeping the meeting lively and enjoyable
- Interactive games: Include interactive games that participants can join, like virtual bingo or trivia. These activities can be a great way to keep everyone engaged.
- Special guests: Occasionally invite a special guest speaker or performer. This can add an element of surprise and excitement to your meetings.
By utilizing breakout rooms, encouraging self-expression, and including entertainment, you can significantly enhance the experience for muted participants. These advanced tips can make your Zoom session more engaging and enjoyable for everyone involved.
{{rt_cta_ai-convenience}}
How Tactiq Enhances Zoom Meetings

Tactiq is an advanced tool designed to enhance your Zoom meetings by offering live transcriptions, AI-generated summaries, and customizable prompts. Here’s how it can improve your experience:
- Real-time Transcriptions and AI Summaries: Tactiq provides live transcriptions and generates AI summaries, ensuring you capture key points without manual note-taking.
- AI Meeting Kits and Prompts: Tactiq offers AI meeting kits and customizable prompts to streamline follow-up tasks, such as writing Jira tickets or emails.
- Post-Meeting Follow-Up: Tactiq’s AI-powered assistant creates detailed summaries and follow-up emails, reducing the time and effort needed for post-meeting tasks.
- Seamless Integration: Tactiq integrates with Zoom and other productivity tools, automating follow-up activities with reusable one-click actions, ensuring you maximize your meeting productivity.
By leveraging Tactiq's powerful features, you can transform your Zoom meetings into efficient, well-documented, and productive sessions. Download the free Tactiq Chrome Extension today!
Muting all participants helps reduce background noise and distractions, so everyone can focus on the agenda and the speaker. This keeps your meetings organized and efficient, saving you time and ensuring all key points are covered.
To mute everyone, open your Zoom meeting, click the 'Participants' button, and select 'Mute All' at the bottom of the panel. This instantly silences all participants, helping you maintain order and keep the meeting on track.
You can keep participants engaged by creating an interactive agenda, using Zoom’s reactions and chat features, and incorporating icebreakers or energizing activities. These strategies ensure everyone stays involved and attentive, even when they can’t speak.
Use breakout rooms for focused small-group discussions, encourage self-expression with custom backgrounds or themed meetings, and include entertainment like live music or games. These approaches make your meetings more lively and enjoyable, boosting engagement for everyone.
Tactiq provides live transcriptions, AI-generated summaries, and automated follow-up actions, so you never miss key points and save time on manual note-taking. With seamless integration, you can focus on the meeting while Tactiq handles documentation and follow-ups for you.
Want the convenience of AI summaries?
Try Tactiq for your upcoming meeting.
Want the convenience of AI summaries?
Try Tactiq for your upcoming meeting.
Want the convenience of AI summaries?
Try Tactiq for your upcoming meeting.


