How to Schedule a Google Meet on Desktop and Mobile
July 23, 2024
July 23, 2024
June 12, 2025
June 12, 2025

Scheduling a Google Meet in advance can help you stay organized and ensure everyone is prepared. Google Meet is a powerful tool for virtual meetings, making it easy to connect with colleagues or clients. Knowing the importance and benefits of scheduling a Google Meet can transform how you manage your time and meetings.

Importance of Scheduling Meetings in Advance
Scheduling meetings in advance allows attendees to prepare. When everyone knows the date and time, they can set aside the necessary time to attend. This preparation leads to more productive meetings. Additionally, you'll avoid last-minute conflicts and ensure that all key participants can join.
Benefits of Using Google Meet for Scheduled Meetings
Google Meet offers features that enhance virtual meetings. You can share screens, present slides, and use breakout rooms. Scheduling with Google Meet integrates seamlessly with Google Calendar, sending automatic reminders to participants.
Scenarios Where Scheduled Meetings are Crucial
Certain scenarios demand scheduled meetings. For instance, team meetings often require everyone to be present to discuss project progress. Client calls need to be scheduled to ensure client availability. Webinars, which often involve many participants, must be planned in advance to ensure broad attendance and smooth execution.
How Scheduling Enhances Productivity and Organization
Scheduled meetings help you maintain a structured day. Knowing your schedule allows you to allocate time for preparation and follow-up tasks. It also helps in prioritizing your workload and reduces the chances of overbooking.
Scheduling your Google Meet sessions can transform how you manage your meetings, ensuring that they are productive, organized, and beneficial for all participants.
How to Schedule a Google Meet from Google Meet Interface
Google Meet makes scheduling meetings straightforward. Whether you need an instant meeting or one planned for later, Google Meet provides easy-to-follow steps. Here’s how to schedule a Google Meet directly from the Google Meet interface.
Step-by-Step Guide to Scheduling a Meeting
- Open Google Meet: Go to meet.google.com.
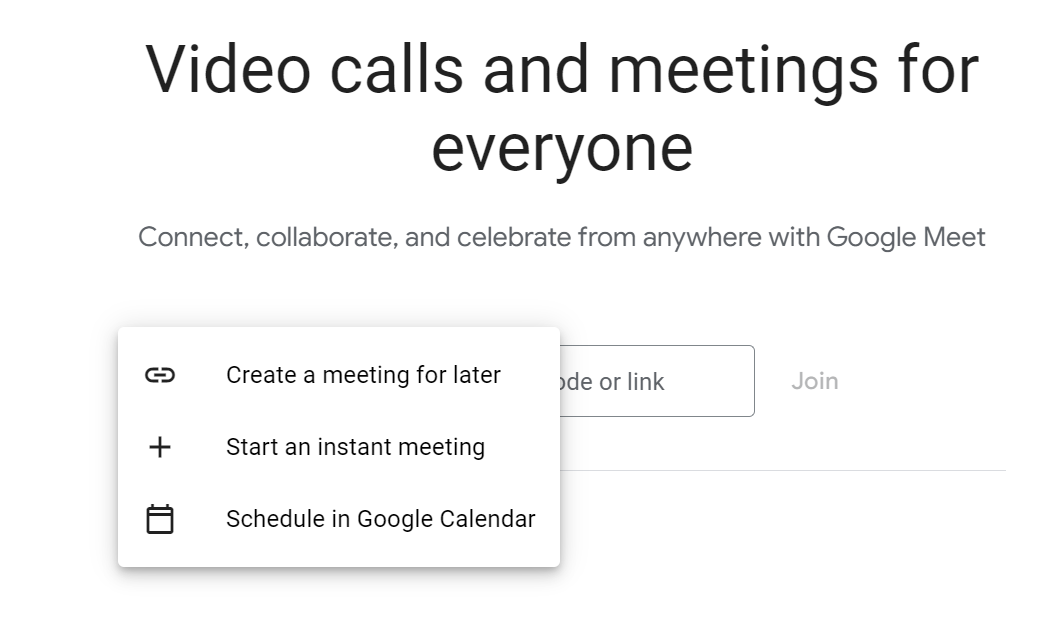
- Click “New Meeting”: Located on the homepage.
- Choose Your Option:
- Create a meeting for later: Generates a meeting link for future use.
- Start an instant meeting: Launches a meeting immediately.
- Schedule in Google Calendar: Redirects you to Google Calendar for detailed scheduling. Fill out the details and hit “Save.”
Tips for Sharing Meeting Details
- Copy Link: After generating a link, click the copy icon. Paste it into an email, chat, or calendar invite.
- Email Invite: Use the email invite option to send details directly from Google Meet.
- Calendar Invite: If scheduling through Google Calendar, include the meeting link in the event description.
Importance of Checking Meeting Code Expiration
Google Meet codes have expiration dates, essential for avoiding access issues.
- Regular Meetings: Codes expire 365 days after the last use.
- Recurring Meetings: Codes expire 365 days after the last session.
- Classroom Meetings: Codes tied to Google Classroom last as long as the class is active.
Sending Meeting Invites via Email or Link
After generating a meeting link, you can invite participants:
- Copy Meeting Invite: Click “Copy meeting invite” to share via email, chat, or other platforms.
- Share via Email: Click “Share via email” to open a new email draft in Gmail with the meeting details pre-filled. Add recipients and send.
Best Practices:
- Clear Subject: Use a clear and relevant subject line for the invite email.
- Detailed Information: Include date, time, and agenda in the email body.
- Reminders: Send reminders to participants before the meeting.
Pre-Meeting Setup: Allowing Microphone and Camera Permissions
Before joining your first meeting, ensure you allow permissions for your microphone and camera:
- Join Meeting: Click the “Join now” button.
- Permission Requests: A pop-up will request access to your microphone and camera.
- Allow Access: Click “Allow” to grant permissions.
- Check Settings:
- Microphone: Click the microphone icon to turn it on or off.
- Camera: Click the camera icon to enable or disable video.
Scheduling Google Meet via Google Calendar
Using Google Calendar to schedule a Google Meet is an effective way to ensure all participants receive the meeting details and reminders. Here’s how to schedule a meeting using Google Calendar:
Creating an Event on Google Calendar with a Video Meeting Link
- Open Google Calendar: Visit Google Calendar.
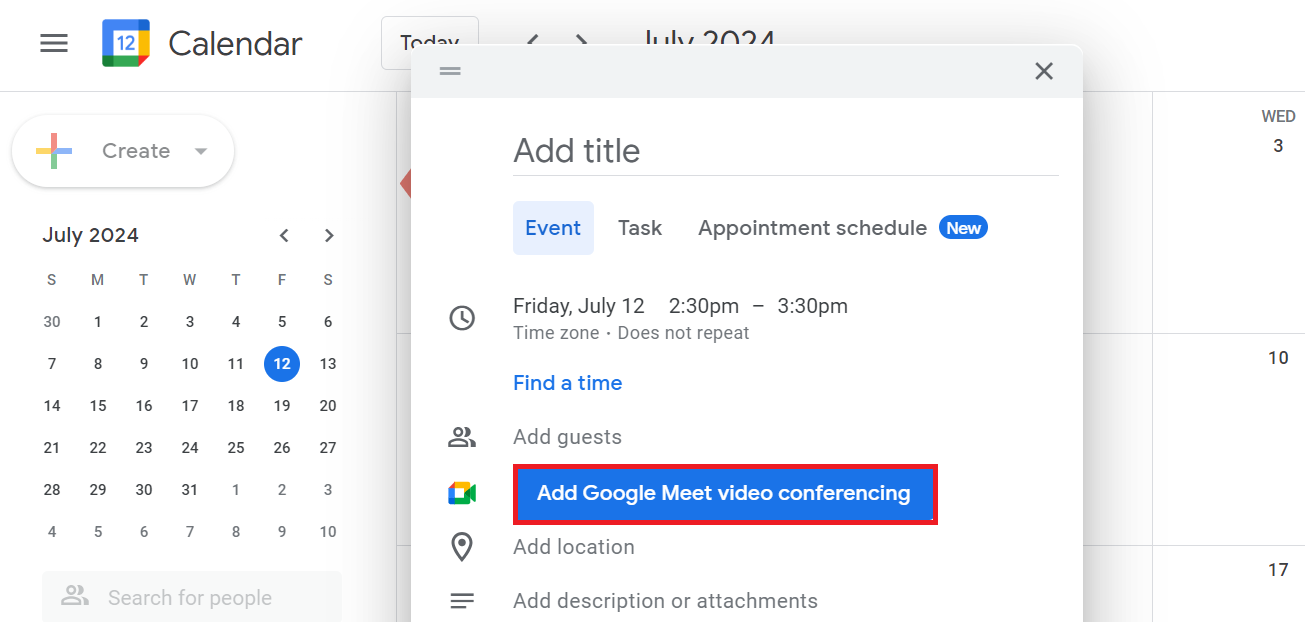
- Create a New Event: Click the “+ Create” button in the top left corner or click on a time slot in the calendar.
- Fill in Event Details:
- Event Title: Enter a clear, descriptive title for your meeting.
- Date and Time: Set the date and time for the meeting.
- Add Google Meet Video Conferencing: Click “Add Google Meet video conferencing” to generate a video meeting link. This link will be included in the event details.
Adding Guests and Sending Invites
To invite participants:
- Add Guests: In the “Add guests” field, enter the email addresses of the people you wish to invite. Google Calendar will automatically send them an email invitation.
- Notify Guests: Click “Save” after adding all necessary details. A pop-up will ask if you want to send invitation emails to guests. Click “Send” to notify participants.
Managing Guest Permissions and Meeting Access
Managing who can join and what they can do in the meeting is crucial for security and efficiency:
- Guest Permissions: In the “Guests” section, you can manage permissions by checking or unchecking options for guests to:
- Modify the event.
- Invite others.
- See the guest list.
- Meeting Access: Click on the “Video call options” to adjust settings like:
- Host Controls: Enable settings such as “Host must join before anyone else” to ensure the meeting starts only when you are ready.
Scheduling a Google Meet from Mobile Devices
Mobile devices make scheduling Google Meets convenient when you're on the go. Here's how to do it using both the Google Meet and Google Calendar apps.
Using Google Meet on Mobile
Steps to Schedule a Meeting Using the Google Meet Mobile App:
- Open the Google Meet App: Download and open the Google Meet app from your device's app store.
- Sign In: Ensure you're signed into your Google account.
- Start a New Meeting:
- Tap the “New Meeting” button.
- Select “Schedule in Google Calendar” to create a future meeting.
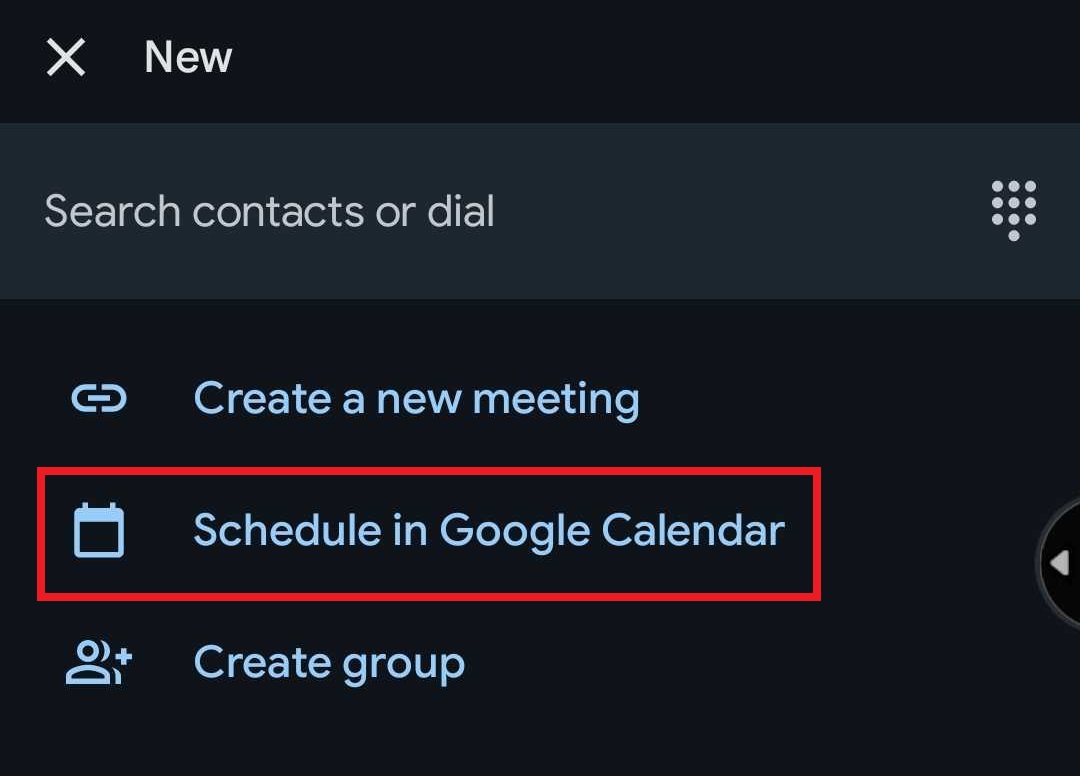
- Fill in Meeting Details: This will redirect you to the Google Calendar app where you can:
- Enter the meeting title.
- Set the date and time.
- Add a description if necessary.
Sharing Meeting Details from the Mobile App:
- Copy Meeting Link: Once the meeting is scheduled, a link is generated.
- Share Link: Tap the link to copy and share it via messaging apps, email, or social media.
Using Google Calendar on Mobile
Scheduling a Meeting Through Google Calendar App:
- Open Google Calendar App: Download and open the Google Calendar app.
- Create a New Event:
- Tap the “+” button at the bottom-right corner.
- Select “Event” from the options.
- Enter Event Details:
- Title: Provide a clear, concise meeting title.
- Date and Time: Set the desired date and time for the meeting.
- Add Google Meet Video Conferencing: Tap “Add conferencing” or “Add Google Meet” to generate a meeting link.
Adding Guests and Managing Invites on Mobile:
- Invite Guests:
- Tap the “Add guests” field.
- Enter the email addresses of the participants.
- Send Invites: After filling in all details, tap “Save” or “Done”.
- Choose to send email invitations to notify guests.
- Manage Permissions:
- Adjust guest permissions by checking or unchecking options such as allowing guests to modify the event or invite others.
How to Control Meeting Access with Host Controls
Mastering host controls in Google Meet is essential for managing and securing your meetings. Here's a detailed guide on how to use these controls effectively.
Using Host Controls to Manage Participant Access
Steps:
- Access Host Controls:
- During the meeting, click on the lock icon in the bottom-right corner.
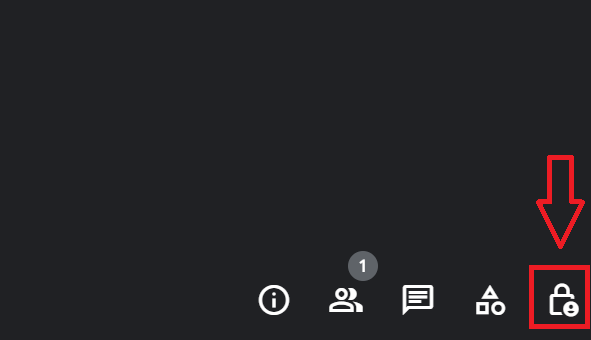
- Manage Participant Permissions:
- Turn on/off Microphone: Control who can mute or unmute themselves.
- Turn on/off Camera: Decide if participants can use their video.
- Chat: Enable or disable chat for all participants.
Different Types of Meeting Access
Google Meet offers three types of meeting access settings:
- Open:
- Anyone with the link can join: No need to request access.
- Best for: Public events or large webinars.
- Trusted:
- Participants within your organization can join without knocking: External participants need to request access.
- Best for: Team meetings or collaborations with known partners.
- Restricted:
- Only invited participants can join: Others must request access and be admitted by the host.
- Best for: Confidential meetings or sensitive discussions.
Tips for Recurring Meetings and Maintaining Settings
Recurring Meetings:
- Set Up Recurrence:
- When scheduling a meeting in Google Calendar, select the “Does not repeat” dropdown.
- Choose the appropriate recurrence (daily, weekly, monthly).
- Maintain Consistent Settings:
- Ensure host controls are configured consistently for all occurrences.
- Any changes to one instance should be replicated across all future instances.
Maintaining Settings:
- Regularly Review Permissions: Periodically check host controls to ensure they align with your meeting's needs.
- Communicate with Participants: Inform attendees of any changes to meeting access or permissions to avoid confusion.
{{rt_cta_ai-convenience}}
How Tactiq Enhances Google Meet Calls

Tactiq is a powerful tool that integrates seamlessly with Google Meet to enhance your meeting experience. It offers real-time transcription, automatic note-taking, and AI-powered summaries. Designed to simplify meeting management, Tactiq ensures you capture every critical detail without the hassle of manual note-taking.
Benefits of Using Tactiq for Improved Productivity and Meeting Management
Using Tactiq significantly boosts productivity and streamlines meeting management.
- Enhanced Focus:
- With Tactiq handling transcriptions, you can focus on the discussion rather than taking notes.
- Benefit: More engaged and effective participation in meetings.
- Efficient Follow-Ups:
- Tactiq's AI pulls actionable insights from your notes to craft follow-up emails and updates.
- Benefit: Streamlines post-meeting tasks, ensuring nothing is missed.
- Integration with Productivity Tools:
- Tactiq integrates with tools like Google Calendar and Gmail.
- Benefit: Simplifies scheduling and sharing meeting invites, saving you time and effort.
- Comprehensive Documentation:
- Every meeting is fully documented, with transcripts and summaries saved for future reference.
- Benefit: Easy retrieval of past discussions and decisions, aiding in long-term project management.
By leveraging Tactiq's capabilities, you can transform your Google Meet sessions into highly productive and well-documented meetings, ensuring that all critical information is captured and easily accessible. Download the free Tactiq Chrome Extension today.
Troubleshooting Common Issues with Google Meet
Running into issues with Google Meet? Here are some common problems and their solutions:
- Connection Problems:
- Solution: Ensure a stable internet connection. If problems persist, try restarting your router or switching networks.
- Audio Issues:
- Solution: Check your microphone settings. Make sure Google Meet has access to your microphone in your browser's settings.
- Video Problems:
- Solution: Verify your camera settings and permissions. If the issue continues, try updating your browser or using a different one.
- Joining Issues:
- Solution: Ensure you have the correct meeting link and that the host has admitted you if necessary. Clear your browser cache if problems persist.
You can schedule a Google Meet by visiting meet.google.com, clicking 'New Meeting,' and choosing to create a meeting for later or schedule it in Google Calendar. This helps you and your participants prepare ahead, avoid last-minute conflicts, and ensure everyone is ready for a productive session.
Google Meet offers features like screen sharing, breakout rooms, and seamless integration with Google Calendar, which sends automatic reminders. These tools help you run efficient meetings and keep everyone on track, so you can focus on collaboration instead of logistics.
Tactiq provides real-time transcription, automatic note-taking, and AI-powered summaries during your Google Meet calls. This means you can stay engaged in the conversation while Tactiq captures every detail, making follow-ups and documentation effortless.
After scheduling, copy the meeting link or use the email invite option to share details. When using Google Calendar, add guests and manage permissions to control who can join, modify the event, or invite others, ensuring your meeting stays secure and organized.
Check your internet connection, microphone, and camera permissions, and ensure you have the correct meeting link. Addressing these basics quickly helps you join meetings smoothly and stay focused on your agenda.
Related articles


_Main.jpg)


Want the convenience of AI summaries?
Try Tactiq for your upcoming meeting.
Want the convenience of AI summaries?
Try Tactiq for your upcoming meeting.
Want the convenience of AI summaries?
Try Tactiq for your upcoming meeting.