Blur Background in Google Meet (Desktop and Mobile)
July 19, 2024
July 19, 2024
July 21, 2025
July 21, 2025

Do you ever wish you could hide the messy background during a Google Meet call? Whether you're working from home or on the go, Google Meet's background blur feature can help you maintain privacy and look professional. Let's dive into what this feature is, why it's important, and what other visual effects you can use.
What is Google Meet Background Blur?
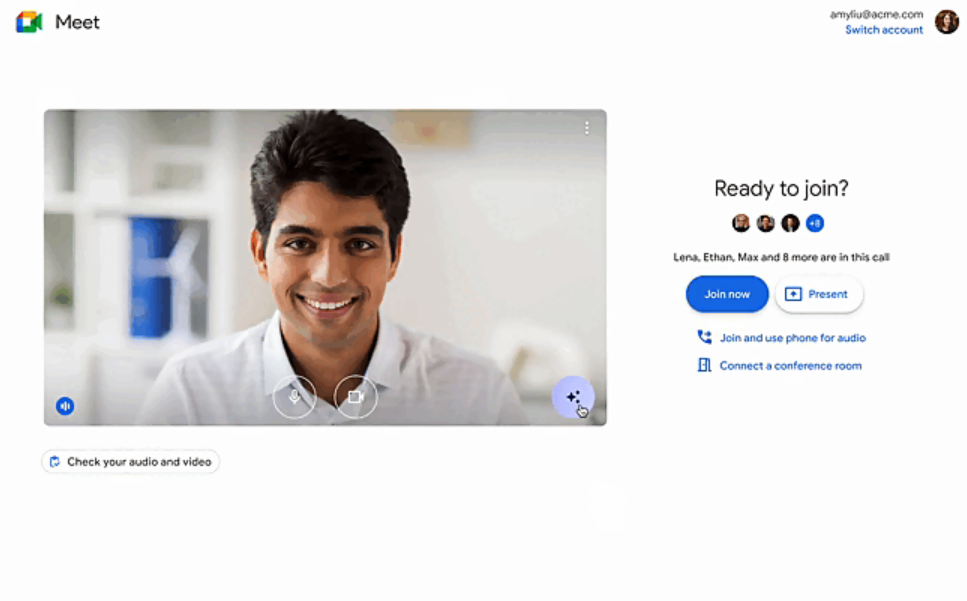
Image from Google
Google Meet's background blur feature helps you blur the area behind you during video calls. This allows you to focus attention on yourself and not what's happening in your surroundings. The feature works by using software to detect your outline and apply a blur effect to everything else in the frame.
Why Use Background Blur in Google Meet?
Background blur in Google Meet offers several key advantages, making it a valuable tool for anyone participating in virtual meetings. Let's explore the benefits in detail.
Reducing Distractions During Meetings
- Keeps Focus on You: A blurred background helps keep the attention on you rather than on what's happening around you. This is particularly useful if you have a busy or cluttered environment.
- Minimizes Visual Noise: By blurring out the background, you eliminate any unnecessary visual clutter that could distract other meeting participants.
Enhancing Professional Appearance
- Clean and Polished Look: Using background blur gives you a more professional appearance, even if your actual surroundings are not ideal.
- Consistency: It provides a consistent look across all your meetings, helping you maintain a professional image regardless of where you are.
Protecting Sensitive Information from Being Visible
- Privacy Protection: Blurring your background ensures that sensitive or personal information in your surroundings is not visible to others.
- Confidentiality: This is especially important in professional settings where confidential information might be present in your workspace.
These benefits make background blur a must-have feature for anyone looking to improve their virtual meeting experience.
How to Blur Your Background Before Joining a Google Meet Session
Blurring your background before joining a Google Meet session ensures you appear professional right from the start. Follow these steps to apply the background blur effectively.
- Open Google Meet: Go to the Google Meet website and sign in to your account.
- Join or Start a Meeting: Either join an existing meeting or click on "New Meeting" to start a new one.
- Access Video Preview Window: Before entering the call, you'll see a video preview. This is where you can adjust your settings.
- Click on Visual Effects: In the lower right corner, you’ll find an icon with three stars or dots. Click on this icon to open the "Apply visual effects" menu.
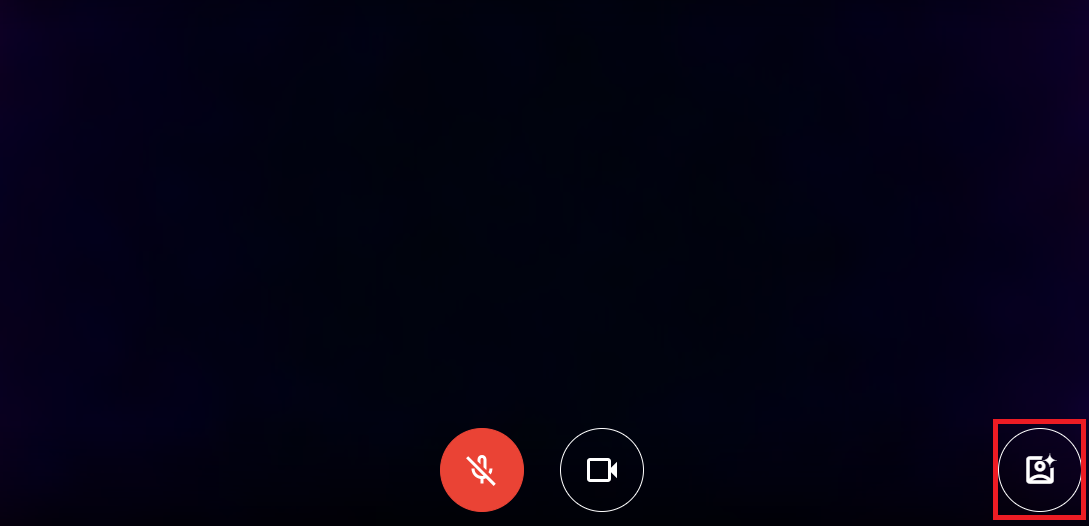
- Select Blur Options: You’ll see two blur options—“Slightly blur” and “Blur”. Choose the one that fits your needs:
- Slightly Blur: Offers a mild blur effect, keeping the background somewhat visible.
- Blur: Use this option to completely blur your background.
Tips for Ensuring the Blur Effect is Properly Applied
- Check Lighting: Proper lighting ensures that the blur effect works well. Avoid backlighting and ensure your face is well-lit.
- Update Browser: Make sure your browser is up-to-date. Google Meet works best on the latest versions of Chrome and Firefox.
- Enable Hardware Acceleration:
- Open your Chrome browser.
- Go to Menu > Settings > Advanced > System.
- Turn on "Use hardware acceleration when available".
- Restart your browser.
How to Blur Your Background During a Google Meet Session
Sometimes, you might need to blur your background after the meeting has already started. Here’s how to do it seamlessly.
- Open the Meeting Controls: During the meeting, move your cursor to the bottom of the screen to reveal the meeting controls.
- Click on the Three Dots Menu: This icon, located at the bottom right, opens additional settings.
- Select 'Apply Visual Effects': Click on this option to access background settings.

- Choose Your Blur Option: You'll see the same options as before—“Slightly blur” and “Blur”. Select the one that suits your needs.
Managing Performance Issues When Using Background Effects
Blurring your background can sometimes affect your device’s performance. Here are some tips to manage these issues:
- Ensure Your Device Meets Requirements:
- Browser Version: Use Chrome version M114 and up or Firefox 110 and up.
- Enable Hardware Acceleration: This improves performance by offloading tasks to your GPU.
- Optimize Device Settings:
- Close Unnecessary Applications: This frees up system resources.
- Adjust Effects Based on Performance:
- Use Cloud-Based Processing: Google Meet can adjust between device and cloud-based processors, especially for devices with fewer than 8 logical cores.
- Lower Effect Intensity: Opt for “Slightly blur” if “Blur” causes performance issues.
Troubleshooting Common Issues with Background Blur in Google Meet
Sometimes, using the background blur feature in Google Meet isn’t as smooth as expected. Here’s how to handle common issues to ensure a seamless experience.
Tips for Optimizing Device Performance for Better Effect Quality
Follow these steps to enhance device performance and improve background blur quality:
- Update Browser and Operating System:
- Keep Software Up-to-Date: Ensure you’re using the latest version of Chrome, Firefox, or Edge.
- Regular OS Updates: Keep your operating system updated to improve overall performance.
- Close Unnecessary Applications:
- Free Up Resources: Close apps and browser tabs that you don’t need during your meeting to free up system resources.
- Background Processes: Open Task Manager (Ctrl + Shift + Esc) and end tasks that consume high CPU or memory.
- Adjust Visual Effects Settings:
- Choose Lower Intensity Effects: If your device struggles with “Blur”, try “Slightly blur” instead.
- Disable Other Effects: Turn off other visual effects in Google Meet to focus on background blur only.
Fix issues with background blur in Google Meet
By addressing these common problems and optimizing your device settings, you can fix issues with background blur in Google Meet effectively. Ensuring hardware acceleration and WebGL support are enabled, along with keeping your software updated, will make the background blur feature work seamlessly.
Advanced Visual Effects and Background Options
Google Meet offers more than just blurring your background. You can explore advanced visual effects and background options to enhance the look of your video calls.
What Are the Different Types of Backgrounds in Google Meet?
Google Meet provides various background types to suit different needs and preferences. Here are the main categories:

- Immersive Backgrounds: These backgrounds create a more engaging environment by using animated effects. Imagine attending a meeting from a virtual beach or a bustling cityscape.
- Static Backgrounds: These are still images that can replace your real background. They include office settings, home interiors, and neutral patterns. Static backgrounds are great for maintaining a professional appearance.
- Seasonal Backgrounds: These backgrounds change according to the season or holidays. For example, you might find festive backgrounds during Christmas or autumn-themed ones in the fall.
- Custom Image Uploads: Google Meet allows you to upload your own images to use as backgrounds. This feature is perfect for personalizing your meeting space with company logos, custom designs, or favorite photos.
To use these backgrounds:
- Open Google Meet: Start or join a meeting.
- Apply Visual Effects: Click on the “Apply visual effects” button located at the bottom of your self-view.
- Choose a Background: Select from the available options or upload your own image by clicking “Upload”.
How to Use Filters and Adjust Lighting
Filters and lighting adjustments can drastically improve your video quality. Here's how to make the most of these features:
- Applying Filters and Special Effects:
- Open Visual Effects: During your meeting, click on the “Apply visual effects” button.
- Select Filters: Navigate to the “Filters” tab. You’ll find options like virtual sunglasses, 3D effects, and festive animations.
- Choose a Filter: Click on the filter you want to apply. Some filters might require on-screen instructions to activate.
- Adjusting Video Lighting and Framing:
- Video Lighting: Good lighting is crucial for a clear video. In the “Appearance” tab, you can adjust the brightness and contrast of your video. Proper lighting makes your face clear and reduces shadows.
- Framing: Ensure your camera is at eye level and centered. This positioning gives a more professional look and keeps the focus on you.
- Advanced Settings: Click on “Adjust” to fine-tune the lighting. Increase brightness in a dark room, or reduce glare if there’s too much light.
By exploring these advanced visual effects and background options, you can make your Google Meet sessions more dynamic and engaging. Whether you’re using an immersive background, applying fun filters, or simply adjusting your lighting, these tools help you present your best self in every meeting.
{{rt_cta_ai-convenience}}
How Tactiq Can Enhance Your Google Meet Experience
Tactiq is a powerful tool designed to make your Google Meet sessions more productive and engaging. Let's look at how Tactiq's features can enhance your meetings.

Overview of Tactiq's Automatic Note-taking Feature
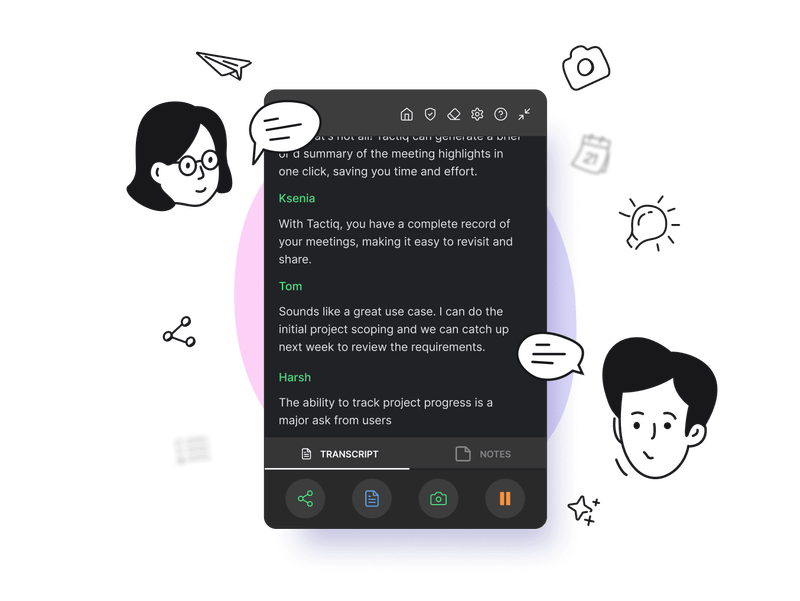
Tactiq offers an automatic note-taking feature that captures every word spoken during your Google Meet sessions. This tool transcribes your meetings in real-time, ensuring that you never miss an important detail.
- Real-time Transcription: As participants speak, Tactiq converts spoken words into text instantly.
- Highlight Key Points: You can highlight essential parts of the conversation by simply clicking on the text during the meeting.
- Automatic Summaries: Tactiq generates summaries of your meetings, giving you an overview of the discussion without sifting through full transcripts.
Benefits of Capturing Meeting Details Efficiently
Efficient capture of meeting details can vastly improve your workflow and productivity. Here’s how Tactiq makes a difference:
- Accuracy: Tactiq’s transcription is highly accurate, reducing the risk of misunderstandings.
- Time-saving: By automating note-taking, you save time that you would otherwise spend manually writing notes.
- Focus: With Tactiq handling the note-taking, you can focus entirely on the meeting, participating actively instead of worrying about missing key points.
Key benefits:
- Enhanced Engagement: Focus on the conversation without the distraction of manual note-taking.
- Easy Follow-ups: Quickly review key points and action items after the meeting.
- Shareability: Easily share meeting summaries and highlights with team members who couldn’t attend.
Integration steps:
- Install the Extension: Download and install the Tactiq extension from the Chrome Web Store.
- Join a Meeting: Once the extension is set up, join a Google Meet session.
- Activate Tactiq: The Tactiq interface will appear, ready to transcribe and capture notes.
Using Tactiq with Google Meet not only enhances your meeting experience but also boosts your overall productivity. The combination of automatic note-taking, efficient detail capture, and seamless integration makes Tactiq an invaluable tool for anyone looking to maximize their Google Meet sessions.
Tips for Making the Most of Google Meet Background Features
Google Meet offers various background effects to enhance your video conferencing experience. These features not only help maintain privacy but also add a professional touch to your meetings. Here are some tips to get the most out of these background features.
Best Practices for Selecting and Applying Background Effects
Choosing the right background effect can make a significant difference in your meetings. Follow these best practices:
- Match the Meeting Context: Select backgrounds that match the nature of the meeting. For professional meetings, choose neutral or office-like backgrounds.
- Avoid Distracting Elements: Ensure your chosen background is simple and not too busy. Distracting elements can take attention away from you.
- Use High-Quality Images: If you upload custom backgrounds, use high-resolution images to avoid pixelation.
- Test Before Meeting: Always test your background before the meeting starts. This helps in adjusting the positioning and ensuring everything looks good.
Combining Background Effects with Other Productivity Tools
Maximize your Google Meet background features by integrating them with other productivity tools:
- Use Tactiq for Note-taking: While Google Meet manages your background, Tactiq can handle the note-taking. This combination allows you to focus on the meeting without distractions.
- Integrate with Calendar Apps: Sync your Google Meet with calendar tools like Google Calendar to keep track of your meetings and prepare in advance.
- Screen Sharing Tools: Pair background effects with screen-sharing tools to present information professionally without revealing your actual surroundings.
Google Meet's background blur keeps the focus on you by softening everything behind you, reducing distractions and visual clutter. This helps you maintain privacy and a professional appearance, even if your surroundings are less than ideal.
To blur your background before joining, open Google Meet, join or start a meeting, and use the video preview window to access visual effects. Click the icon with three stars or dots, then choose either 'Slightly blur' or 'Blur' to apply the effect before entering the call.
If you experience performance issues, update your browser, enable hardware acceleration, and close unnecessary applications to free up resources. You can also select 'Slightly blur' instead of 'Blur' for a lighter effect that demands less from your device.
Tactiq automatically transcribes your meetings in real time and generates summaries, so you never miss important details. With Tactiq handling note-taking, you can focus fully on the conversation and easily review or share key points afterward.
Select backgrounds that match your meeting's context and avoid busy or distracting images. Always test your background before the meeting, use high-quality images for uploads, and combine background effects with tools like Tactiq for a seamless, professional experience.
Related articles


_Main.jpg)


Want the convenience of AI summaries?
Try Tactiq for your upcoming meeting.
Want the convenience of AI summaries?
Try Tactiq for your upcoming meeting.
Want the convenience of AI summaries?
Try Tactiq for your upcoming meeting.