Everything You Need to Know about Zoom Clips
April 3, 2025
April 3, 2025
September 13, 2025
September 13, 2025

When Zoom Clip was announced, I initially thought it was a feature for sharing a few seconds of clips from your longer Zoom recording. That way, people could watch important meeting highlights without watching the full recording. As it turned out, it is way better than I thought.
Zoom Clip is an essential tool for any remote professional, especially if Zoom is your top choice for video conferencing tools. You don’t have to set up a Zoom meeting every time. Sometimes, recording your screen or short video messages is enough, especially if your team is working in different time zones.
In this blog post, we’ll talk about Zoom Clip’s features, how to share it, and how you can optimize your meeting workflows.
What is Zoom Clip?
Zoom Clip offers a convenient solution for recording your screen and camera.
In short, it’s Zoom’s version of Loom. You’ll use it when trying to show a workflow, troubleshoot an issue, or record an onboarding video. The goal is for you to share a quick video that anyone can watch and comment on.
Zoom Clips features
Zoom Clip's advanced features include:
- Virtual background: Add a virtual background when recording with a camera.
- Add chapters: If your video is longer than 10 seconds, you can add chapters.
- Comments and reactions: Viewers can leave comments and emoji reactions.
- Basic editing tools: Trim the beginning and end of your recordings.
- Add notes: Add text, draw, stamp, or spotlight.
- Add a CTA button: Add a specific action and a link.
- Customize it: You can also add your logo and colors.
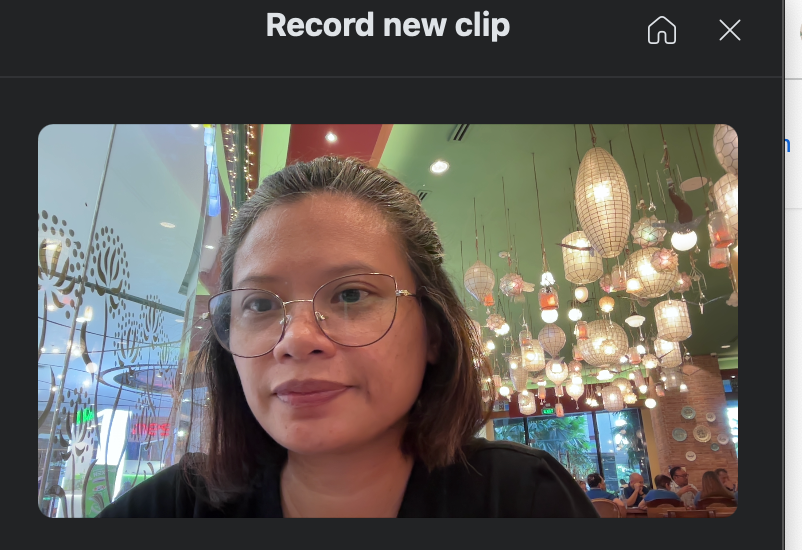
Zoom Clips demo
Here’s a quick look at how it works.
Zoom clip is available on the browser, Zoom app for your desktop, and phone.
Zoom Clips cost and limit
The good news is that you can use Zoom Clip even with a free Basic Zoom account. You’ll be limited to a two-minute recording and up to five clips.
If you want unlimited videos with no time limit, you’ll need a Zoom Pro account, which is 13.33 USD per month when billed annually and 15.99 USD when billed monthly. Note that the price may change, so please check Zoom’s pricing page for the latest pricing.
It’s also available in these plans:
- Legacy Enterprise
- Zoom Workplace Pro and higher
- Zoom Meeting EDU
- Zoom One Education
- Healthcare New
- Online BAA
These are the main plans where Zoom Clips is available. However, features and limitations may vary depending on your specific plan and region. Be sure to check with your Zoom administrator or account settings for detailed information about your access to Zoom Clips.
How to Record a Zoom Clip
Now, let’s explore how to create different types of recordings using Zoom Clips.
Web/Browser
The recording process from the browser and the Zoom app is essentially the same. If you start from a browser like Google Chrome, you can choose Zoom Clip from the navigation menu. But once you click it, it will open the Zoom app.
Note that if you don’t have the Zoom app, you’ll be prompted to download it.
To create clips on the browser:
- Go to the Zoom Web Portal and sign in to your account.
- Look for the Clips tab in the left sidebar. Sometimes, it will also appear on the home page with a blue button that says “New clip.”
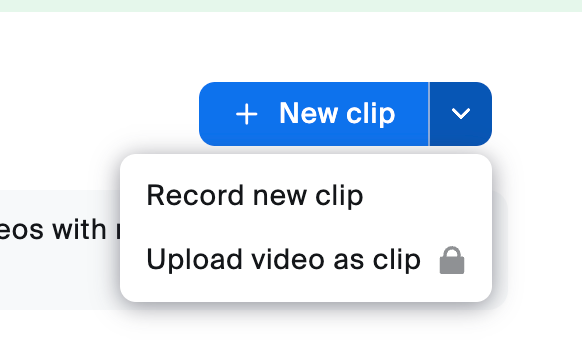
- Click "+New clip" or click the downdrown menu button where you’ll see “Record new clip or upload video as a clip.”
- This will open the Zoom app.
- Choose what you want to record:
- Camera only
- Screen only
- Camera and screen together
- Adjust your audio and video settings if needed.
- Hit Record when ready.
- Click Stop when finished. You can also hit the pause button in the menu bar to pause the recording.
- Preview your recording and make any quick edits.
Zoom Desktop App (Mac, Windows, Linux)
To record a Zoom Clip directly from the Zoom app:
- Open the Zoom Workplace app.
- Click on “More,” then “Clips.”

- Choose whether you want to record your screen only, your screen and your camera, or your camera only.
- Click “Start Recording.”
- When finished recording, click "Stop" to end your recording.
- Preview your clip and make any necessary edits using the basic editing tools.
- Add a title and description, then click "Save" to finalize your clip.
Mobile (Android, iOS)
To record a Zoom Clip on mobile:
- Sign in to the Zoom mobile app.
- Tap the More icon, then tap Clips.
- Tap New clip.
- Choose your recording settings:
- Camera only
- Screen only (screen recording must be enabled in your device settings)
- Tap the Record button to start recording.
- Tap Stop when finished.
- Preview your recording and make any edits if needed.
- Add a title and save.
Note that there will always be a countdown timer, regardless of where you’re recording your clips.
There you have it, the basics of recording a Zoom Clip on your browser, desktop, or phone are pretty much the same. There are variations in the permissions for your mic and camera, depending on your browser of choice and your operating system for desktop or mobile.
How to Share a Zoom Clip
Once you’re done editing your final recording, it’s time to share it.
Here's how to share your Zoom clip:
- Find your clip in your Zoom Clips content library.
- Choose how you want to share it:
- Copy the link: Click the link icon to grab a shareable link quickly.
- Download as MP4: Use the download icon to save it to your device (desktop only)
- Advanced sharing: Click the More (three dots) icon for additional options like:
- Share directly with team members or by email
- Embed it on a webpage (choose responsive or fixed size)
- Adjust link permissions

In general, sharing is similar to downloading a Zoom recording.
One last thing to note about Zoom Clips. Admins have advanced settings to control how a Zoom Clip is shared. This ensures security and prevents the sharing of private information outside of the organization. Don’t be surprised if there are specific features that are missing from your own Zoom account. You just need to talk to your admin and ask them to enable Zoom Clips with your preferred sharing options.
How to Delete Zoom Clips
If you want to delete your video and screen content from Zoom to regain more space, follow these simple steps:
- Navigate to your Zoom Clips page.
- Hover over the clip you want to delete and click the More (three dots) icon.
- Select "Move to trash" and confirm your choice.

Once your deleted clips are moved to the trash, they will stay there for 30 days. After 30 days, it will be permanently deleted. If you change your mind and want to bring back a clip still on the Trash page, just click the three dots and choose “Restore.”
If you don’t want to wait 30 days, click “Delete”, and it will be deleted immediately. Once it’s deleted permanently, you can’t restore it.
Zoom Clips vs. Loom
If you’re wondering, which one is better: Zoom Clips or Loom? If you already have a paid Zoom account and your team generally uses the Zoom ecosystem, it’s easier to integrate Zoom Clips into your workflows. This way, you don’t have to pay extra for another subscription.
If you’re not generally using Zoom and have been using Loom to record videos, it’s probably best to stick with Loom. Loom offers a free account with up to 25 five-minute recordings and similar features, including editing and sharing recordings.
{{rt_cta_ai-convenience}}
How to Generate Transcripts for Zoom Clips
Zoom Clips is one of the tools to help you easily record your workflows. But when this article is written, it doesn’t automatically generate a transcript. That’s where Tactiq becomes handy.
If you want to get a transcript of a Zoom Clip, here’s how:
- Download the Zoom clip.
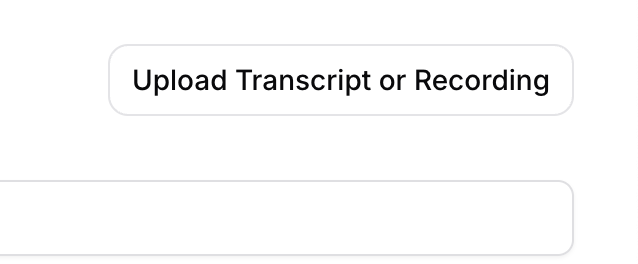
- Log in to Tactiq.io or set up an account if you don’t have one yet.
- Once you’re in the Tactiq dashboard, click “Upload transcript or recording.”
Tactiq will process the video and generate the transcript. Plus, it allows you to get AI summaries. It’s the perfect AI companion for Zoom.
The best part is that you can use Tactiq outside Zoom. It also works with Google Meet and Microsoft Teams. It also has built-in AI workflows to automate tasks from your transcript.
Here’s how to get started using Tactiq:
- Install the Tactiq Chrome extension from the Chrome Web Store.
- Sign up for a free Tactiq account.
- Join your next meeting on Zoom, Google Meet, or Microsoft Teams - Tactiq will automatically start transcribing.
- Access your transcript during or after the meeting through the Tactiq dashboard.
- Use AI features like summaries and action items to get more value from your transcripts.
Using features like Zoom Clips and amplifying them with AI tools like Tactiq is a powerful way to streamline remote collaboration and ensure that no important information gets lost. By combining asynchronous video communication with AI-powered transcription and insights, teams can communicate more effectively and maintain a searchable record of all their important discussions.
It’s A Wrap
Zoom Clips is a great tool that lets you record and share short videos instead of having live meetings. You can use it to make quick how-to guides, give updates to your team, or explain things with video. This makes it easier to communicate with your team without having to schedule meetings all the time.
Combining Zoom Clips with tools like Tactiq gives you the best of both worlds: asynchronous video communication plus AI-powered transcription. Tactiq turns your video messages into searchable text, providing intelligent summaries and action items. This powerful combination helps remote teams communicate effectively and ensures that no important information gets lost.
Use Zoom Clips for quick video messages, tutorials, workflow demonstrations, or when you need to explain something visually without scheduling a live meeting.
No, Zoom Clips is built into the Zoom desktop app and is also accessible via zoom.us. You'll need the Zoom desktop app installed to use it.
Free users can make up to 5 two-minute recordings. Unlimited clips require a Zoom Pro account or higher.
Zoom Clips doesn't include built-in transcription. For transcripts, you can use Tactiq to transcribe and get AI-powered insights from your videos automatically.
Check if you have the latest Zoom version installed and ensure your account/plan includes Zoom Clips access. Contact your Zoom admin if issues persist.
Related articles


_Main.jpg)


Want the convenience of AI summaries?
Try Tactiq for your upcoming meeting.
Want the convenience of AI summaries?
Try Tactiq for your upcoming meeting.
Want the convenience of AI summaries?
Try Tactiq for your upcoming meeting.