How to Blur Background on Microsoft Teams
September 18, 2024
September 18, 2024
March 31, 2026
March 31, 2026

Blurring your background on Microsoft Teams is a simple but effective way to look professional and distraction-free on video calls. Whether you’re working from home or in a busy office, this feature keeps the focus on you, not what’s behind you.
In this guide, we’ll walk you through the benefits of blurring your background and provide step-by-step instructions to help you get started. For more insights into Microsoft Teams, check out these related articles: Top Microsoft Teams Alternatives in 2024, Microsoft Teams vs Google Meet: A Detailed Comparison, and ChatGPT for MS Teams: How to Generate Meeting Notes.
Why Use a Blurred Background on Microsoft Teams?

Image from Microsoft
Using a blurred background on Microsoft Teams can make your video calls more professional and focused. It helps remove distractions and keeps the attention on you. Let's explore the benefits of this feature in detail:
Enhancing Focus on the Speaker
When you blur your background, the focus automatically shifts to you. Viewers won't get distracted by what's behind you, like a cluttered room or moving objects. This keeps the conversation centered around you and your message.
- Clearer Communication: Your facial expressions and body language become more visible.
- Better Engagement: Participants stay more attentive to what you're saying.
Minimizing Background Distractions
Background distractions can disrupt the flow of a meeting. By blurring your background, you minimize these interruptions.
- No More Visual Clutter: Items like books, posters, or pets won't draw attention away from the conversation.
- Less Movement: Any movement in the background, like someone walking by, becomes less noticeable.
Maintaining a Professional Appearance
A blurred background helps you maintain a professional look, even if you're working from a less-than-ideal location.
- Consistent Look: No matter where you are, your setup looks uniform and tidy.
- Enhanced Image: You appear more polished and prepared, which can leave a positive impression.
Ensuring Privacy in Home or Shared Environments
Blurring your background is also a great way to protect your privacy. This is especially useful if you're working from home or in a shared space.
- Hide Personal Items: Personal belongings or family members won't be visible.
- Secure Environment: Sensitive information in your background remains confidential.
By using these tips, you can make your Microsoft Teams meetings more effective and professional.
How to Blur Your Background Before Joining a Microsoft Teams Meeting
Blurring your background before a Microsoft Teams meeting ensures you start with a distraction-free environment. Follow these steps to set it up on different devices:
Step-by-Step Instructions for Desktop Users
- Open Microsoft Teams: Launch the Microsoft Teams app on your desktop.
- Join a Meeting: Click on a meeting link or schedule a new meeting.
- Turn on Your Camera: Ensure your camera is enabled.
- Select Background Filters: Before joining, locate the “Background filters” button below your video preview.
- Choose Blur: Click on the “Standard Blur” option. Your background will become soft-focused, leaving you in sharp clarity.
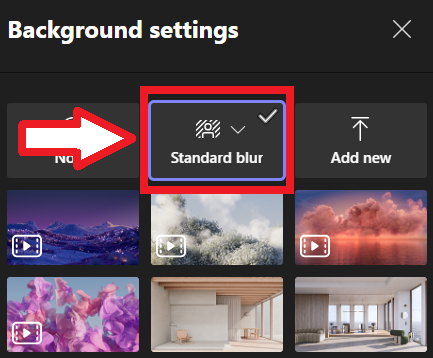
- Join: Click “Join now” to enter the meeting with a blurred background.
Instructions for Mobile Users
- Open the Teams App: Launch the Microsoft Teams app on your phone.
- Join or Schedule a Meeting: Tap on a meeting link or set up a new one.
- Enable Camera: Make sure your camera is on.
- Tap on Effects: Look for the three dots (More options) at the bottom of the screen and tap on them.
- Select Background Effects: Choose “Background effects” from the menu.
- Choose Blur: Tap on the “Blur” option to blur your background.
- Confirm and Join: Tap “Done” and then “Join now” to start the meeting with your background blurred.
Common Issues and Troubleshooting Tips
Sometimes, blurring your background may not work as expected. Here are some common issues and their solutions:
- Blur Option Not Available: Ensure your Teams app is updated to the latest version. Older versions might not support background blur.
- Device Compatibility: Background blur requires certain hardware capabilities. Check if your device meets the requirements.
- Network Issues: A poor internet connection can sometimes prevent background effects from loading. Ensure you have a stable connection.
- Permissions: Make sure Microsoft Teams has permission to access your camera in your device settings.
Supported File Formats for Custom Backgrounds
If you prefer using custom backgrounds, Teams supports specific file formats:
- JPEG (.jpg)
- PNG (.png)
- Bitmap (.bmp)
To upload a custom background:
- Open Background Effects: Follow the steps to access background effects.
- Select Add New: Click on “Add new” to upload your image.
- Choose Your Image: Select an image file from your device.
- Apply and Save: Click “Apply” to use the custom background for your meeting.
By following these steps and tips, you can ensure a smooth experience when setting up your background before joining a Microsoft Teams meeting.
How to Blur Your Background During an Ongoing Microsoft Teams Meeting
Sometimes, you may need to blur your background during a meeting. Here are the steps to do it seamlessly:
Detailed Steps for Desktop Users
- Open Meeting Controls: In the meeting, move your cursor to bring up the meeting controls.
- More Actions: Click on the three dotted-icon in the toolbar.
- Select Background Effects: Choose “Video effects and settings” from the drop-down menu.
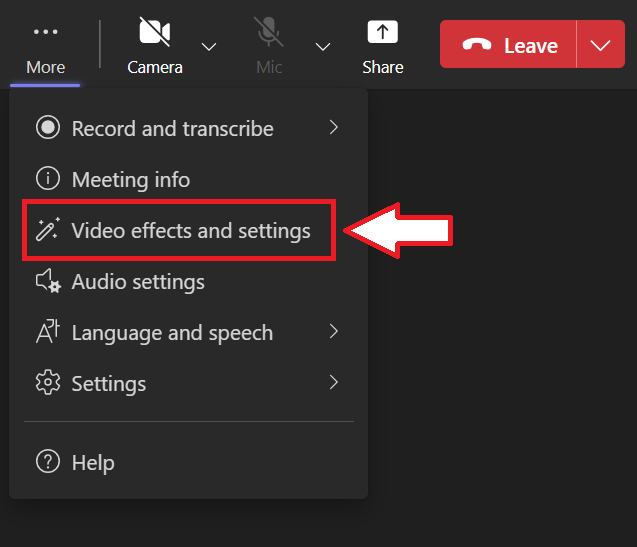
- Pick Blur: Click on the “Standard blur” option to blur your background.
- Preview and Apply: Use the “Preview” button to see how it looks. If satisfied, click “Apply” to set the blur effect.
Instructions for Mobile Users
- Access Meeting Controls: Tap on the screen to bring up the meeting controls.
- Choose More Options: Tap the three dots (More options) at the bottom of the screen.
- Select Background Effects: Click on “Video effects and settings.”
- Enable Blur: Tap on the “Blur” option.
- Confirm Changes: Tap “Done” to apply the blur effect.
Differences Between Pre-Meeting and In-Meeting Background Changes
- Pre-Meeting Setup: Allows you to start the meeting with your background already blurred, ensuring no distractions from the beginning.
- In-Meeting Changes: Useful if you forgot to blur your background or if your surroundings become distracting during the meeting. However, it might momentarily take attention away from the discussion as you change settings.
Tips for Seamless Transitions
- Practice Beforehand: Familiarize yourself with the background settings in Teams to reduce time spent adjusting during meetings.
- Stable Internet: Ensure a stable internet connection to avoid lag when changing background settings.
- Quick Access: Keep the More Actions menu in mind so you can quickly access it if needed.
- Use Preview: Always preview the blur before you apply it to avoid any surprises.
By following these steps and tips, you can manage your background during live Microsoft Teams meetings and have a professional distraction-free environment.
More Tips for a Better Virtual Meeting Experience
Using Virtual Backgrounds
Virtual backgrounds can add a professional touch or a bit of fun to your meetings. Here’s how to use them:
- Choose the Right Background: Pick a background that matches the tone of your meeting. For business meetings, a simple background is best. For casual meetings, you can go a bit more creative.
- Test Before: Always test your virtual background before the meeting starts to make sure it works with your lighting and camera.
- Avoid Busy Backgrounds: Simple backgrounds are less distracting. Too much going on can take the attention away from you.
Lighting and Camera Angles Matter
Lighting and camera angles can make a big difference in how you look on video:
- Natural Light: If you can, sit in front of a window. Don’t sit with your back to the window, or you’ll be a silhouette.
- Use Artificial Light: If natural light isn’t available, use lamps or ring lights. Place them in front of you to light your face.
- Camera Height: Position your camera at eye level. This is the most flattering and helps with eye contact, so the conversation feels more natural.
- Avoid Cluttered Backgrounds: Even with good lighting, a messy background can be distracting. Keep your space tidy or use a virtual background.
Best Practices for Audio Settings
Clear audio is crucial for effective communication:
- Use a Quality Microphone: Built-in laptop microphones often pick up background noise. Use an external microphone or a headset for clearer sound.
- Mute When Not Speaking: This minimizes background noise and prevents interruptions. Remember to unmute before you need to speak.
- Check Audio Levels: Test your microphone and adjust the volume settings. Ensure that your voice comes through clearly without distortion.
- Use Noise Suppression: Many conferencing tools, including Microsoft Teams, offer noise suppression features. Enable this to filter out ambient sounds.
Incorporating Virtual Props and Effects
Adding virtual props and effects can make your presentations more engaging:
- Virtual Props: Use digital tools to display charts, graphs, and other visual aids. This keeps the audience engaged and helps explain complex ideas.
- Effects: Some tools offer effects like spotlighting, which can help highlight important points.
- Interactive Elements: Use features like polls, Q&A, and breakout rooms to make the meeting interactive. This keeps participants involved and attentive.
With these tips, it’s easy to improve the quality and professionalism of your virtual meetings.
{{rt_cta_ai-convenience}}
How Tactiq Enhances Note-Taking in Microsoft Teams
Tactiq simplifies note-taking during Microsoft Teams meetings with real-time transcription, AI-generated summaries, and custom prompts. Here’s how Tactiq can improve your virtual meetings:
- Live Transcriptions: Automatically transcribes the meeting, ensuring you never miss a key point.
- AI Summaries: After each call, Tactiq generates a meeting summary, highlighting key takeaways and action items.
- AI Meeting Kits & Prompts: Use customizable prompts to automate tasks like creating follow-up emails or Jira tickets, streamlining your workflow.
- Custom Keyword Highlights: Highlight important terms or topics during the meeting for easy reference later.
- Seamless Integration: Tactiq integrates with your favorite tools like Trello or Jira, allowing you to turn notes into actionable tasks immediately.
By using Tactiq, you can enhance your meeting experience with precise notes, actionable insights, and a more efficient follow-up process. Download the free Tactiq Chrome Extension today!
Blurring your background keeps the focus on you, not on any distractions behind you. This helps you appear more professional and ensures your message is clear, so your meetings are more productive and engaging.
On desktop, open Teams, join a meeting, turn on your camera, select 'Background filters,' choose 'Standard Blur,' and click 'Join now.' On mobile, open the app, join or schedule a meeting, enable your camera, tap 'More options,' select 'Background effects,' choose 'Blur,' tap 'Done,' and then 'Join now.'
Make sure your Teams app is updated to the latest version and check if your device supports background blur. Also, confirm that Teams has permission to access your camera and that you have a stable internet connection, so you can use background effects smoothly.
Use simple virtual backgrounds, test your setup before meetings, ensure good lighting and camera angles, and keep your space tidy. Clear audio and interactive elements like polls or Q&A can also help you communicate more effectively and keep participants engaged.
Tactiq provides real-time transcriptions, AI-generated summaries, and custom prompts, so you never miss key points and can easily follow up on action items. You save time and boost productivity by turning meeting notes into actionable tasks and insights automatically.
Related articles


Want the convenience of AI summaries?
Try Tactiq for your upcoming meeting.
Want the convenience of AI summaries?
Try Tactiq for your upcoming meeting.
Want the convenience of AI summaries?
Try Tactiq for your upcoming meeting.