Add Zoom Plugin to Outlook in Easy Steps
August 27, 2024
August 27, 2024
June 12, 2025
June 12, 2025
Integrating Zoom with Outlook lets you schedule video calls without juggling apps. This guide shows you the simple steps to add the Zoom Outlook plugin, so you can start managing meetings more efficiently in just a few clicks.
For more ways to enhance your Zoom experience, learn how to save Zoom chat and integrate Zoom with Google Calendar.
Why Add the Zoom Plugin to Outlook?
Enhanced Meeting Scheduling and Management
Adding the Zoom-Microsoft Outlook plugin takes your meeting scheduling to the next level. You no longer need to switch between apps to set up a video conference. Simply create a new event in Outlook and add a Zoom meeting link with a few clicks to start instant Zoom meetings. This streamlined process saves you time and reduces the chance of errors.
Streamlined Communication and Collaboration
When you integrate Zoom with Outlook, communication becomes more efficient. You can quickly send invites, updates, and reminders—all from one platform. This means fewer missed meetings and better coordination among team members. The integration also ensures that your Zoom meeting details are always up-to-date in your Outlook calendar.
Improved Productivity with Integrated Tools
Combining Zoom with Outlook means you have powerful tools at your fingertips. You can access Zoom’s video conferencing features directly within Outlook. This integration helps you stay focused and organized, as you don’t need to juggle multiple apps. Everything you need for a successful meeting is in one place.
Centralized Platform for All Meeting Needs
Having Zoom in Outlook creates a centralized platform for all your meeting needs. Whether you’re scheduling, joining, or managing a meeting, you do it all from within Outlook. This centralization helps you maintain a clear overview of your schedule and ensures that you never miss an important meeting.
By adding Zoom to Outlook, you enhance your scheduling capabilities, streamline communication, boost productivity, and centralize your meeting management. This integration helps you make the most of both tools, ensuring a smoother workflow and better organized meetings.
How to Install the Zoom Add-On for Outlook
- Sign in to the Office 365 Admin Portal.
- From the navigation menu on the left, select Settings and then Integrated apps.
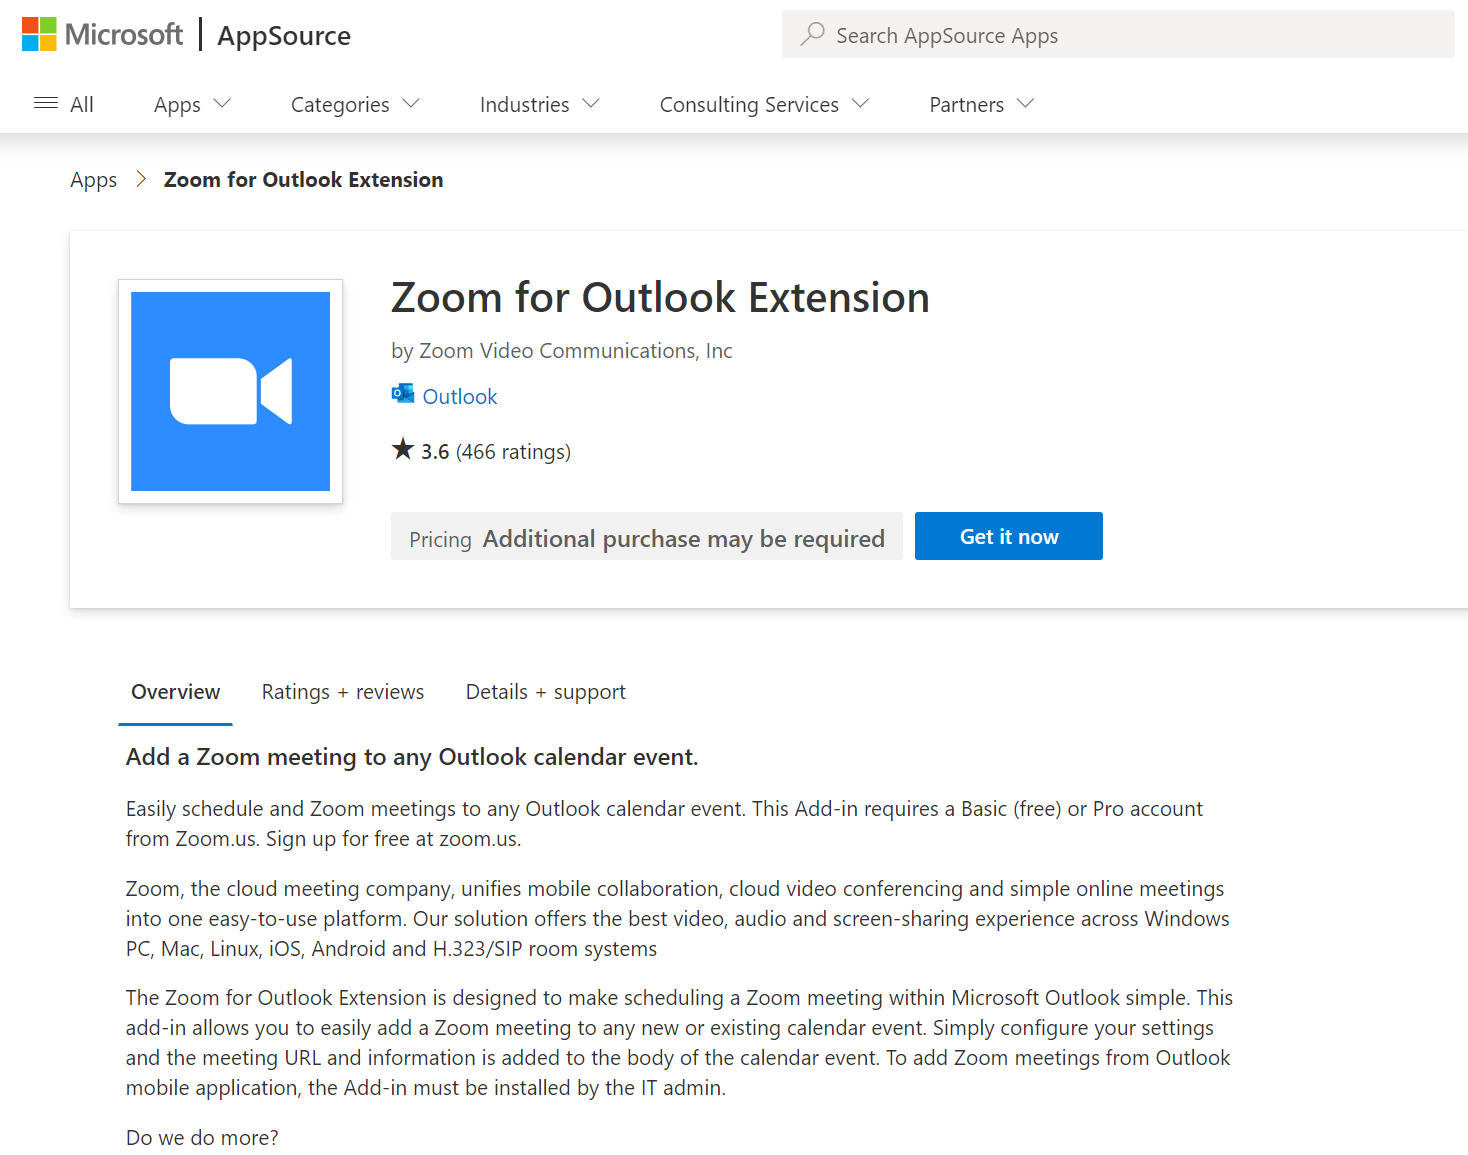
- Click Get apps.
- In the search bar, type "Zoom for Outlook" and select Get it now.
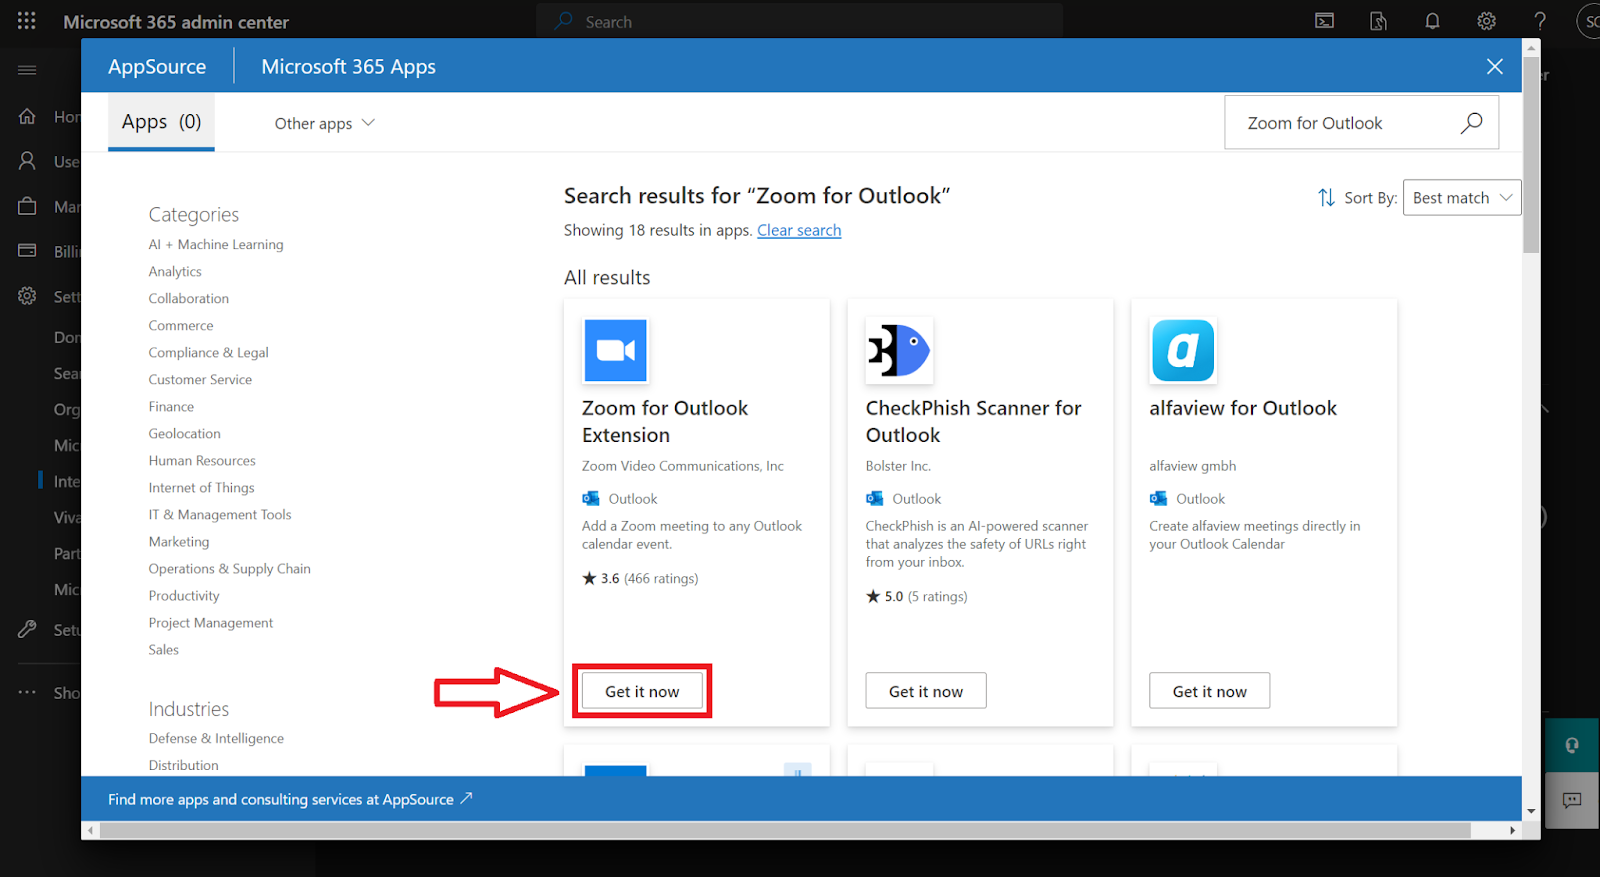
- Enter your information, agree to the terms of use, and click Continue.
- Review the add-in details and click Next.
- Choose how you want the add-in deployed across your organization:
- Optional, enabled: The Zoom for Outlook add-in will be automatically added for all users, but they can choose to remove it.
- Optional, disabled: Users can opt to add the Zoom for Outlook add-in themselves, but it won’t be added by default.
- Mandatory, always enabled: The Zoom for Outlook add-in will be added for all users, and they won’t be able to disable it.
- Click Next.
- Select who will have access to this add-in by searching for specific groups to add.
- Click Save to process the manifest file.
- Once the installation is complete, click Close.
How to Schedule a Zoom Meeting in Outlook
Creating and Managing Meetings
Steps to Schedule a New Zoom Meeting from Outlook
Follow these steps to schedule a Zoom meeting directly from Outlook:
- Open Outlook: Go to your Outlook calendar.
- New Event: Click on "New Event" or "New Meeting" in the calendar view.
- Select Zoom: In the event window, click the "..." (ellipsis) button and choose "Zoom" from the dropdown menu.
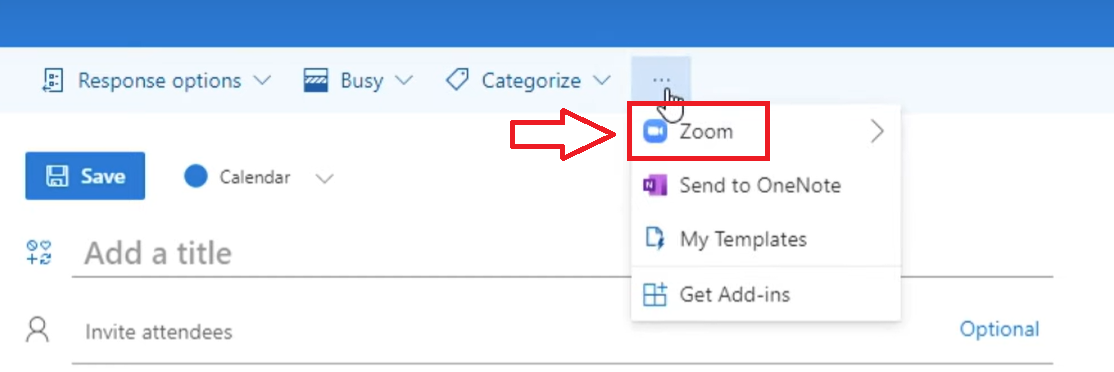
- Sign In: If prompted, sign in to your Zoom account.
- Add Zoom Meeting: Click "Add a Zoom Meeting" to insert the meeting details automatically.
Setting Meeting Details and Preferences
After you add the Zoom meeting link, you can customize the following details:
- Title: Enter a meaningful title for your meeting.
- Date and Time: Choose the date and time for your meeting.
- Location: Set to "Zoom Meeting" or leave blank since the Zoom link will be included.
- Description: Add any relevant notes or agenda items in the description box.
- Meeting Options: Click on "Zoom Settings" to adjust meeting options like waiting room, passcode, and video preferences.
Sending Invites and Managing RSVPs
To invite attendees and manage RSVPs, follow these steps:
- Add Invitees: Enter email addresses of the people you want to invite in the "Invitees" field.
- Send Invites: Click "Send" to distribute the meeting invitations.
- Track Responses: Check the calendar event to see who has accepted, declined, or not responded to the invite.
Editing or Canceling Scheduled Meetings
If you need to make changes or cancel the meeting, here’s what to do:
- Edit Meeting:
- Open Event: Go to the scheduled meeting in your Outlook calendar.
- Make Changes: Update the meeting details as needed.
- Save and Update: Click "Save" to apply changes and notify invitees of the updates.
- Cancel Meeting:
- Open Existing Calendar Event: Find the meeting you want to cancel in your calendar.
- Click Cancel: Select "Cancel Meeting" or "Delete Event."
- Send Cancellation: Notify all invitees by sending a cancellation notice.
By using these steps, you’ll efficiently schedule, manage, and adjust your Zoom meetings within Outlook.
How to Add a Zoom Meeting to an Existing Outlook Appointment
Launching Outlook and Accessing the Calendar
To begin, launch your Outlook application. Make sure you are in the calendar view to see all your scheduled appointments. If you’re using the Outlook desktop app, click on the "Calendar" icon located at the bottom of the left-hand pane. For Outlook web users, select "Calendar" from the main menu.
Selecting the Desired Appointment and Opening It
Once you’re in the calendar view, locate the appointment to which you want to add a Zoom meeting. Click on the appointment to open it. This will bring up the appointment details window, where you can see and edit all the information related to the event.
Adding a Zoom Meeting Link to the Appointment
After opening the appointment, follow these steps to add a Zoom meeting link:
- Click the Ellipsis Button: Look for the "..." (ellipsis) button in the appointment window. This button usually appears in the toolbar.
- Select Zoom: From the dropdown menu, choose "Zoom" and then click "Add a Zoom Meeting."
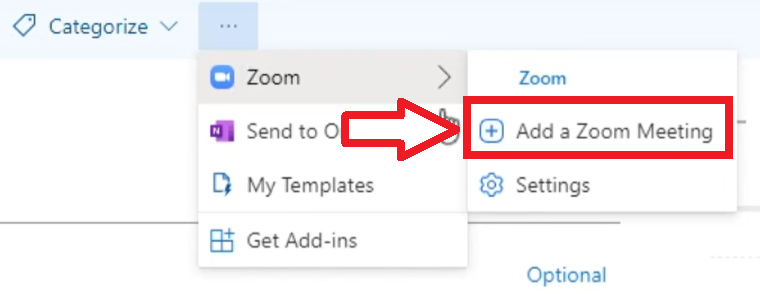
- Sign In to Zoom: If prompted, sign in to your Zoom account to authenticate the action.
- Embed Zoom Link: The Zoom meeting link will automatically populate in the location or notes section of the appointment.
Saving Changes and Notifying Attendees
Once the Zoom meeting link is added, you need to save the changes and notify all attendees:
- Save and Close: Click "Save & Close" to update the appointment with the new Zoom meeting link.
- Send Update: A prompt will appear asking if you want to send an update to all attendees. Click "Send Update" to ensure everyone receives the new meeting details.
By following these steps, you can easily add a Zoom meeting to any existing Outlook appointment, ensuring all participants have the necessary details.
Troubleshooting Zoom Add-In Issues in Outlook
Common Problems and Solutions
Using the Zoom add-in with Outlook can sometimes lead to issues. Here’s how to troubleshoot common problems:
Addressing Issues with the Add-In Not Working
Add-In Not Visible: If you don’t see the Zoom add-in in your Outlook, check if it’s disabled:
- Go to File: Click "File" in the top-left corner of Outlook.
- Options: Select "Options" from the menu.
- Add-Ins: In the Outlook Options window, choose "Add-Ins."
- Manage: At the bottom, there’s a "Manage" dropdown menu. Select "COM Add-ins" and click "Go."
- Enable Add-In: If Zoom is listed under "Disabled Application Add-ins," check the box next to it and click "OK."
Ensuring Browser Settings Are Configured Correctly
Sometimes browser settings can interfere with the Zoom add-in, especially if you’re using the Outlook web app:
- Clear Cache and Cookies: Go to your browser settings and clear your cache and cookies. This can resolve many minor issues.
- Pop-Up Blockers: Ensure that your browser allows pop-ups, as the Zoom integration might need to open new windows.
- Permissions: Check that your browser permissions allow access to your microphone and camera, which Zoom requires for meetings.
Checking for Updates and Compatibility Issues
Outdated software can cause compatibility issues:
- Update Outlook: Make sure you have the latest version of Outlook. Go to "File," then "Office Account," and click "Update Options."
- Update Zoom: Open the Zoom application, click on your profile picture, and select "Check for Updates."
- System Requirements: Confirm that your operating system meets the requirements for both the Zoom add-in and Outlook. For example, Windows users need at least Outlook 2010 or Office 365.
Following these troubleshooting steps can help you resolve most issues with the Zoom add-in in Outlook, ensuring smooth and hassle-free integration.
{{rt_cta_ai-convenience}}
How Tactiq Enhances Your Zoom Experience

Why Use Tactiq?
Tactiq is an AI-powered tool designed to enhance your Zoom meetings by automating key aspects of meeting management and boosting productivity. Here’s how:
- Streamlined Meeting Management
- Tactiq automatically records your Zoom meetings and generates live transcripts, all stored in one centralized location for easy access and review.
- Tactiq’s AI captures essential points during meetings, creates concise summaries, and highlights key takeaways, freeing you from manual note-taking so you can focus on the discussion.
- With Tactiq's AI meeting kits and customizable prompts, you can streamline post-meeting tasks like writing emails or Jira tickets, making your workflow more efficient.
- Enhanced Collaboration and Accessibility
- Tactiq allows easy sharing of meeting notes, recordings, and summaries with team members, ensuring everyone stays aligned. The tool seamlessly integrates with Zoom, centralizing all your meeting content.
Key Benefits:
- Automated Record-Keeping: Saves time and reduces the risk of missing important details.
- Enhanced Collaboration: Improves team communication and efficiency.
- Centralized Access: Simplifies retrieval of meeting content.
By leveraging Tactiq, you transform your Zoom meetings into well-organized, productive sessions, ensuring you stay focused on effective communication and collaboration. Download the free Tactiq Chrome Extension today!
Additional Tips for Using Zoom with Outlook
Best Practices for Scheduling and Managing Meetings
- Schedule in Advance: Always schedule your meetings ahead of time. This gives participants enough notice to prepare and attend.
- Clear Agendas: Include a clear agenda in the meeting invite. This helps attendees know what to expect and come prepared.
- Time Zones: Be mindful of participants in different time zones. Use Outlook’s time zone feature to schedule meetings at convenient times for everyone.
- Recurring Meetings: For regular meetings, set up recurring events. This saves time and ensures consistency.
Utilizing Advanced Zoom Features within Outlook
- Zoom Integration: Make sure the Zoom add-in is properly installed in Outlook. This allows you to schedule Zoom meetings directly from your Outlook calendar.
- Meeting Settings: Customize your Zoom meeting settings to fit your needs. For example, enable waiting rooms for added security or set meetings to start with participants muted.
- Polls and Q&A: Use Zoom’s polling and Q&A features to engage participants. These can be scheduled and managed directly within the Zoom interface.
Ensuring Smooth and Efficient Meeting Workflows
- Pre-Meeting Checks: Verify that all your equipment (camera, microphone, internet) is working before the meeting starts.
- Reminders: Set up automatic email reminders in Outlook to ensure participants don’t forget about the meeting.
- Follow-Up: Send follow-up emails with meeting minutes or key points discussed. This reinforces what was covered and outlines next steps.
Tips for Maximizing Collaboration and Productivity
- Shared Documents: Use shared documents or cloud storage to distribute meeting materials before the meeting. This allows participants to review and add comments.
- Breakout Rooms: Utilize Zoom’s breakout rooms for smaller group discussions. This can be very effective for brainstorming or detailed project discussions.
- Real-Time Collaboration: Use tools like shared whiteboards or collaborative notes during the meeting. This keeps everyone engaged and allows for real-time input.
- Post-Meeting Summaries: Generate and distribute post-meeting summaries. This ensures everyone is aligned and aware of their responsibilities moving forward.
By following these tips, you can make the most out of integrating Zoom with Outlook, ensuring your meetings are well-organized, productive, and collaborative.
Integrating Zoom with Outlook lets you schedule, join, and manage video meetings directly from your Outlook calendar. You save time and reduce errors by handling all meeting tasks in one place, making your workflow smoother and more efficient.
To install the Zoom add-in, sign in to the Office 365 Admin Portal, go to Settings > Integrated apps, search for 'Zoom for Outlook,' and follow the prompts to deploy it. You can choose whether the add-in is optional or mandatory for users, ensuring everyone in your organization has the right access.
Open your Outlook calendar, create or open an event, and select 'Zoom' from the options to add a Zoom meeting link. You can customize meeting details, invite attendees, and manage RSVPs—all without leaving Outlook, so you stay organized and in control.
If the Zoom add-in isn’t visible, check if it’s disabled in Outlook’s Add-Ins settings and enable it if needed. Also, update your software, clear your browser cache, and ensure permissions are set correctly to resolve most common issues and keep your meetings running smoothly.
Tactiq automatically transcribes and summarizes your Zoom meetings, storing everything in one place for easy access. You save time on manual note-taking and can quickly share key insights with your team, making every meeting more productive and actionable.
Want the convenience of AI summaries?
Try Tactiq for your upcoming meeting.
Want the convenience of AI summaries?
Try Tactiq for your upcoming meeting.
Want the convenience of AI summaries?
Try Tactiq for your upcoming meeting.


