How to Annotate on Zoom: Step-by-Step Guide
August 7, 2024
August 7, 2024
June 12, 2025
June 12, 2025

In today's dynamic virtual workspace, effective communication is more crucial than ever. Zoom's annotation feature stands out as a powerful tool for enhancing collaboration and engagement during meetings.
This guide will cover everything you need to know about using annotations in Zoom, from understanding its tools to enabling and optimizing their use. Whether you're leading a presentation, conducting a training session, or brainstorming with your team, mastering Zoom's annotation tools will help you create the perfect meeting.
What is Annotation on Zoom?
Annotation in Zoom allows you to draw, write, or highlight directly on shared screens or whiteboards during a meeting. This feature helps make presentations more interactive and engaging by allowing participants to visually emphasize points.
Overview of Annotation Features for Different Zoom Plans
Zoom’s annotation features vary based on the plan:
- Basic Plan: Offers essential annotation tools like text, draw, and stamp.
- Pro Plan: Includes advanced tools such as spotlight, format, and save options.
- Business and Enterprise Plans: Provide comprehensive features, including multiple whiteboards and enhanced collaboration tools.
By understanding the definition, tools, and benefits of annotations, you can leverage these features to make your Zoom meetings more effective and collaborative.
Why Use Annotations on Zoom?
Add annotations on Zoom to transform your virtual meetings and presentations. Here are some key reasons to use them:
Enhancing Participant Engagement
Annotations help keep participants actively involved in the meeting:
- Interactive Elements: Drawing, highlighting, and stamping can make even the most mundane slides interesting.
- Real-Time Feedback: Participants can immediately see and react to annotations, fostering a more dynamic interaction.
- Participation: Allowing attendees to annotate encourages everyone to contribute, making the Zoom session more inclusive and engaging.
Improving Clarity During Presentations
Annotations can significantly improve the clarity of your presentations:
- Visual Emphasis: Highlighting key points or circling important data helps draw attention to crucial information.
- Simplified Explanations: Annotations can break down complex ideas into understandable visual segments.
- Immediate Clarification: Address questions or misunderstandings on the spot by annotating directly on the shared screen.
Providing Visual Aids to Support Verbal Communication
Visual aids are essential for supporting what you're saying:
- Dual Modes of Communication: Combining verbal explanations with visual annotations helps reinforce the message.
- Retention: Visual elements help participants remember information better.
- Accessibility: Visual cues can assist participants who may have difficulty following verbal instructions alone.
Using annotations on Zoom not only makes your meetings more interactive and engaging but also ensures that your message is clear and effectively communicated.
How to Enable Annotation in Zoom
Enabling annotation in Zoom is a straightforward process that can enhance your meetings significantly.
Steps to Enable Annotation for Hosts and Participants
- Sign In to Zoom: Log into your Zoom account via the web portal.
- Navigate to Settings: Click on "Account Management" in the navigation panel, then select "Account Settings."
- Meeting Settings: Under the "Meeting" tab, scroll to find "In Meeting (Basic)".
- Enable Annotation: Toggle the switch next to "Annotation" to enable it. A verification window may pop up to confirm your choice.
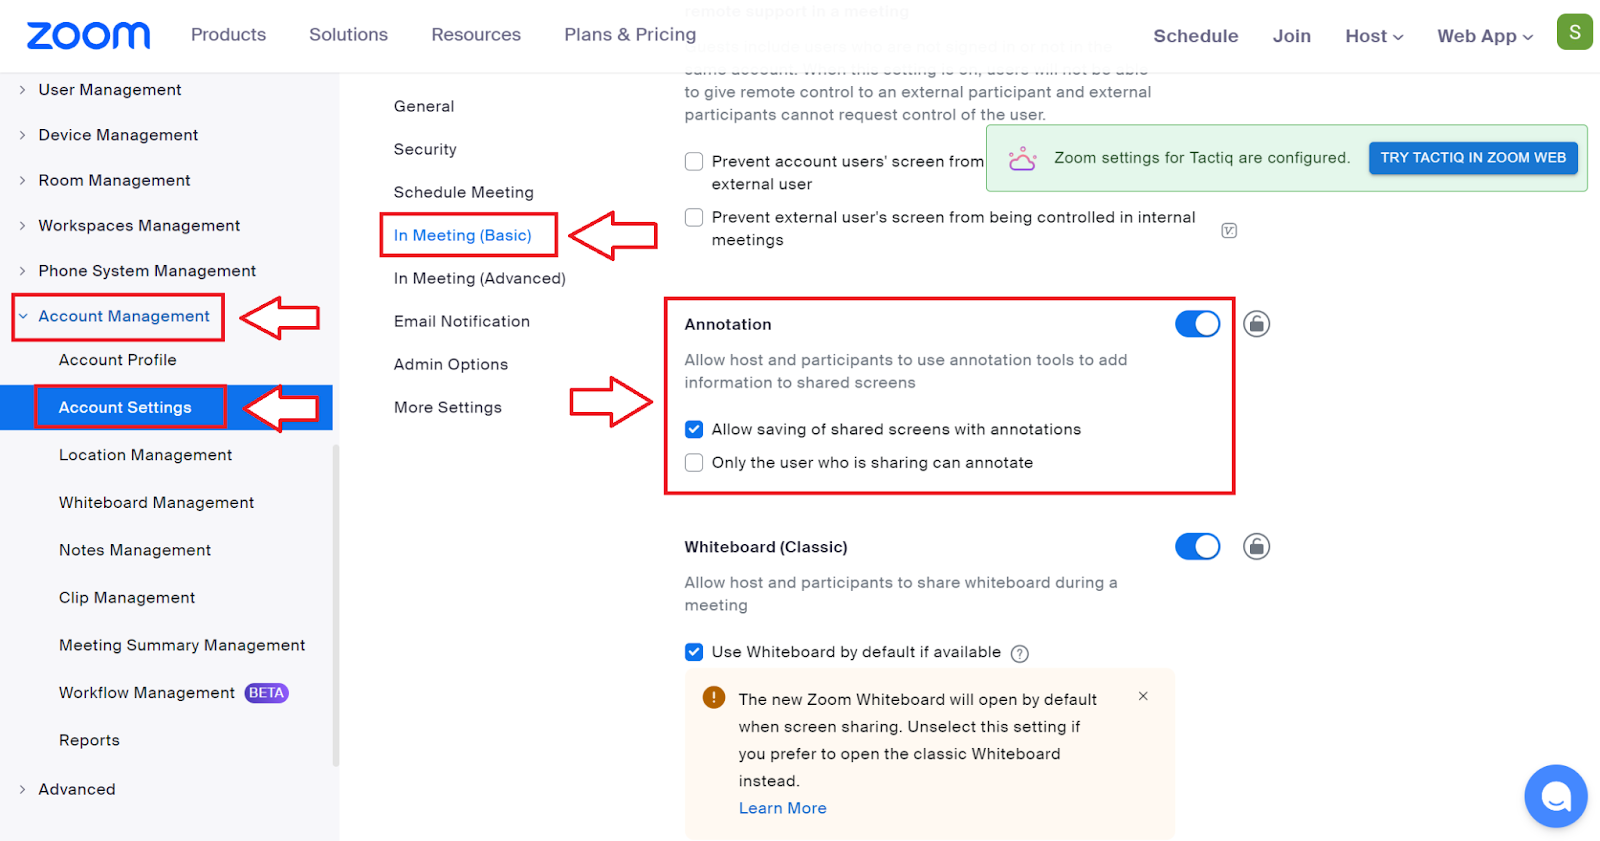
- Allow Saving: Optionally, you can check the box to allow participants to save shared screens with annotations.
Hosts can enable annotation for participants during a meeting by clicking "More" on the screen-sharing toolbar and selecting "Enable Annotation for Others."
Compatibility Issues and Solutions
Chromebooks:
- Issue: Zoom's full annotation features may not be supported on ChromeOS.
- Solution: Use the Zoom web client instead of the Chrome app to access more features. Alternatively, participants can join from another device with full annotation capabilities.
General Compatibility:
- Windows/Mac/Linux: Ensure you have the latest version of Zoom installed. Annotations may not work on outdated versions.
- Mobile Devices: Update to the latest version of the Zoom mobile app for your Android or iOS device. Some annotation features might be limited on mobile compared to desktop.
Security Considerations When Enabling Annotation
Protecting Your Meeting:
- Enable Annotations Only When Necessary: Prevent unauthorized or disruptive annotations by enabling annotation only when needed.
- Deactivate Annotation Tools: If you do not want participants to annotate, you can disable this feature during a meeting by selecting "More" and then "Disable Annotation for Others."
- Show Names of Annotators: This feature can help identify who is making annotations, adding a layer of accountability.
Troubleshooting Common Issues with Enabling Annotation
- Annotation Tools Not Showing:
- Check Meeting Settings: Ensure that annotation is enabled in the Zoom web portal.
- Update Zoom: Make sure you have the latest version of Zoom installed. Outdated software may not support annotation features.
- Participants Can't Annotate:
- Permissions: Ensure the host has enabled annotation for participants.
- Rejoining the Meeting: Sometimes, rejoining the meeting can resolve temporary glitches.
- Annotations Not Saving:
- Permissions: Ensure the host has enabled the option to save annotations.
- Storage Location: Check the designated folder on your device where Zoom saves annotations, typically under "Documents" > "Zoom."
Enabling annotation on Zoom can significantly enhance your meetings, making them more interactive and engaging. With these steps and tips, you can ensure a smooth experience for both hosts and participants.
How to Use Annotation Tools on Zoom
Annotations can make your Zoom meetings more interactive and engaging. Knowing how to use these tools effectively can help convey your points clearly.
How Do I Add an Annotation on Zoom?
Accessing the Annotation Toolbar During Screen Share
- Start Screen Share: Click "Share Screen" in the Zoom toolbar at the bottom of your screen.
- Select What to Share: Choose the screen or application window you want to share and click "Share."
- Open the Annotation Tools: Once you are sharing your screen, hover your mouse at the top of the screen to reveal the toolbar. Click "Annotate" to open the annotation controls.

Using Different Annotation Tools
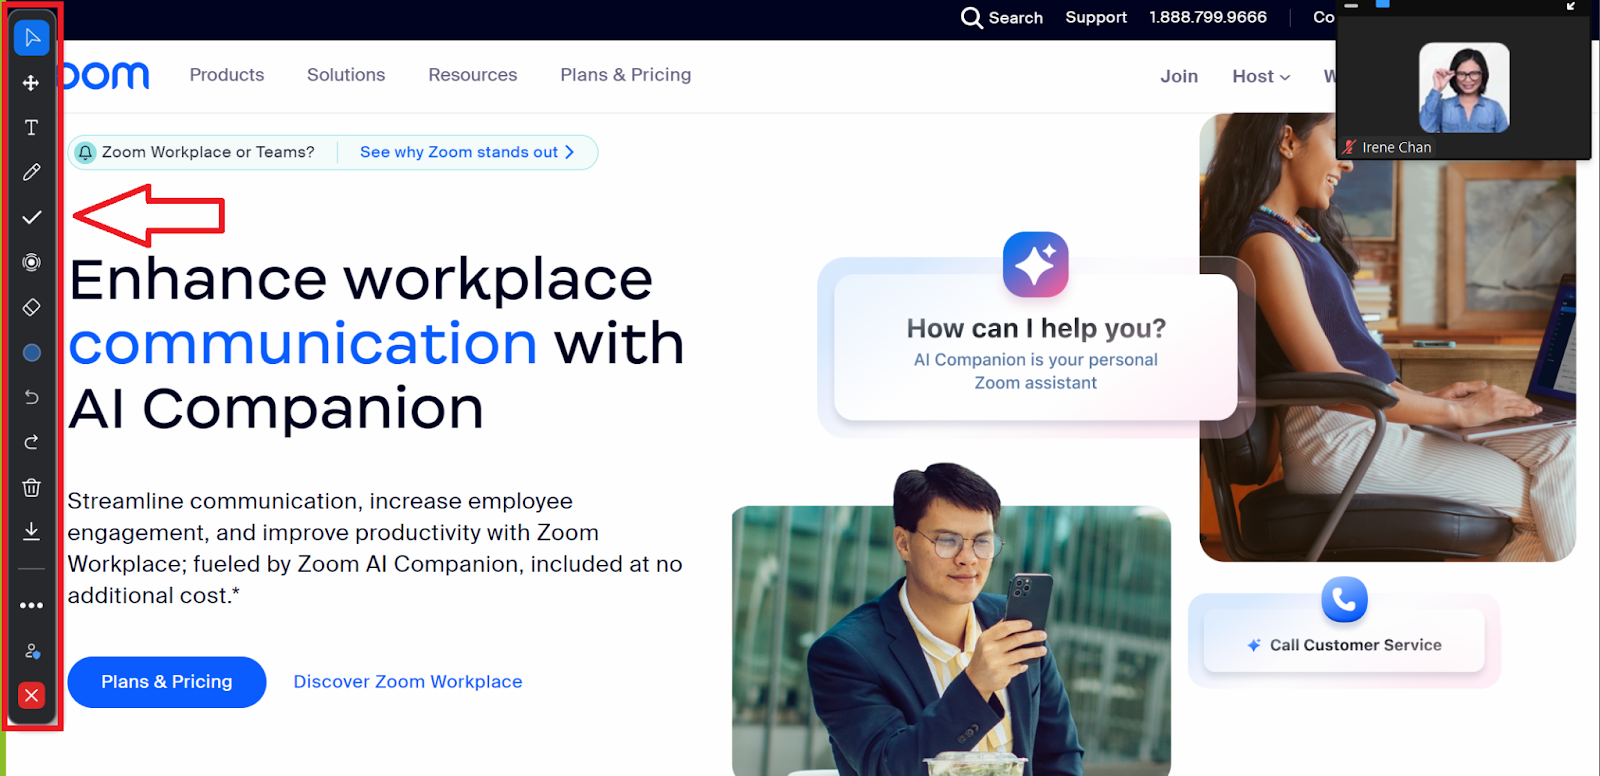
The annotation toolbar offers various tools for different purposes:
- Pointer Tool: Use the mouse pointer to draw attention to specific areas on the screen.
- Text Tool: Insert text anywhere on the screen.
- Draw Tool: Create free-form lines, shapes, and arrows.
- Stamp Tool: Insert predefined icons like check marks or stars.
- Spotlight Tool: Highlight areas on the screen with a red dot.
- Eraser Tool: Remove annotations.
- Format Tool: Adjust font size, colors, and line thickness.
- Undo/Redo Tools: Correct mistakes or revert changes.
- Clear: Delete all annotations.
- Save Tool: Save the annotated screen as a PNG or PDF file.
How to Save Annotated Screenshots on Zoom
Saving your annotations can be very useful for later reference or for sharing with participants who might have missed the meeting.
Saving Annotations as Images or PDFs
- Click the Save Button: On the annotation toolbar, click "Save."
- Choose File Format: A dropdown menu will appear. Select either PNG or PDF.
- PNG: Saves each Zoom whiteboard or annotated screen as a separate image file.
- PDF: Compiles all whiteboards and annotated screens into a single PDF document.
- Locate Files: Zoom saves these files to your local recording location. Typically, this is under "Documents" > "Zoom".
Sharing Annotated Screenshots with Participants
- During the Meeting:
- Share via Zoom Chat: You can share the saved files directly through the Zoom chat by clicking "File" and selecting the files from your computer.
- After the Meeting:
- Email: Attach the saved images or PDFs to an email to share with your participants.
- Cloud Storage: Upload the files to a cloud storage service like Google Drive or Dropbox, and share the link with your participants for easy access.
Understanding how to add annotations and save them ensures that your meetings are both interactive and well-documented, helping everyone stay on the same page.
Best Practices for Using Annotations in Zoom Meetings
Using annotations effectively can significantly enhance your Zoom meetings. Here are some best practices to help you make the most out of this feature.
Guidelines for Effective Annotation Use
- Keep It Simple: Use annotations to highlight key points rather than cluttering the screen with too many annotations.
- Be Purposeful: Only annotate when necessary to emphasize or explain something that might not be immediately clear.
- Use Different Colors: Different colors can help distinguish between various points or topics, making it easier for participants to follow along.
Tips for Keeping Annotations Clear and Organized
- Label Everything: When using the text tool, clearly label your annotations. For example, if circling a graph, label it with "Key Data Points" to avoid confusion.
- Group Related Annotations: Keep related annotations close together. If discussing multiple parts of a presentation, group annotations by topic.
- Use Shapes Effectively: Draw shapes around items you want to highlight. A rectangle can emphasize a section of text, while an arrow can point to specific data points.
- Clear Unnecessary Annotations: Periodically clear old annotations to prevent clutter. Use the "Clear" tool to remove all annotations or specific ones.
Strategies for Collaborative Annotation During Team Meetings
- Enable Participant Annotations: Allow team members to use annotation tools by enabling this option in your Zoom settings.
- Assign Annotation Roles: Designate specific team members to annotate during different parts of the meeting. This keeps annotations organized and reduces overlap.
- Use a Shared Whiteboard: Utilize Zoom’s whiteboard feature for brainstorming sessions. This can be a collaborative space for everyone to contribute ideas visually.
- Annotate in Real-Time: Encourage team members to annotate in real-time during discussions. This can make the meeting more interactive and ensure that everyone is engaged.
Examples of Successful Annotation Use Cases
- Project Planning: Use annotations to outline project timelines on a shared Gantt chart. Highlight deadlines and key milestones.
- Training Sessions: During a training session, annotate over slides to emphasize important points or steps in a process. This helps participants follow along more easily.
- Sales Presentations: Annotate on product images to highlight features or benefits. This can make your presentation more compelling and easier to understand.
Employing these best practices ensures that your annotations add value to your meetings rather than causing confusion. They can make your presentations more interactive, help keep everyone on the same page, and improve overall communication.
Can You Use Annotations in Zoom Webinars?
Differences Between Zoom Meetings and Webinars
Zoom meetings and webinars serve different purposes. Understanding these differences helps in knowing how and when to use annotations.
- Interactivity: Zoom meetings allow all meeting participants to interact, share screens, and annotate. Webinars, however, limit interaction primarily to hosts and panelists.
- Audience Size: Meetings are ideal for smaller groups where everyone can participate. Webinars can host larger audiences, often with hundreds of attendees.
- Role Assignment: In meetings, participants can be hosts, co-hosts, or attendees. Webinars have roles like hosts, co-hosts, panelists, and attendees, with specific permissions for each.
How to Enable and Use Annotations in Webinars
Using annotations in webinars requires enabling specific settings:
- Enable Annotations for Hosts and Panelists:
- Go to the Zoom web portal.
- Navigate to Settings > In Meeting (Basic).
- Toggle the Annotation setting to enable it.
- Using Annotations During a Webinar:
- Start the webinar and share your screen or whiteboard.
- Click the Annotate option from the toolbar that appears.
- Use available tools like text, drawing, and shapes to highlight important points.
Benefits of Using Annotations in Webinars
Annotations can make webinars more engaging and informative:
- Enhanced Clarity: Annotations make complex information easier to understand. Highlighting key points can help attendees follow along.
- Interactive Experience: Even though webinars are less interactive than meetings, annotations provide a way for hosts to engage the audience.
- Visual Emphasis: Use shapes and text to emphasize important data or sections of your presentation, keeping attendees focused.
Limitations and Alternatives for Webinar Annotations
While annotations are useful, they come with limitations in webinars:
- Limited Participant Interaction: Only hosts and panelists can annotate, which limits real-time feedback from the audience.
- Potential Distractions: Overusing annotations can clutter the entire screen and distract attendees from the main content.
- Technical Issues: Some users may experience lag or difficulty seeing annotations, especially with large audiences.
Alternatives:
- Polls and Q&A: Use these features to engage attendees without relying solely on annotations.
- Pre-Recorded Videos: Incorporate videos with pre-made annotations to ensure clarity and avoid technical issues.
- Interactive Slides: Use platforms that allow embedding interactive elements within slides, offering a more engaging experience.
By understanding these aspects, you can make the most out of annotations in your Zoom webinars, enhancing both clarity and engagement.
Why Can't I Annotate on Zoom on Chromebook?
Explanation of Compatibility Issues with ChromeOS
Chromebooks use a unique operating system called ChromeOS, which is different from Windows, macOS, or Linux. This difference creates several compatibility issues with Zoom's annotation features:
- Limited App Support: ChromeOS relies heavily on web-based applications. Zoom's web version lacks the full range of features available in its desktop clients, including advanced annotation tools.
- Technical Constraints: ChromeOS doesn't support certain APIs and system calls that Zoom's annotation tools require, leading to functionality gaps.
- Resource Allocation: Chromebooks often have less processing power compared to traditional laptops, which can impact the performance of resource-intensive features like real-time annotations.
Workarounds and Alternative Solutions for Chromebook Users
Chromebook users can still participate in Zoom meetings effectively by employing several workarounds:
- Use External Devices: Connect an external tablet or touchscreen device that supports Zoom's full features. This allows you to annotate without relying on ChromeOS.
- Online Whiteboard Tools: Utilize third-party online whiteboard tools like Miro or Jamboard. Share your screen during the Zoom meeting to display annotations created on these platforms.
- Zoom App for Android: Some Chromebooks support Android apps. Install the Zoom Android app from the Google Play Store, which may offer better functionality than the web version.
{{rt_cta_ai-convenience}}
Why Use Tactiq for Your Zoom Meeting Needs?

If you're looking for an alternative to Zoom's annotation features, Tactiq is an excellent choice. Tactiq is a powerful, free tool designed to enhance your Zoom meetings by providing accurate transcriptions and insightful AI features.
How Can Tactiq Enhance Your Zoom Meetings?
- Accurate Transcriptions and AI Summaries: Tactiq provides precise, word-for-word transcriptions and AI-generated summaries that help capture the essence of your meetings.
- AI Meeting Kits and Prompts: Streamline your meeting preparation and follow-up tasks with AI-powered meeting kits and prompts.
How Does Tactiq Compare to Zoom's Annotation Tools?
- Highlights and Notes: Like Zoom's annotations, Tactiq allows you to highlight critical sections and add notes within transcriptions, ensuring that key points are easily accessible.
- Organize Information: Similar to the organizational benefits of Zoom's annotation tools, Tactiq helps keep all highlights and notes in one place for easy reference and review.
How Does Tactiq Facilitate Collaboration?
- Sharing Transcriptions and Summaries: Easily share meeting content with your team, promoting consistency and clarity.
- Ensuring Accessibility: Make meeting content accessible to all participants.
Using Tactiq for your Zoom meetings improves record accuracy and accessibility, simplifies post-meeting tasks, and enhances team alignment and accountability. Its features echo the benefits of Zoom's annotation tools.
Zoom annotations let you draw, write, or highlight directly on shared screens or whiteboards during meetings. By using these tools, you make your presentations more interactive and help participants better understand and remember key points.
To enable annotations, sign in to Zoom, go to Account Settings, and toggle the Annotation option under 'In Meeting (Basic)'. Once enabled, start a screen share, click 'Annotate' on the toolbar, and use tools like text, draw, and spotlight to engage your audience.
Keep annotations simple and purposeful, use different colors to distinguish topics, and label your notes clearly. Clearing old annotations and grouping related notes help keep your screen organized, so everyone can follow along easily.
Chromebooks have limited support for Zoom annotations, but you can use the Zoom web client, external devices, or third-party whiteboard tools as workarounds. Always update your Zoom app and check permissions if annotation tools aren’t working as expected.
Tactiq provides accurate transcriptions and AI-generated summaries, letting you highlight and organize key points without manual note-taking. You save time, ensure everyone has access to meeting insights, and make collaboration easier by sharing searchable records with your team.
Related articles


_Main.jpg)


Want the convenience of AI summaries?
Try Tactiq for your upcoming meeting.
Want the convenience of AI summaries?
Try Tactiq for your upcoming meeting.
Want the convenience of AI summaries?
Try Tactiq for your upcoming meeting.