How to Change Time Zones in Google Calendar App & Web
October 3, 2024
October 3, 2024
October 7, 2025
October 7, 2025

Ever miss an important meeting because of time zone confusion? Google Calendar helps you stay organized by showing the correct time for your events, no matter where you are.
This guide will walk you through how to:
- Change your primary time zone on desktop and mobile
- Display multiple time zones with a secondary clock or the world clock
- Create and manage events in a different time zone
- Use the new appointment booking sidebar with Gmail integration
- Fix common issues with device time zone updates, daylight saving, and UTC handling
Changing the Primary Time Zone for Google Calendar
You can update your primary time zone in Google Calendar from any device, including your computer, phone, or tablet. When you change your settings, all events display in the correct local time for you, while people you invite will still see the event in their own time zone.
Changing the primary time zone for Google Calendar on your computer
- Open Google Calendar on your computer.
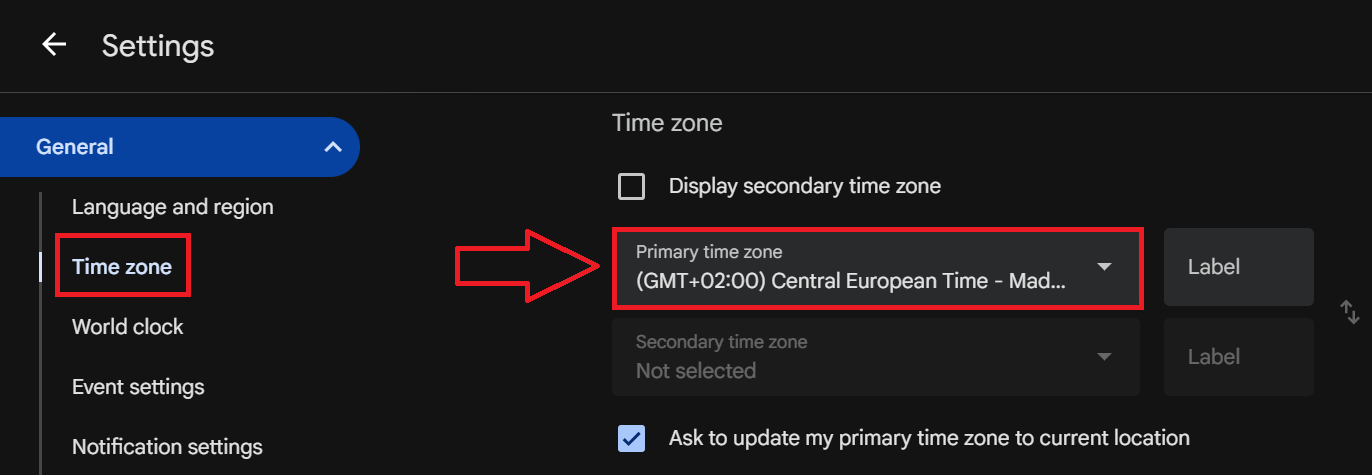
- In the top right, click the gear icon and select Settings.
- Go to the Time zone section under “General.”
- From the dropdown menu, choose your desired time zone.
If you want to adjust only one calendar:
- In the left panel, go to My calendars.
- Hover over a calendar, click the three dots, then select Settings and sharing.
- Under Calendar settings, update the calendar’s time zone.
Changing the primary time zone for Google Calendar on Android
- Open the Google Calendar app.
- Tap the Menu in the top left, then scroll down to Settings.
- Go to General and tap Use device time zone.
- If turned on, your device's time zone updates automatically as you travel.
- If turned off, you can manually select a time zone from the dropdown menu.
Changing the primary time zone for Google Calendar on iPhone or iPad
- Open the Google Calendar app.
- Tap the Menu in the top left, then Settings at the bottom.
- Go to General and switch Use device time zone on or off.
- If turned on, your device's time zone updates automatically as you travel.
- If turned off, you can manually select a time zone from the dropdown menu.
💡 Pro tip: Even if your Google Calendar settings are correct, it’s easy to forget what was said in a meeting. Use Tactiq with Google Meet calls to capture live transcripts and AI summaries across time zones, so you always keep the correct details.
Using Multiple Time Zones in Google Calendar
Need to compare schedules across different time zones? Google Calendar lets you add a secondary time zone or even show a world clock in the sidebar.
Display a secondary time zone (desktop only)
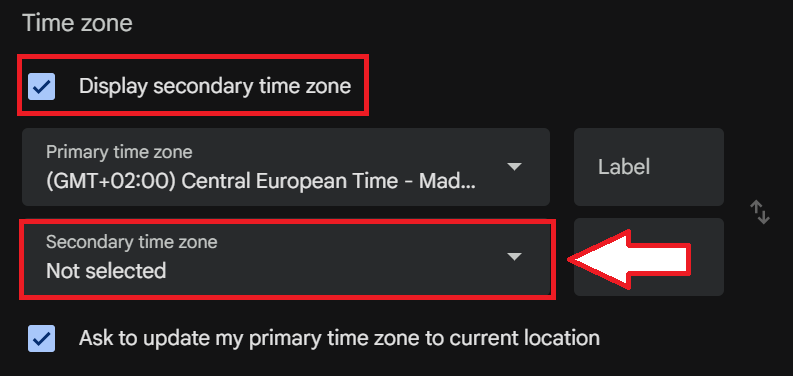
- On your computer, open Google Calendar.
- Click the gear icon in the top right, then select Settings.
- In the Time zone section, check Display secondary time zone.
- Use the dropdown menu to choose your desired time zone.
👉 Note: The option to display a secondary time zone works only on desktop. It isn’t available in the mobile app.
Show multiple time zones with the world clock
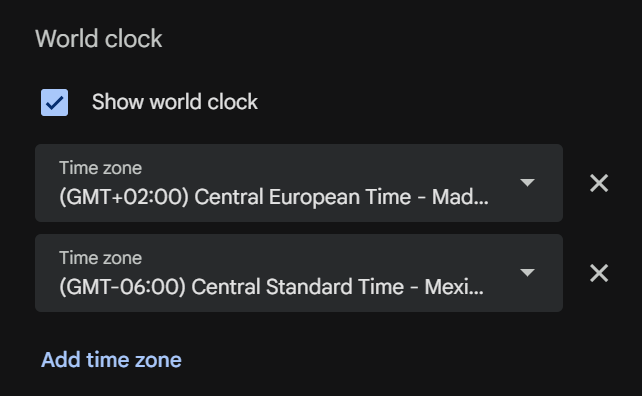
For more flexibility, turn on the world clock in the sidebar.
- In Google Calendar settings, go to World clock.
- Check the Show world clock button.
- Use Add time zone to display as many regions as you need.
With the world clock, you’ll see several time zones at once, which makes managing time zones across global teams much easier.
Creating Events in Different Time Zones
Sometimes you need to create an event in a different time zone than your own, like when scheduling a call with colleagues abroad. Google Calendar makes it easy to adjust event times so everyone sees the correct schedule.

- On your computer, open Google Calendar.
- Click Create event in the top left, then More options.
- In the event editor, click Time zone next to the event start time.
- From the dropdown menu, select your desired time zone.
- Add other event details, then click Save.
Change the time zone of a specific event
- Open Google Calendar on your computer.
- Click an event, then select the pencil icon to edit.
- Next to the event time, click Time zone.
- Choose a different time zone from the dropdown menu.
- Click Save to confirm.
Everyone invited will still see the event in their own calendar’s time zone, so no matter where people are located, the schedule adjusts automatically.
Appointment Booking Sidebar & Gmail Integration
Google Calendar now includes an appointment schedule feature that generates a booking page you can share with others. You can manage this directly from the Calendar sidebar, and even insert booking links into Gmail drafts to make scheduling faster.
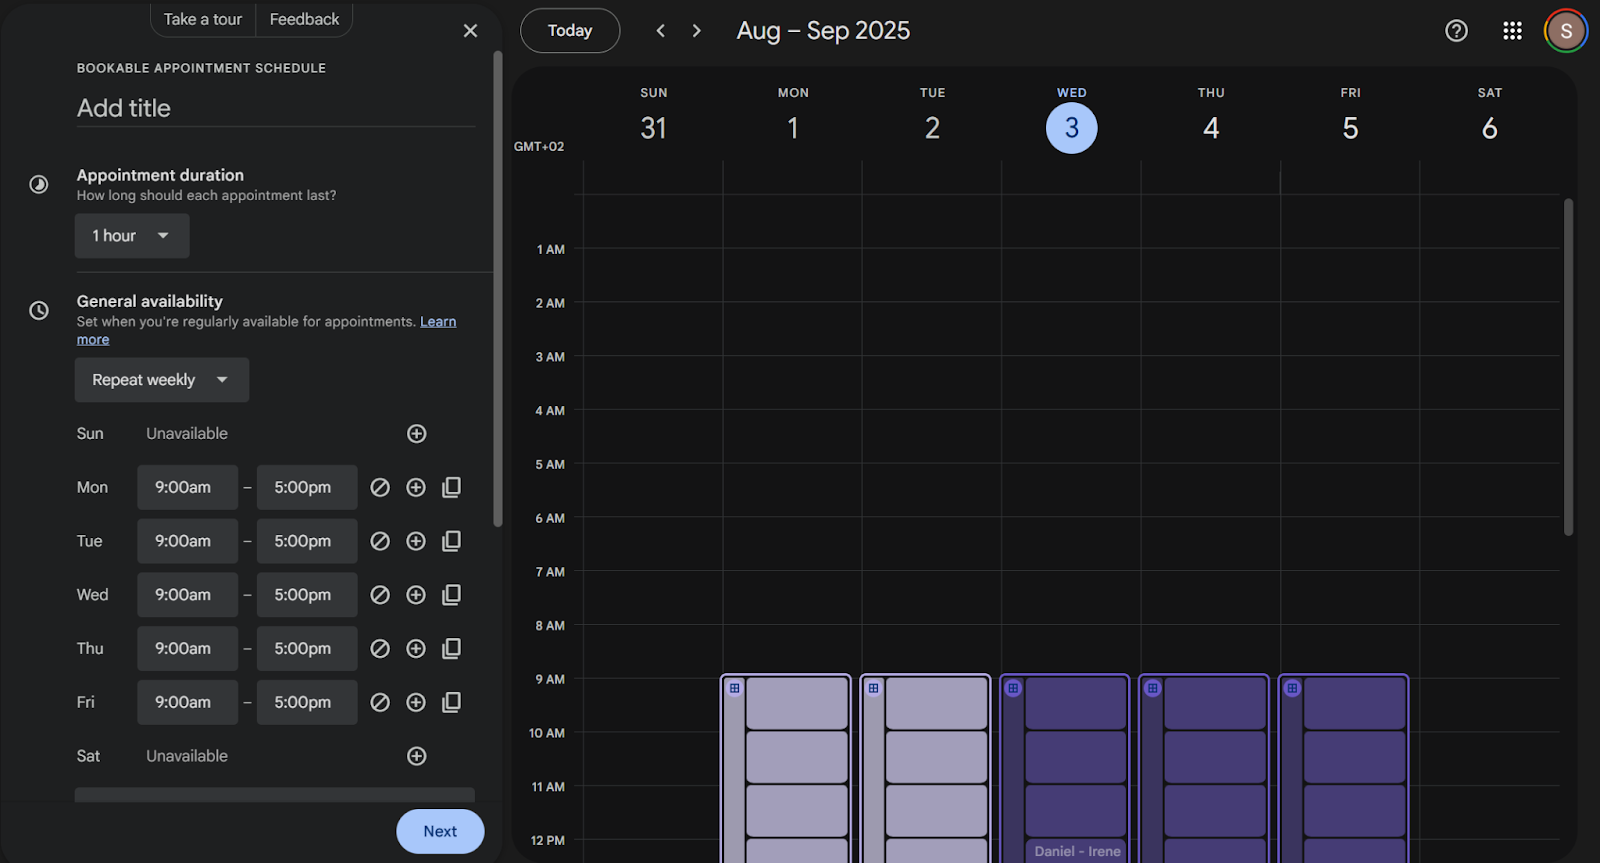
Create an appointment schedule
- On your computer, open Google Calendar.
- Click Create in the top left and select Appointment schedule.
- Add a title, choose an appointment duration, and set your availability.
- Adjust options like:
- Scheduling window (how far in advance people can book)
- Buffer time between appointments
- Maximum bookings per day
- Co-hosts and which calendar to use
- Click Next, then set up your booking page. Here you can:
- Add a description of your service
- Choose how to meet (Google Meet, phone, in-person, or later)
- Customize the booking form fields (name, email, etc.)
- Require email verification to reduce spam
- Connect Stripe to accept payments, if needed
- Click Save to publish your booking page.
Insert booking links in Gmail drafts
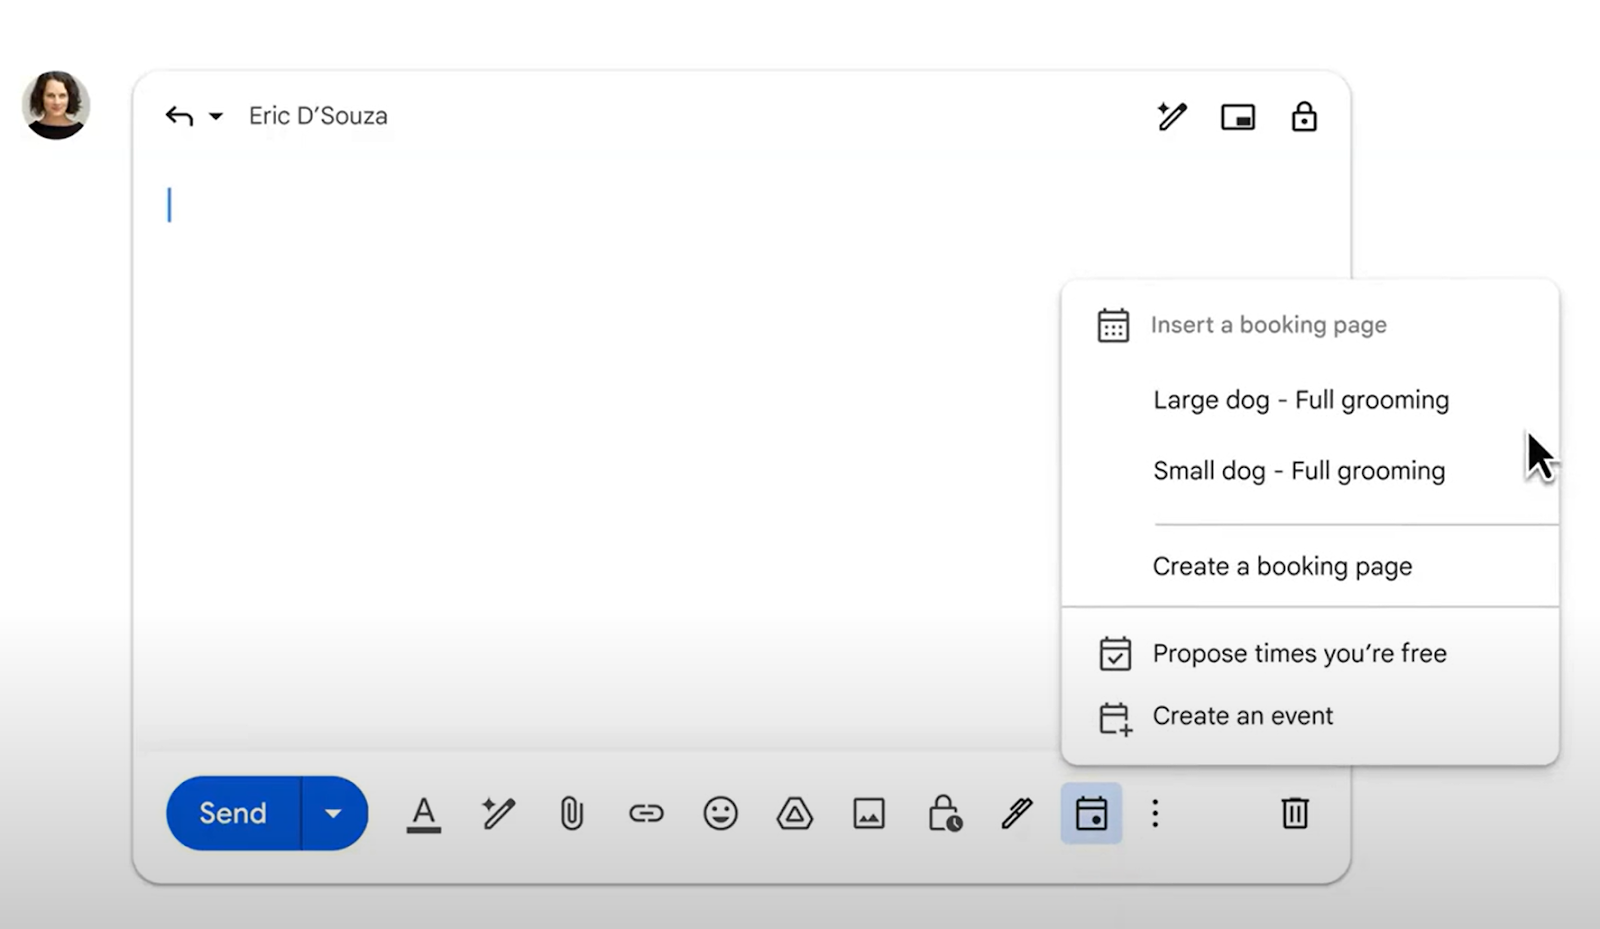
Image from Google
When drafting an email in Gmail, click the Calendar icon in the toolbar. From there, you can insert your booking page link so people can select a time directly.
👉 Note: You need a Google Account and a computer browser to create appointment schedules. The feature isn’t available in the mobile Calendar app, though booking links still work on mobile.
Troubleshooting Common Time Zone Issues
Even with the right calendar settings, you may notice problems with event times. Here are a few key things to know:
Automatic device time zone updates
On mobile, you can let Calendar adjust to your current location.
- Open the Google Calendar app.
- Go to Menu > Settings > General.
- Turn Use device time zone on.
- On: Calendar updates automatically as you travel.
- Off: You’ll need to select a time zone manually from the dropdown menu.
How Google Calendar handles UTC and daylight saving time
To avoid errors during daylight saving changes, Google Calendar saves all events in Coordinated Universal Time (UTC).
- You’ll always see event times displayed in your local time zone.
- If a country changes its official time zone or DST rules, older events may display incorrectly until the new rules are applied.
👉 Note: Past or far-future events may not always reflect the latest daylight saving changes, but Google Calendar automatically adjusts when updated time data becomes available.
How Tactiq Helps With Meetings Across Time Zones
Even if Google Calendar shows the correct time, keeping track of what was said in a meeting can be harder, especially when you’re working across different time zones.
Tactiq makes it simple to capture and organize your discussions.
Tactiq works with Google Meet, Zoom, and Microsoft Teams to give you accurate transcripts and smart AI-powered insights:
- Live transcriptions: Follow the conversation in real time without worrying about missed details.
- AI summaries & workflows: Get clear summaries and automate follow-ups, action items, or project updates.
- Custom AI prompts & meeting kits: Ask tailored questions or build reusable prompts for consistent insights.
- Real-time translation: View instant translations during calls, helping global teams bridge time zones and languages.
- File uploads: Upload audio or video recordings to generate transcripts and summaries anytime.
With Tactiq, you stay on top of meetings across time zones and always have a record of the key points.
👉 Install the free Tactiq Chrome Extension for free today and turn every meeting into clear transcripts, AI summaries, and actionable insights.
{{rt_cta_ai-convenience}}
Wrapping Up
Managing time zones in Google Calendar keeps your events accurate, no matter where you are. It’s easy to stay aligned with your schedule and avoid mix-ups.
Pair Calendar with Tactiq, and you don’t just see the correct time. You capture every important detail inside the meeting. Together, they help you focus on the conversation and stay productive across different time zones.
👉 Try Tactiq for free today and make every meeting count.
FAQs About Changing Time Zone on Google Calendar
How do you change your primary time zone in Google Calendar?
Go to Google Calendar settings, click the gear icon, then update the primary time zone under the Time zone section.
What steps should you follow to adjust the time zone for one calendar?
In My calendars, hover over a calendar > click the three dots > Settings and sharing, then change the calendar’s time zone.
How can you display multiple time zones in Google Calendar?
On desktop, go to Settings > Time zone, then enable Display secondary time zone. For more options, turn on the world clock in the next section.
What should you do if your shared calendar events show the wrong time zone?
Check your Google Calendar settings, verify the event time zone, and ensure all synced calendars use the same default time zone.
Why is my Google Calendar defaulting to the wrong time zone?
This usually happens if the Use device time zone option is off, your current location isn’t updating, or your device clock is out of sync.
How does Tactiq make managing online meetings easier?
Tactiq provides live transcriptions, AI summaries, and meeting kits, so you always capture key points across different time zones.
You can change your primary time zone by opening Google Calendar, clicking the gear icon, selecting 'Settings,' and then choosing your desired time zone under the 'Time zone' section. This helps ensure all your events display at the correct local time, so you never miss a meeting due to time zone confusion.
To adjust a single calendar’s time zone, go to 'My Calendars,' click the three dots next to the calendar, select 'Settings and sharing,' and update the time zone in the 'Time zone' section. This lets you manage different projects or teams across various regions without mixing up schedules.
Enable the 'Display secondary time zone' option in your Google Calendar settings and select an additional time zone from the dropdown. This feature helps you easily compare schedules and plan meetings with colleagues in different parts of the world.
Check your Google Calendar settings to ensure your primary time zone matches your location, enable secondary time zones if needed, and verify that event time zones are set correctly. Keeping your settings consistent across all synced calendars prevents confusion and ensures everyone sees the right event times.
Tactiq provides real-time transcriptions, AI-generated summaries, and customizable meeting kits, so you can focus on the conversation instead of taking notes. You save time on follow-ups and always have accurate records, making your meetings more productive and actionable.
Related articles


Want the convenience of AI summaries?
Try Tactiq for your upcoming meeting.
Want the convenience of AI summaries?
Try Tactiq for your upcoming meeting.
Want the convenience of AI summaries?
Try Tactiq for your upcoming meeting.