How to Screen Record on Mac: Easy Steps
February 20, 2025
February 20, 2025
June 6, 2025
June 6, 2025

Ever needed to show someone exactly what’s happening on your Mac screen? Screen recording can help! This feature is great for creating tutorials, capturing a bug, or recording a meeting. Macs come with built-in tools that make this easy, like the Screenshot Toolbar and QuickTime Player. This article will show you step-by-step how to use these tools.
Using the Screenshot Toolbar for Screen Recording
To open the Screenshot Toolbar, press Shift + Command + 5. You’ll see a small toolbar appear at the bottom of your screen.

Image from Apple
This toolbar lets you:
- Capture the entire screen.
- Capture a selected window.
- Record the entire screen.
- Record a selected portion of the screen.
Recording the Entire Screen
- Press Shift + Command + 5.
- Click the Record Entire Screen button.
- Click Record to start recording.
- To stop recording, click the Stop button in the menu bar or press Command + Control + Esc.
Recording a Selected Portion of the Screen
- Press Shift + Command + 5.
- Click the Record Selected Portion button.
- Drag to select the area you want to record.
- Click Record to start recording.
- To stop recording, click the Stop button in the menu bar or press Command + Control + Esc.
Using QuickTime Player for Screen Recordings
- Open QuickTime Player from your Applications folder.
- Go to File > New Screen Recording.
- Click the small arrow next to the Record button.
- Choose your microphone if you want to record system audio.
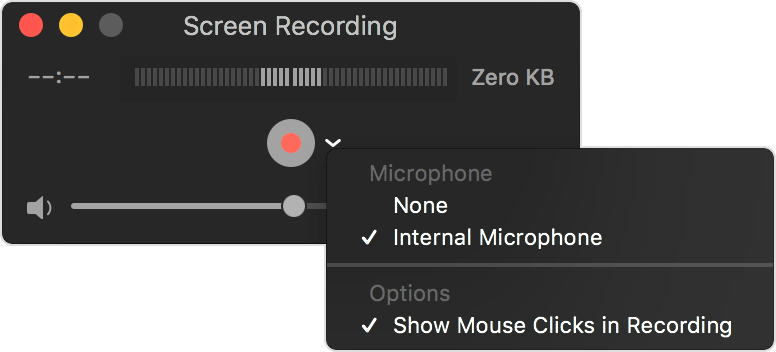
Image from Apple
- Select Show Mouse Clicks in Recording if desired.
- Click the Record button.
- To record the entire screen, click anywhere on the screen.
- To record a portion, drag to select the area and click Start Recording.
- To stop recording, click the Stop button in the menu bar or press Command + Control + Esc.
Adjusting Screen Recording Permissions
Granting Screen Recording Permissions
- Open System Settings.
- Go to Privacy & Security.
- Click Screen Recording.
- Enable screen recording for the specific app you are using.
Advanced Screen Recording Tips
- Improve Audio Quality - Use an external microphone.
- Ensure High Video Quality - Close unused applications to reduce lag.
- Edit Recordings - Use built-in tools like iMovie or third-party software to refine your videos.
- Share Easily - Use cloud services like Dropbox or Google Drive to share large files.
Troubleshooting Permission Issues
Sometimes, even after granting permissions, you might encounter issues. Here’s how to resolve common problems:
App Not Listed
If an app doesn’t appear in the Screen Recording section:
- Close the app completely and reopen it. If prompted for permissions, grant them.
- Uninstall and reinstall the app to reset its permissions.
Permissions Not Working
If you’ve granted permissions but the app still can’t record:
- A simple restart can sometimes fix permission issues.
- Ensure both your macOS and the app are up to date. Sometimes, updates fix bugs related to permissions.
Image from Apple
Reset Privacy Settings
If all else fails, you might need to reset your privacy settings:
- Go to Applications > Utilities > Terminal.
- Type tccutil reset ScreenRecording and press Enter. This command resets screen recording permissions, allowing you to re-grant them afresh.
{{rt_cta_ai-convenience}}
Try Tactiq for Real-Time Transcription

If you’re seeking an alternative for capturing screen-recorded content, Tactiq offers real-time transcription for virtual meetings. No need for recordings! Here’s how Tactiq can benefit you:
- It provides transcripts for your Zoom, Google Meet, and Microsoft Teams meetings, creating a searchable record of key points.
- Customizable AI prompts to highlight essential insights, action items, and summaries.
- Tactiq also automates post-meeting tasks like follow-ups and project updates. Let Tactiq do the work for you to get more out of your meetings.


便利なAIサマリーが欲しいですか?
次回のミーティングで Tactiq をお試しください。
便利なAIサマリーが欲しいですか?
次回のミーティングで Tactiq をお試しください。
便利なAIサマリーが欲しいですか?
次回のミーティングで Tactiq をお試しください。